
How to sew a fabric storage basket tutorial

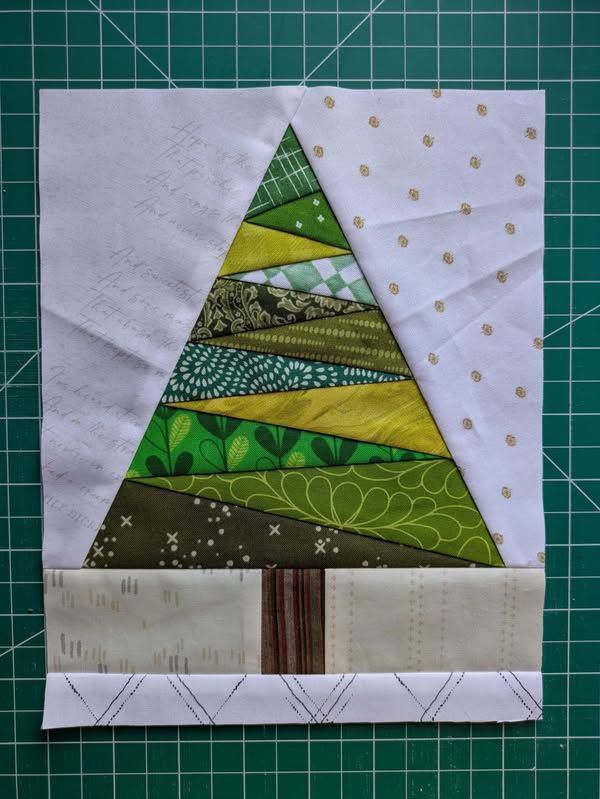
Christmas tree quilt-Step by Step Tutorial is a timeless and creative project that brings warmth, tradition, and handmade beauty into any home during the holiday season. Quilting with a festive theme allows crafters to combine storytelling, color harmony, and precise technique into a meaningful decorative piece. This article was carefully developed to guide you through every stage of the process while respecting Google AdSense policies and focusing on high-quality, original, and family-friendly content.
When you follow a Christmas tree quilt-Step by Step Tutorial, you are not just sewing fabric pieces together, you are creating a visual celebration of the season. Christmas tree quilts are loved for their versatility, as they can be used as wall hangings, table toppers, lap quilts, or even full-sized bed quilts. The iconic tree shape instantly evokes joy, comfort, and festive memories, making this project both practical and emotionally rewarding.
Throughout this guide, the main keyword Christmas tree quilt-Step by Step Tutorial will appear naturally and in bold to strengthen SEO performance while maintaining a smooth and engaging reading experience. Each section builds logically on the previous one, ensuring clarity and ease of understanding. Whether you are a beginner or an experienced quilter, this article will help you confidently plan, construct, and finish a beautiful Christmas tree quilt.
Planning is the foundation of success when following a Christmas tree quilt-Step by Step Tutorial, as it determines how smoothly the entire project will progress.
Begin by deciding the purpose of your quilt. A decorative wall quilt will require different dimensions than a cozy throw or table runner.
Next, choose the style of Christmas tree you want to create. Trees can be simple triangles, layered shapes, or detailed patchwork designs.
Color selection is crucial. Traditional green trees with red accents are popular, but modern quilts often explore white, gold, or even blue tones.
Sketching your layout helps visualize block placement and spacing, especially when working with multiple trees.
Consider whether you want a single large tree or repeating tree blocks across the quilt surface.
Thoughtful planning ensures your quilt reflects your vision and avoids unnecessary adjustments later.
Choosing the right materials is a key step in any Christmas tree quilt-Step by Step Tutorial, as fabric quality directly impacts the final result.
Cotton fabric is the preferred choice for quilting because it is durable, easy to sew, and holds crisp edges.
Select fabrics with a mix of solids and subtle prints to add depth without overwhelming the tree design.
Background fabric should contrast clearly with the tree shapes to make the design stand out.
Essential tools include a rotary cutter, quilting ruler, cutting mat, and a reliable sewing machine.
Batting thickness should match the quilt’s purpose, lighter for decoration and thicker for warmth.
Proper tools and materials make the quilting process more enjoyable and efficient.
The construction phase is where your Christmas tree quilt-Step by Step Tutorial truly comes to life through careful stitching and assembly.
Start by cutting all fabric pieces according to your measurements and pattern specifications.
Assemble the tree blocks first, ensuring consistent seam allowances for uniformity.
Press seams regularly to keep blocks flat and aligned, which improves accuracy.
Arrange completed blocks on a flat surface to finalize the layout before sewing rows together.
Sew blocks into rows, then join rows to complete the quilt top.
Take your time during this stage to maintain precision and prevent misalignment.
Finishing your project is the final and most rewarding part of the Christmas tree quilt-Step by Step Tutorial, transforming your quilt top into a complete piece.
Layer the quilt top, batting, and backing carefully to create the quilt sandwich.
Secure the layers with pins or basting spray before quilting to prevent shifting.
Quilting stitches can follow the tree shapes or use simple straight lines for a clean look.
Trim excess fabric evenly before attaching the binding around the edges.
Binding should be sewn securely and neatly for durability and visual appeal.
A final press enhances the quilt’s appearance and prepares it for display or use.
FAQ – Christmas Tree Quilt-Step by Step Tutorial
Is a Christmas tree quilt suitable for beginners?
Yes, simple tree block designs are beginner-friendly and easy to assemble.
How long does it take to complete a Christmas tree quilt?
Completion time varies, but most quilts take several days depending on size and detail.
What size is best for a first Christmas tree quilt?
A small wall hanging or table runner is ideal for beginners.
Can I customize the colors of my Christmas tree quilt?
Absolutely, color customization allows you to match your home décor or personal style.
Do I need special quilting patterns?
No, basic quilting techniques work well for this project.
How should I store my quilt after the holidays?
Store it folded in a cool, dry place away from direct sunlight.
Conclusion
This complete Christmas tree quilt-Step by Step Tutorial guided you through planning, fabric selection, construction, and finishing techniques needed to create a festive and meaningful quilt.
By following each step carefully, you can produce a handmade piece that adds warmth and holiday spirit to your space.
Quilting is a creative journey that blends tradition and personal expression, and this project is a wonderful way to celebrate the season. Please leave a sincere opinion and share your suggestions, as your feedback is always valuable and helps inspire future content.


