
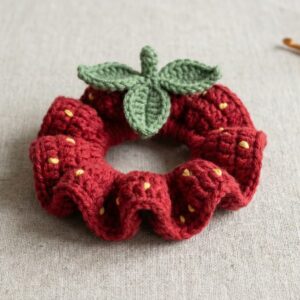
Strawberry crochet hair tie pattern

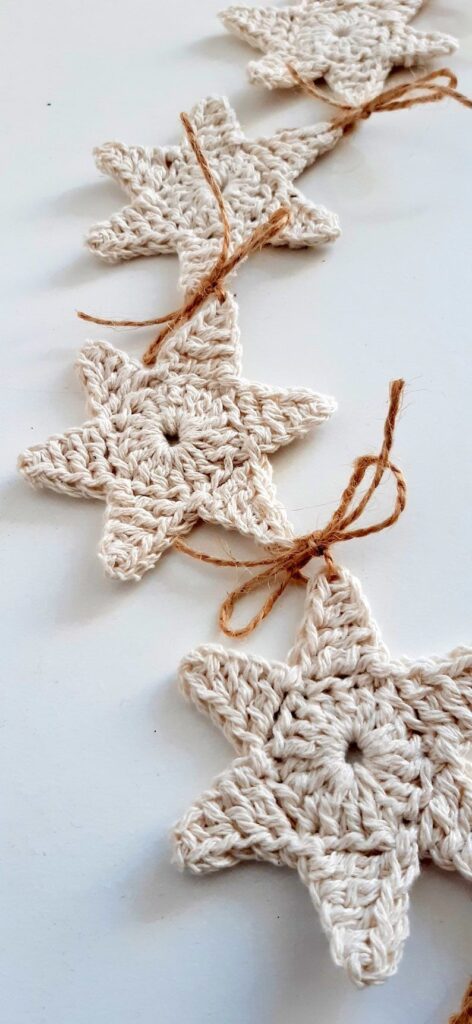
The Mini Star Christmas Ornament- Step by Step Tutorial is the perfect way to bring handmade charm into your holiday décor. Creating your own ornaments is not only fun but also meaningful, as it allows you to decorate your Christmas tree with pieces that reflect creativity, love, and personal style. Handmade ornaments are also wonderful keepsakes that can be passed down through generations, making each holiday season even more special.
When it comes to crafting a Mini Star Christmas Ornament, the process is surprisingly simple and suitable for beginners who want to try crochet or other crafting methods for the first time. With just a few basic materials, you can create beautiful little stars that can hang on your Christmas tree, be attached to gift wrapping, or even be used to decorate garlands and wreaths. The beauty of these ornaments lies in their versatility and the fact that they can be customized in endless ways.
This Mini Star Christmas Ornament- Step by Step Tutorial will guide you through the entire process with clear explanations. You will learn what materials are needed, how to shape the star, how to assemble it properly, and how to personalize it with colors, ribbons, or even glitter to make your ornament truly unique. By following this tutorial, even complete beginners can enjoy crafting something festive and impressive for the holiday season.
To create a Mini Star Christmas Ornament, you will only need a few basic materials that are easy to find in most craft stores. Yarn is the first essential item, and it is recommended to choose a soft, medium-weight yarn in festive colors like gold, white, red, or green. These shades instantly bring the Christmas spirit to life, but you can also experiment with metallic threads to add extra sparkle.
You will also need a crochet hook that matches the yarn weight. For most beginner-friendly patterns, a size between 3.5mm to 4.5mm works well. Using the right hook ensures that your stitches look neat and the star shape comes out correctly without being too loose or too tight. If you are new to crochet, don’t worry—this tutorial is designed with beginners in mind.
Scissors and a yarn needle will be required to cut the thread and weave in any loose ends once your ornament is complete. To turn your star into a hanging ornament, you will need either a small ribbon or a loop of yarn that can be attached at the top. This step is simple yet very important, as it allows your star to shine beautifully on your Christmas tree.
Another optional but fun addition is decorative elements like beads, sequins, or even a touch of fabric glue with glitter. These tiny details can take your Mini Star Christmas Ornament from simple to dazzling. However, it’s always good to start with the basics before moving into advanced embellishments, especially if this is your first time trying such a project.
Preparing your materials before starting ensures that your crafting process goes smoothly. One of the biggest benefits of making a mini ornament is that it doesn’t require a large investment. With a small amount of yarn and a little time, you can create a keepsake that will last for years.
Finally, remember that the materials you select will define the final look of your ornament. Whether you want a classic, elegant design with white and gold, or a playful and colorful decoration, the choice is entirely yours. The best part of this Mini Star Christmas Ornament- Step by Step Tutorial is that it allows you to express your personal holiday style.
The process of making a Mini Star Christmas Ornament starts with a simple foundation that even beginners can follow. First, begin by creating a magic ring or a small chain circle. This will be the center of your star, where all the points connect. The magic ring is often preferred because it allows the center to be tightly closed, giving the star a polished look.
Once the center is secured, you will start building the first round of stitches. Typically, this involves working single crochets or half double crochets evenly around the ring. The number of stitches depends on how many points you want your star to have, but a five-pointed star is the most common and iconic choice for Christmas ornaments.
To form the points of the star, you will alternate between creating small chains and working stitches back into the base circle. This step might seem tricky at first, but as you go along, you will see the star shape forming clearly. The key is consistency: make sure each chain and stitch is the same length so that all points look even.
After completing the star shape, it’s important to fasten off the yarn securely. Using a yarn needle, weave in any loose ends carefully so they don’t come undone later. This step might feel minor, but it’s crucial for making your ornament durable and long-lasting, especially if it will be handled year after year.
At this point, your Mini Star Christmas Ornament is complete in its basic form. You can keep it simple and charming, or you can take a few extra steps to enhance its beauty. Adding a ribbon loop at the top transforms it into a hanging ornament instantly. If you want extra sparkle, carefully apply fabric glue and sprinkle a bit of glitter around the edges.
This step by step process ensures that beginners feel confident while crafting their first ornament. The beauty of this tutorial is that it breaks everything down into easy stages, making the art of crochet accessible to anyone who wants to try.
The Mini Star Christmas Ornament is not only perfect for decorating a Christmas tree but also has many other creative uses during the holiday season. One of the most popular ways to use it is by attaching it to gift wrapping. Instead of a standard bow, a handmade star adds a unique and personal touch that makes any present feel even more special.
Another wonderful use is incorporating the stars into a holiday garland. By stringing several stars together, you can create a beautiful handmade garland to hang on a fireplace mantel, staircase railing, or doorway. This decoration adds warmth and charm to your home and showcases your handmade skills.
The stars can also be used as table decorations during Christmas dinners. Place a few around the table as festive accents or attach them to napkin rings to create a cohesive holiday theme. Guests will surely appreciate the thoughtful handmade details that make the occasion memorable.
You can even turn the Mini Star Christmas Ornament into keychains or bag charms. This idea allows you to carry a little piece of Christmas spirit with you wherever you go, even outside the holiday season. It’s a fun way to extend the life of your handmade creation beyond just tree decorations.
For those who enjoy gift-giving, these stars also make excellent small presents. Because they are quick to make, you can produce several in different colors and give them to family, friends, or coworkers. Handmade gifts always feel more heartfelt than store-bought items, and a crocheted star is both useful and beautiful.
Ultimately, the versatility of the Mini Star Christmas Ornament makes it a must-try project for beginners and experienced crafters alike. With just one simple design, you can create endless variations and uses that brighten up the holiday season.
If you are new to crochet, the Mini Star Christmas Ornament- Step by Step Tutorial is the perfect way to practice basic techniques while creating something useful and beautiful. One of the most important tips is to take your time and practice the stitches before starting the full ornament. Even a few minutes of practice can make a big difference in the outcome of your star.
Another helpful trick is to use a light-colored yarn when learning. Dark colors like navy or black can make it difficult to see where your hook needs to go, while lighter shades make it much easier to follow your stitches and spot any mistakes. Once you feel confident, you can move on to metallic or darker colors for a more festive look.
Counting stitches carefully is another essential step. Stars require symmetry to look balanced, so it’s important to keep track of your stitch count at all times. Beginners often find stitch markers helpful to avoid losing their place, especially when working in rounds.
Don’t worry if your first star isn’t perfect. Handmade crafts are meant to have small imperfections that add to their charm and uniqueness. Each ornament you make will improve your skills and become easier than the last. The important thing is to enjoy the process of creating something festive with your own hands.
Blocking is another trick that can elevate the final look of your ornament. By gently shaping your star and pinning it in place while it dries, you can make sure it holds a crisp, even shape. This is particularly useful if you want your ornament to look polished and professional.
Finally, remember that crafting should be fun. The Mini Star Christmas Ornament is not about perfection but about joy, creativity, and celebrating the season. Approach it with patience, and you’ll be surprised at how quickly you can create a whole set of stars to decorate your home.
1. Is the Mini Star Christmas Ornament suitable for complete beginners?
Yes, this tutorial is designed for beginners. The stitches are simple, and the instructions are broken into easy steps to ensure anyone can follow along.
2. How long does it take to make one star?
On average, it takes about 20 to 30 minutes to make one Mini Star Christmas Ornament, depending on your skill level and speed.
3. What type of yarn works best for this ornament?
Medium-weight yarn in cotton or acrylic works best. Festive colors such as red, green, white, or metallic yarns are ideal for Christmas decorations.
4. Can I make the star bigger or smaller?
Yes, you can adjust the size by changing your yarn weight and hook size. Thicker yarn and a larger hook will create a bigger star, while thinner yarn and a smaller hook will create a smaller ornament.
5. How do I hang the star on my Christmas tree?
Simply attach a ribbon loop or a piece of yarn to the top of the star, and it will be ready to hang on your tree.
6. Can I add embellishments to the ornament?
Absolutely! Beads, sequins, and glitter can all be added to enhance the beauty of your Mini Star Christmas Ornament and make it stand out.
In this article, we explored the Mini Star Christmas Ornament- Step by Step Tutorial, covering everything from the materials needed to the crochet process, creative uses, and tips for beginners. We also answered common questions to help you feel confident as you begin crafting your own ornaments. This project is simple, festive, and perfect for anyone who wants to add a handmade touch to their holiday décor.
Now that you know how to make your own Mini Star Christmas Ornament, it’s time to gather your yarn, hook, and creativity. Give it a try, enjoy the process, and share your creations with family and friends.
Don’t forget to leave a sincere opinion and suggestions on how this tutorial helped you or how it could be improved for future projects. Your feedback is always valuable and appreciated!


