
Strawberry crochet hair tie pattern

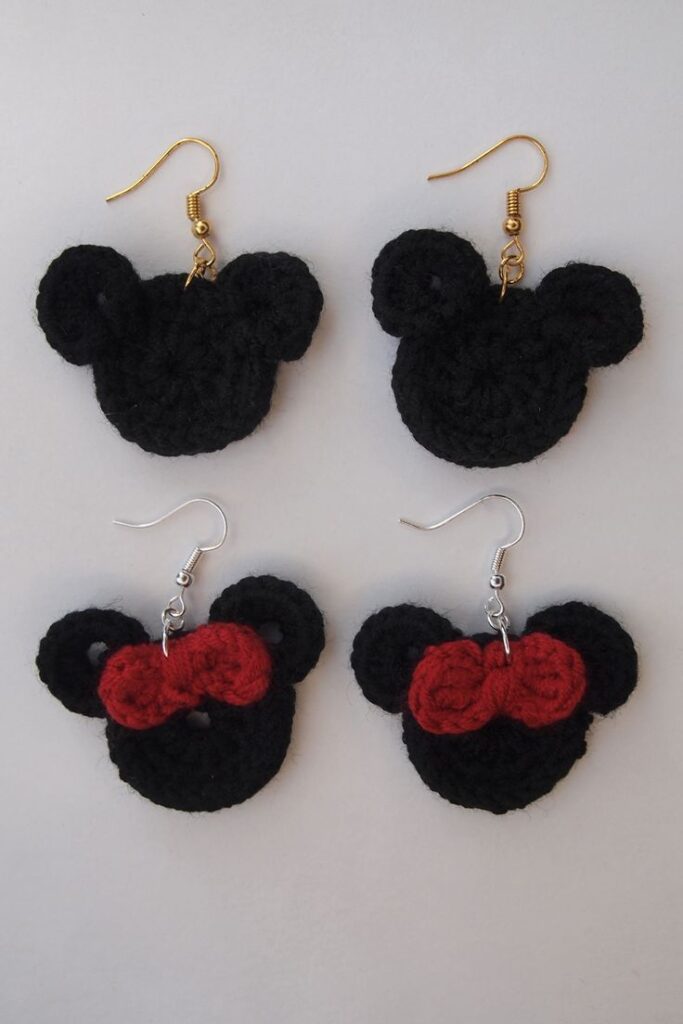
If you are looking for a creative and adorable handmade accessory, this Mickey Mouse and Minnie Mouse Crochet Earrings – Step by Step Tutorial is the perfect project for you. Crochet earrings are lightweight, customizable, and trendy, and when you add the iconic Disney characters Mickey and Minnie, they become even more special. Whether you want to make them for yourself, as a gift, or even to sell, this tutorial will guide you through every detail in a simple and fun way.
One of the main advantages of this Mickey Mouse and Minnie Mouse Crochet Earrings – Step by Step Tutorial is that it does not require advanced crochet skills. Even beginners can follow along and create beautiful earrings by learning a few basic stitches. The process is straightforward, and the final result is a pair of unique accessories that stand out for their cuteness and originality.
Throughout this article, you will learn everything about making these earrings: the materials needed, the essential crochet stitches, the complete step-by-step instructions, and creative ideas for customization. You will also find a FAQ section answering the most common questions about crochet earrings. By the end, you will feel confident to create your own Mickey Mouse and Minnie Mouse Crochet Earrings – Step by Step Tutorial and maybe even start a small business making handmade jewelry.
Before we start the Mickey Mouse and Minnie Mouse Crochet Earrings – Step by Step Tutorial, it is important to gather all the necessary materials. Having everything ready before you begin will make the process smoother and more enjoyable.
First, you will need lightweight cotton or acrylic yarn. These materials are perfect for earrings because they are soft yet strong, keeping the earrings comfortable to wear while maintaining their shape. Black yarn is essential for the Mickey and Minnie base, while red and white yarns are ideal for Minnie’s bow and decorative details.
Second, you will need a small crochet hook, usually between 1.5mm and 2mm. A small hook creates tight stitches, which is crucial for making small items like earrings. Tight stitches help maintain the shape and durability of the final product.
You will also need earring hooks or studs to attach to your crochet pieces. These can be found in most craft stores, and they come in different finishes like gold, silver, or stainless steel to match your personal style.
Other useful tools include a yarn needle for weaving in ends, small pliers for attaching the earring hooks securely, and scissors to cut the yarn neatly.
Finally, you may want to use a small amount of fabric stiffener or diluted glue to make the earrings slightly rigid so that they hold their shape better when worn. This step is optional but highly recommended for professional-looking results.
To complete the Mickey Mouse and Minnie Mouse Crochet Earrings – Step by Step Tutorial, you will need to learn or review a few basic crochet stitches and techniques. These stitches are simple, and once you practice them a little, you will be able to create your earrings easily.
The first stitch you will use is the chain stitch (CH). This is the foundation of most crochet projects and is used to start your work or create connecting pieces like Minnie’s bow.
Next is the single crochet (SC), one of the simplest and most common stitches in crochet. It creates a tight, even texture, which is perfect for small items like earrings where you want clean edges and a neat finish.
The slip stitch (SL ST) is another important technique. It is used to join stitches, close rounds, and give your earrings a smooth and professional look.
You will also need to learn how to crochet in the round because both Mickey and Minnie’s heads are circular in shape. Working in the round allows you to create seamless pieces without visible starting or ending points.
Increasing stitches will be necessary to make the circle larger as you go, while decreasing stitches help shape smaller details like Minnie’s bow.
Finally, basic sewing skills with a yarn needle will be used to attach the different parts, such as the ears and bow, to the main base before connecting the crochet pieces to the earring hooks.
Now that you know the materials and stitches needed, let’s start the Mickey Mouse and Minnie Mouse Crochet Earrings – Step by Step Tutorial. Follow each step carefully, and you will have your adorable earrings ready in no time.
Begin by making the main circle for Mickey’s head using black yarn. Start with a magic ring, work single crochet stitches in the round, and add increases every few stitches to keep the circle flat as it grows. Stop when the circle reaches the desired size for the earring base.
Make two smaller circles for the ears using the same black yarn. These are made the same way as the head but with fewer stitches so they stay smaller and proportional.
For Minnie’s earrings, create a small bow using red yarn. This is done by crocheting a small rectangle and cinching it in the middle with a piece of yarn to form the classic bow shape.
Attach the ears to the top of the main circle using a yarn needle and secure them tightly. For Minnie, sew the bow between the ears for her signature look.
Use fabric stiffener if desired to make the earrings more rigid, then let them dry completely before attaching the earring hooks with small pliers.
Finally, check that all parts are secure, and your earrings are ready to wear or gift to someone special.
One of the best things about the Mickey Mouse and Minnie Mouse Crochet Earrings – Step by Step Tutorial is how easy it is to personalize your creations. Small changes in colors, details, or materials can completely transform the look of your earrings.
For example, you can use glittery yarn or add tiny beads to give the earrings some sparkle. This is perfect for special occasions like parties or holidays when you want accessories that stand out.
Try experimenting with different sizes. Make smaller versions for subtle, everyday earrings, or larger ones for a bold and playful fashion statement.
Instead of classic black and red, choose different colors to match your outfits or create themed versions for events. Pastel pinks, blues, or even metallic threads can give a modern twist to the classic design.
You can also make matching sets with necklaces, bracelets, or keychains using the same crochet pattern. This way, you create a complete handmade jewelry collection.
Another fun idea is to make seasonal versions, such as adding tiny Santa hats for Christmas or pastel bows for Easter, turning your earrings into festive accessories.
1. Are crochet earrings heavy to wear?
No, crochet earrings made with cotton or acrylic yarn are very lightweight and comfortable for everyday use.
2. Can beginners make these earrings?
Yes, the Mickey Mouse and Minnie Mouse Crochet Earrings – Step by Step Tutorial uses basic stitches and is suitable for beginners.
3. How long does it take to make one pair?
On average, it takes about 2–3 hours to make one pair, depending on your crochet speed and experience.
4. Can I sell earrings made with this tutorial?
Yes, you can sell your handmade earrings as long as you create them yourself. Many crafters sell similar items at craft fairs or online shops.
5. How do I care for crochet earrings?
Keep them dry and store them in a jewelry box. If they get dusty, gently wipe them with a soft cloth.
6. What size hook should I use for crochet earrings?
Small hooks, usually between 1.5mm and 2mm, work best because they create tight and neat stitches.
This Mickey Mouse and Minnie Mouse Crochet Earrings – Step by Step Tutorial has guided you through every step of creating your own adorable crochet earrings.
We covered materials, basic stitches, step-by-step instructions, and fun customization ideas to make each pair unique.
Now it’s your turn to try this tutorial and create beautiful earrings for yourself or as gifts. We would love to hear your honest opinion about this tutorial and any suggestions you might have for future crochet projects. Your feedback helps us improve and bring you even more creative ideas!


