
Strawberry crochet hair tie pattern

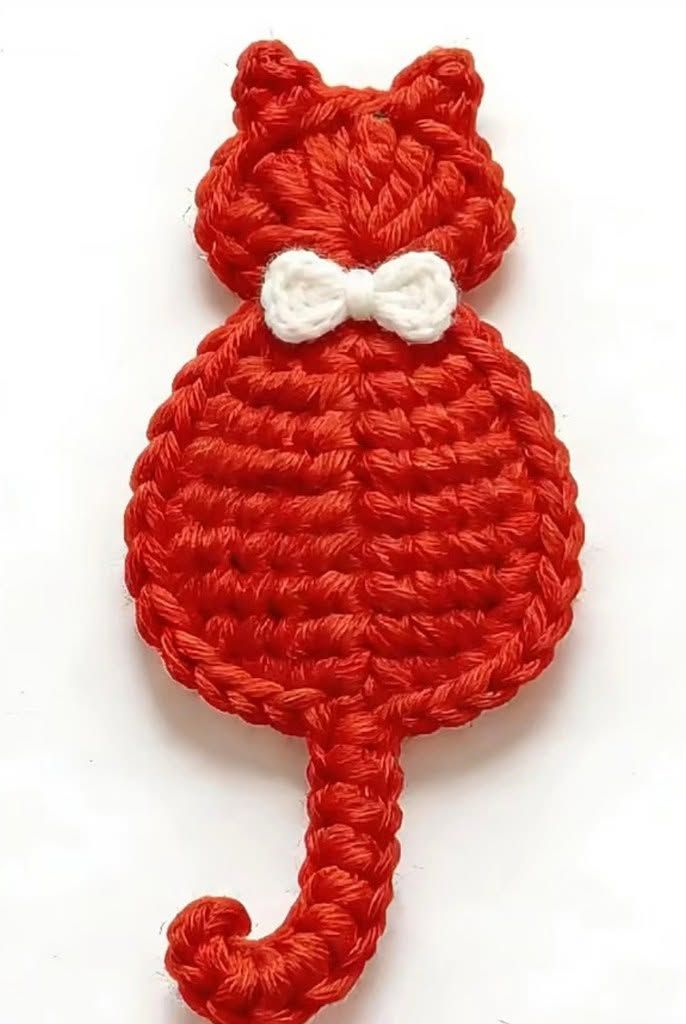
How to Crochet a Kitten Step by Step is a delightful and beginner-friendly project that allows crafters to create an adorable handmade toy filled with personality and charm. Learning How to Crochet a Kitten Step by Step not only improves your crochet skills but also opens the door to making heartfelt gifts, nursery decorations, or even small handmade products to sell. This creative journey combines simple techniques with imagination, resulting in a soft and lovable kitten that anyone can treasure. Whether you are just starting with crochet or already experienced, this guide will help you understand every stage clearly and confidently.
Understanding How to Crochet a Kitten Step by Step begins with mastering the fundamentals of crochet. Working with basic stitches, maintaining consistent tension, and following a structured pattern are essential skills for achieving a polished result. A crocheted kitten is typically made using amigurumi techniques, which involve crocheting in continuous rounds to form small stuffed figures. This method ensures a seamless and smooth finish, making your kitten look professional and well-crafted. With patience and attention to detail, even beginners can create a charming kitten design.
One of the most rewarding aspects of learning How to Crochet a Kitten Step by Step is the opportunity to personalize your creation. You can experiment with different yarn colors, eye styles, and facial expressions to give your kitten a unique personality. Some crafters prefer realistic tones like gray, cream, or orange, while others choose playful pastel shades. The flexibility of this project allows you to adjust size, texture, and accessories according to your preferences. By following clear instructions and practicing regularly, you will gain confidence and improve your overall crochet technique.
Choosing the right yarn is the first essential step in How to Crochet a Kitten Step by Step. Soft cotton or acrylic yarn works well because it is durable and easy to manage. Medium-weight yarn is often recommended for beginners as it creates a balanced texture and shape.
The crochet hook size must match the yarn you select. A slightly smaller hook than recommended on the yarn label helps create tighter stitches, which is ideal for stuffed toys. Tight stitches prevent the stuffing from showing through the fabric.
Polyester fiberfill is commonly used to stuff your crocheted kitten. Even distribution of stuffing ensures a smooth, symmetrical appearance. Avoid overfilling, as it can stretch stitches and distort the shape.
Safety eyes or embroidered features are important for defining your kitten’s face. If the toy is intended for young children, embroidered eyes are safer and more secure than plastic parts. Facial details greatly influence the final expression.
Additional tools include stitch markers, scissors, and a yarn needle. Stitch markers are especially helpful when working in continuous rounds, as they help track the beginning of each round accurately.
Optional accessories such as small bows, crocheted collars, or tiny scarves can enhance your kitten’s personality. These creative touches make each project unique and visually appealing.
To master How to Crochet a Kitten Step by Step, you need to understand basic stitches such as the single crochet. This stitch forms the foundation of most amigurumi projects and provides a firm, dense texture.
The magic ring technique is commonly used to start the kitten’s head or body. It allows you to pull the center tightly closed, creating a neat and secure beginning for round projects.
Increasing stitches helps expand the shape, forming rounded sections like the head and body. Evenly spaced increases maintain symmetry and prevent uneven bulges.
Decreasing stitches are used to taper and close sections. Invisible decreases are recommended because they create a smoother and more professional finish.
Working in continuous spirals instead of joining rounds ensures a seamless appearance. Using a stitch marker to track rounds is crucial for maintaining accuracy.
Proper tension control is vital when learning How to Crochet a Kitten Step by Step. Consistent tension results in uniform stitches and a clean overall look.
The head is usually the first part created in How to Crochet a Kitten Step by Step. It is formed by increasing stitches to create a sphere and then decreasing after stuffing to close the shape.
The body follows a similar pattern but may be slightly oval. Proper stuffing ensures that the kitten can sit upright without losing balance.
Ears are typically crocheted separately and sewn onto the head. Small triangular shapes give the kitten its recognizable feline appearance.
The legs and tail are smaller components that add character and realism. Secure attachment is important to ensure durability and longevity.
Facial embroidery brings the kitten to life. Carefully placed eyes, a small nose, and stitched whiskers create an expressive and charming look.
Once all parts are assembled, inspect your kitten for loose ends or uneven stuffing. Final adjustments help refine the overall appearance.
One exciting aspect of How to Crochet a Kitten Step by Step is the ability to customize your project. Changing yarn colors can transform the kitten into different breeds or fantasy designs.
You can create themed kittens for holidays by adding seasonal accessories. A tiny hat or scarf adds personality and makes the kitten festive.
Experimenting with textured yarn produces a fluffy effect. This variation gives your kitten a soft and cuddly appearance.
Miniature versions can be turned into keychains or decorative charms. These smaller projects are quick to complete and make thoughtful handmade gifts.
Personalized kittens with embroidered names are meaningful keepsakes. Adding initials or small details enhances sentimental value.
For those interested in selling handmade crafts, crocheted kittens are popular items. Their universal appeal makes them attractive to various audiences.
Is learning How to Crochet a Kitten Step by Step suitable for beginners?
Yes, beginners can follow simple patterns that use basic stitches and clear instructions. Practicing foundational techniques first is helpful.
How long does it take to complete a crocheted kitten?
The time varies depending on size and experience level, but most small kittens can be completed within a few hours.
What type of yarn works best?
Medium-weight cotton or acrylic yarn is ideal for maintaining shape and durability.
How do I make my kitten look more realistic?
Focus on color selection, facial details, and balanced proportions. Small embroidery details add realism.
Can I wash a crocheted kitten?
Most yarns are washable, but hand washing and air drying are recommended to preserve shape.
What is the best way to secure parts?
Use strong sewing techniques and weave in ends tightly to ensure durability.
Conclusion
Learning How to Crochet a Kitten Step by Step is a rewarding and creative experience that combines skill-building with artistic expression. In this article, we explored essential materials, foundational techniques, assembly steps, customization ideas, and frequently asked questions.
By understanding each stage of How to Crochet a Kitten Step by Step, you can confidently create a charming handmade kitten that reflects your personal style. With practice and attention to detail, your crochet projects will continue to improve in quality and creativity.
If you found this guide helpful, please share your honest opinion and leave your suggestions. Your feedback inspires new ideas and helps build a supportive crafting community.


