
Strawberry crochet hair tie pattern

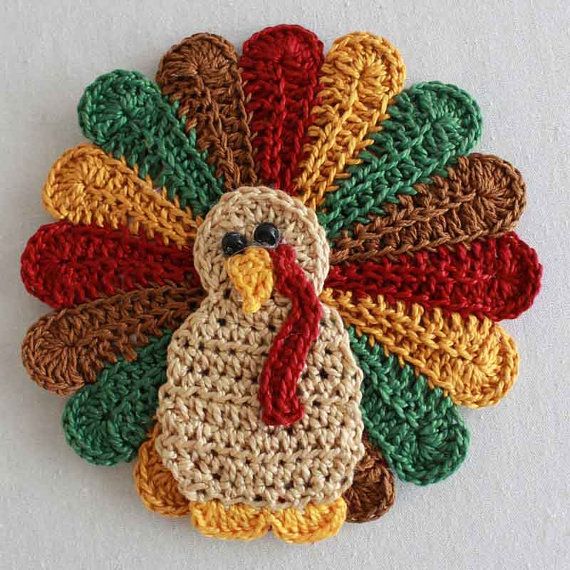
Crocheted turkey tutorial is a delightful guide for craft enthusiasts who want to create a charming handmade decoration using yarn and basic crochet techniques. This Crocheted turkey tutorial introduces a creative project that combines traditional crochet skills with a playful design inspired by a turkey. Handmade crochet figures are popular because they allow people to transform simple materials into unique decorative items. By following this Crocheted turkey tutorial, crafters can learn how to shape yarn into a recognizable and attractive figure while improving their crochet abilities.
The popularity of the Crocheted turkey tutorial continues to grow because handmade decorations bring warmth and personality to any space. Many people enjoy creating crochet projects that reflect seasonal themes or playful animal shapes. A turkey design is especially appealing because it can be used in home decoration, table settings, or as a thoughtful handmade gift. Through this Crocheted turkey tutorial, readers will discover how small details and careful stitch work can turn yarn into a beautiful and creative craft project.
Another advantage of the Crocheted turkey tutorial is that it offers an enjoyable learning experience for both beginners and experienced crocheters. While beginners can practice basic stitches and shaping techniques, advanced crafters can experiment with colors, textures, and decorative details. This comprehensive Crocheted turkey tutorial will guide you through the materials required, the step-by-step crochet process, creative design ideas, and useful tips that will help you complete a successful crochet turkey project.
Before beginning the Crocheted turkey tutorial, it is important to gather all the materials needed for the project. Preparing your tools and supplies in advance will help make the crafting process more organized and enjoyable.
The most important material in the Crocheted turkey tutorial is yarn. Soft cotton or acrylic yarn is commonly used because it is easy to work with and available in a wide range of colors. Brown, red, orange, and yellow yarns are often chosen to create a vibrant turkey design.
Another essential tool in the Crocheted turkey tutorial is a crochet hook. The hook size should match the yarn weight so that the stitches remain balanced and the finished turkey maintains its shape.
Scissors are also necessary when following the Crocheted turkey tutorial. Sharp scissors help trim yarn ends neatly and ensure a clean finish for the project.
A yarn needle is commonly used in the Crocheted turkey tutorial to weave in loose ends and attach decorative parts such as the beak, wings, or tail feathers.
Stuffing material may also be required depending on the design used in the Crocheted turkey tutorial. Soft fiber filling can give the turkey a three-dimensional shape.
Finally, stitch markers can be helpful during the Crocheted turkey tutorial. They allow you to track rounds and maintain accurate stitch placement.
The first step in the Crocheted turkey tutorial is creating the base of the turkey’s body. This is usually done using a magic ring followed by several rounds of crochet stitches to form a round shape.
After forming the body, the Crocheted turkey tutorial continues with building the structure of the figure. Increasing and decreasing stitches help shape the turkey and give it a balanced appearance.
The next stage in the Crocheted turkey tutorial involves creating the wings and attaching them to the sides of the body. These small details help define the turkey’s overall shape.
Once the wings are complete, the Crocheted turkey tutorial focuses on adding the tail feathers. Brightly colored yarn can be used to create a fan-like pattern that resembles real turkey feathers.
The following step in the Crocheted turkey tutorial includes crocheting the small facial features such as the beak and eyes. These details bring personality and charm to the design.
The final step in the Crocheted turkey tutorial is assembling all the pieces and weaving in loose yarn ends. This ensures that the project is secure and ready for display.
One of the most enjoyable aspects of the Crocheted turkey tutorial is experimenting with color combinations. Using bright yarn shades can create a cheerful and eye-catching turkey figure.
Another creative idea in the Crocheted turkey tutorial is incorporating textured stitches. Raised stitches or layered crochet patterns can add dimension to the feathers.
Some crafters enjoy adding embroidered details when following the Crocheted turkey tutorial. Small embroidered accents can enhance the facial features and make the turkey look more expressive.
Another option in the Crocheted turkey tutorial is adjusting the size of the figure. Using thicker yarn or a larger crochet hook can create a bigger decorative piece.
Layering crochet pieces is another technique often used in the Crocheted turkey tutorial. Separate tail feathers can be attached to create a more detailed appearance.
Finally, the Crocheted turkey tutorial can inspire themed crochet sets. Matching decorations or small crochet animals can complement the turkey design.
Maintaining consistent tension is one of the most important tips for completing the Crocheted turkey tutorial successfully. Even stitches help the figure maintain a balanced shape.
Counting stitches carefully is another helpful recommendation in the Crocheted turkey tutorial. Accurate stitch counts prevent uneven shaping during the crochet process.
Choosing quality yarn is also essential when following the Crocheted turkey tutorial. Strong and soft yarn improves both the durability and appearance of the finished project.
Using stitch markers can simplify the Crocheted turkey tutorial by helping identify the beginning of rounds.
Taking your time with each step is another valuable suggestion for the Crocheted turkey tutorial. Careful work results in a cleaner and more polished final design.
Finally, creativity and patience are key elements in enjoying the Crocheted turkey tutorial. Every project can be unique depending on the colors and details you choose.
Is the Crocheted turkey tutorial suitable for beginners?
Yes, the Crocheted turkey tutorial can be followed by beginners who are familiar with basic crochet stitches.
What type of yarn works best for this project?
Cotton or acrylic yarn is commonly recommended for the Crocheted turkey tutorial because it is durable and easy to handle.
How long does it take to complete the project?
Most people can finish a project from the Crocheted turkey tutorial within a few hours depending on the size and complexity.
Can the design be customized?
Yes, the Crocheted turkey tutorial allows many variations in color, size, and decorative details.
Can the crochet turkey be used as a gift?
Absolutely. A project made from the Crocheted turkey tutorial can be a thoughtful handmade gift.
Do I need advanced crochet skills?
No, the Crocheted turkey tutorial mainly uses basic crochet techniques and simple shaping methods.
This article presented a detailed Crocheted turkey tutorial, explaining the materials required, the step-by-step crochet process, creative design ideas, and helpful tips for achieving the best results. By following this guide, you can transform simple yarn into a charming handmade turkey that works beautifully as a decorative craft.
The Crocheted turkey tutorial demonstrates how crochet projects can combine creativity, relaxation, and artistic expression. Whether you create it as a decorative piece or a handmade gift, this project offers a rewarding crafting experience.
If you enjoyed learning from this Crocheted turkey tutorial, feel free to leave your honest opinion and suggestions. Your feedback is valuable and helps inspire future crochet tutorials and creative craft ideas.


