
Strawberry crochet hair tie pattern

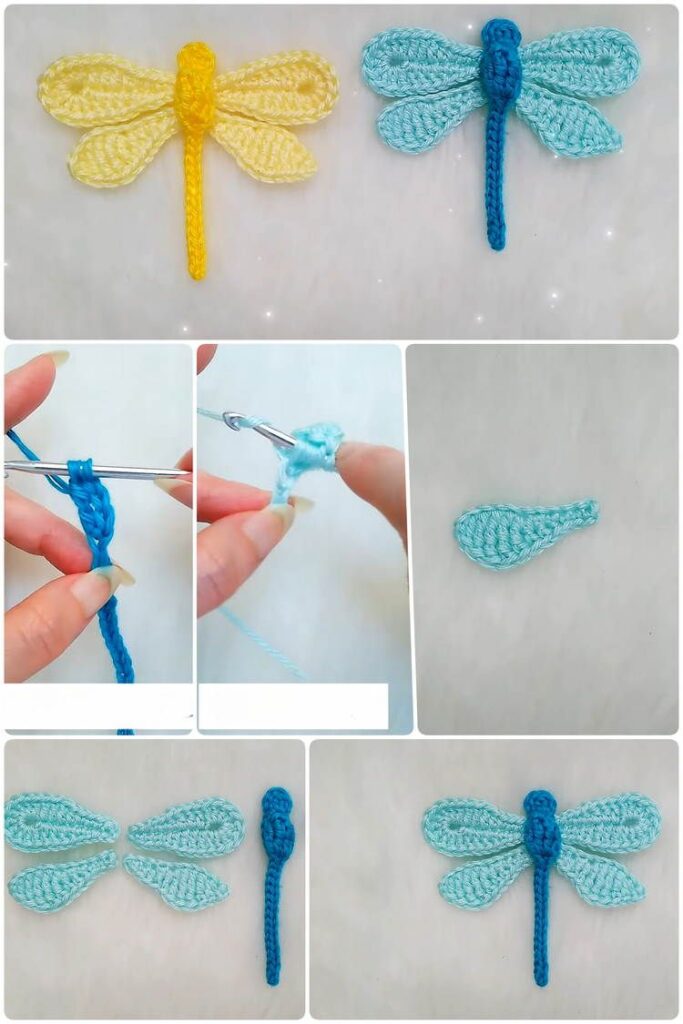
Crocheted dragonfly-Step by Step Tutorial is a charming and creative project that brings together the beauty of handmade crafts and the gentle elegance of nature. This tutorial is perfect for beginners and experienced crocheters who want to create a delicate decorative piece that can be used in many ways. Whether you want to add a whimsical touch to your home décor, embellish a gift, or create a keychain or accessory, a bold Crocheted dragonfly is a lovely project that allows your creativity to shine. With this bold Crocheted dragonfly-Step by Step Tutorial, you will discover techniques, tips, and creative suggestions that will help you succeed from start to finish.
Before diving into the actual stitches, it is important to understand the purpose of this bold Crocheted dragonfly-Step by Step Tutorial. The goal is not only to guide you through the creation of a beautiful crocheted dragonfly but also to ensure that you feel confident at every step. The instructions are written in a friendly, humanized tone, making the process enjoyable and accessible. You will learn how to choose the right materials, how to work the essential stitches, and how to assemble your dragonfly so that it looks delicate and well-finished. This combination of clear information and creative inspiration makes the tutorial suitable for a wide range of crocheters.
In addition to learning the steps, you will also explore different ways to personalize your bold Crocheted dragonfly so it matches your taste and needs. You may choose bright colors for a joyful touch, delicate neutral shades for a more elegant effect, or even metallic yarns for a shimmering finish. Throughout this bold Crocheted dragonfly-Step by Step Tutorial, you will find suggestions to adapt the project and make it truly unique. These options allow you to create multiple dragonflies, each with its own personality and charm, perfect as gifts or decorative accents for your home or craft projects.
To begin this bold Crocheted dragonfly-Step by Step Tutorial, you need to gather the essential materials. Choosing the correct yarn is crucial to ensure your dragonfly looks delicate and maintains its shape. Cotton yarn is often recommended because it creates clean, defined stitches and gives the final piece a polished look. Lighter yarn weights, such as fingering or sport, can produce a dainty dragonfly, while medium-weight yarns will make a larger and more visible decoration.
A suitable crochet hook is also essential for your bold Crocheted dragonfly. Using a hook that is slightly smaller than recommended for your yarn can help you achieve tight stitches, which is ideal for projects that require structure. Other useful tools include scissors, a tapestry needle for sewing and weaving ends, and optional beads or embroidery thread if you want to add embellishments to the wings or body. Having everything prepared beforehand ensures a smooth and enjoyable crafting experience.
It is helpful to create a small workspace where you feel comfortable working on your bold Crocheted dragonfly-Step by Step Tutorial. Make sure you have good lighting, especially because some of the stitches may be small and delicate. A neat and organized environment allows you to concentrate better and follow the instructions with greater ease. This preparation phase is often overlooked by beginners, but it can make a big difference in the final quality of your project.
Before you begin crocheting, take a moment to review the basic stitches used in this bold Crocheted dragonfly-Step by Step Tutorial. Most dragonfly patterns use chains, slip stitches, single crochet, and double crochet. These stitches create the shape of the wings and body, giving your dragonfly its graceful form. Practicing these stitches for a few minutes can help build confidence and ensure the process flows smoothly.
You may also want to decide on the color combination you will use. This is one of the most creative parts of the bold Crocheted dragonfly-Step by Step Tutorial. You can choose one solid color for a classic design or mix shades for a more artistic effect. Pastels create a soft, delicate appearance, while vibrant tones make the dragonfly stand out. Whichever option you choose, make sure the yarns complement each other for an attractive final result.
With all your materials gathered and your workspace prepared, you are ready to begin the step-by-step process. This tutorial ensures that every part of your bold Crocheted dragonfly is explained with clarity so you can enjoy the experience of crafting something beautiful with your own hands.
The wings are one of the most striking features of the bold Crocheted dragonfly-Step by Step Tutorial, and they bring elegance and movement to the piece. To start, you will typically create a foundation chain that forms the base of each wing. The number of chains will determine the wing’s length, allowing you to adjust the size if you want a larger or smaller dragonfly. This flexibility is one of the enjoyable aspects of crocheting your own design.
Once the foundation chain is complete, you can begin shaping the wings with a combination of single crochet and double crochet stitches. Alternating these stitches helps create texture and a natural wing-like curve. The instructions provided in this bold Crocheted dragonfly-Step by Step Tutorial ensure that even beginners can follow along easily. The stitches gradually widen and then narrow again, creating the characteristic dragonfly wing shape.
After completing the first wing, you will repeat the process to create the other wings. Some dragonfly designs have two wings, while others feature four. This tutorial offers guidance for both versions, allowing you to choose the style that matches your vision. Each wing should be symmetrical so the final piece looks balanced and well-crafted. Taking your time with this step is essential to achieving a polished result.
Adding details to the wings can make your bold Crocheted dragonfly even more charming. You may choose to incorporate a subtle edging stitch or add beads for a delicate touch. These embellishments are optional but can make your project stand out. The bold Crocheted dragonfly-Step by Step Tutorial encourages creativity, giving you space to personalize the design as much as you want.
When all wings are finished, use your tapestry needle to weave in any loose ends. This ensures the dragonfly looks neat and professional. Keeping the backside tidy is just as important as the front, especially if your dragonfly will be displayed or used in accessories where both sides may be visible. This step completes the main structure of the wings and prepares you for assembling the full dragonfly.
With the wings completed, you can set them aside and begin working on the body. The wings are light, delicate, and essential to the design, making them a beautiful part of this bold Crocheted dragonfly-Step by Step Tutorial.
Creating the body is one of the most enjoyable steps in the bold Crocheted dragonfly-Step by Step Tutorial. The body provides structure, balance, and personality to your finished piece. It usually begins with a small starting chain worked into a tight, elongated shape. This gives the body a sleek appearance that resembles a real dragonfly.
Using single crochet stitches helps keep the body firm and stable. Working tightly is important to maintain a solid shape, especially if you plan to attach the dragonfly to another surface. This bold Crocheted dragonfly-Step by Step Tutorial explains each stitch clearly, guiding you through increases and decreases that shape the head and tail. The head is typically slightly rounded, while the tail remains thin and elongated.
Color choices can also affect the final look of your dragonfly. You may choose to work the entire body in one color or use two tones to create definition between the head and tail. The bold Crocheted dragonfly-Step by Step Tutorial encourages experimentation, allowing you to create dragonflies that match different themes or decorations. You can even use variegated yarn for a unique shimmering effect.
As you continue crocheting, take care to maintain even tension throughout the project. Uneven tension can affect the shape, making the dragonfly look crooked or distorted. The tutorial emphasizes consistency, reminding you to take short breaks if needed so your hands remain relaxed and comfortable. This attention to detail will result in a much cleaner and more polished final product.
Once the body is complete, you can choose to add small embellishments. Some crafters embroider tiny eyes or sew on beads for added dimension. These elements are optional but encouraged, as they bring charm and personality to your bold Crocheted dragonfly. Just make sure any added details are securely attached.
With the body ready, it is time to move on to the assembly stage. The body serves as the central anchor that holds everything together, making this step crucial in the overall bold Crocheted dragonfly-Step by Step Tutorial.
Assembly is where your project truly comes to life. As you follow this bold Crocheted dragonfly-Step by Step Tutorial, you will see how each piece fits together to form a delicate and enchanting design. Start by positioning the wings behind the body to determine the ideal placement. Make sure they are symmetrical and aligned so your dragonfly looks balanced.
Using your tapestry needle and matching yarn, carefully stitch the wings to the backside of the body. Small, tight stitches work best because they hold the wings firmly without showing on the front side. The tutorial emphasizes taking your time with this step, as good assembly is essential to a beautiful final result. Even slight adjustments in placement can transform the dragonfly’s appearance.
After attaching the wings, check to see if everything feels secure. Tug gently (but not too hard) to ensure the stitching is strong. A well-assembled dragonfly can be used as a decoration, keychain, magnet, or embellishment without fear of the wings coming loose. The bold Crocheted dragonfly-Step by Step Tutorial aims to help you create long-lasting handmade pieces you can enjoy for years.
Once the structure is complete, trim any excess yarn ends. Use your needle to hide any remaining threads inside the stitches so the dragonfly looks clean and professional. A tidy finish greatly improves the appearance and durability of your creation. This tutorial provides the best practices for finishing so your dragonfly looks as beautiful as possible.
At this stage, you may decide to add optional touches. A light spray of fabric stiffener can help the wings hold their shape, especially if you used soft yarn. You may also add decorative accents like sequins or embroidery to enhance the design. The bold Crocheted dragonfly-Step by Step Tutorial encourages you to tailor the final touches to your style and purpose.
With everything assembled and finished, your dragonfly is complete. Whether you use it as a gift, decoration, or personal keepsake, your handmade creation is a beautiful example of creativity and craftsmanship.
How long does it take to complete a crocheted dragonfly?
Most beginners complete a dragonfly in about one to two hours. More detailed designs may take longer, especially if you add embellishments.
What type of yarn works best for this project?
Cotton yarn is recommended because it produces defined stitches and a clean finish, making it ideal for small decorative items.
Can I make larger or smaller dragonflies?
Yes. You can adjust the size by changing the yarn weight or hook size. Thinner yarn creates smaller dragonflies, while thicker yarn makes bigger ones.
Is this project suitable for beginners?
Absolutely. The bold Crocheted dragonfly-Step by Step Tutorial uses simple stitches and provides clear instructions, making it beginner-friendly.
Can I use the dragonfly as a keychain or accessory?
Yes. Just attach a keyring or small clip to the top of the body. Make sure your stitches are tight so the piece holds up with use.
Do I need to block the wings?
Blocking is optional but recommended if you want crisp, well-shaped wings. It helps maintain structure over time.
This bold Crocheted dragonfly-Step by Step Tutorial guided you through every part of creating a beautiful crocheted dragonfly, from choosing materials to completing the final details.
You learned how to crochet the wings, form the body, and assemble the dragonfly with care and precision. This project is both enjoyable and customizable, allowing you to express your creativity in a unique way. I hope you enjoyed this tutorial and found it helpful.
Please leave your honest opinion and share suggestions so I can continue creating content that inspires and supports your crochet journey.


