
Strawberry crochet hair tie pattern

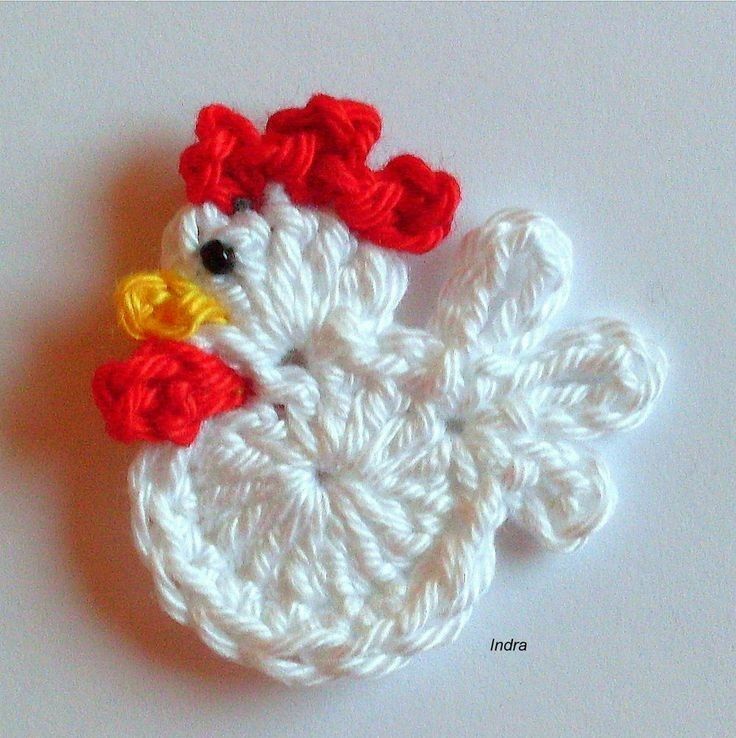
Crocheted chicken applique tutorial is a delightful craft project that combines creativity, basic crochet skills, and decorative design. This Crocheted chicken applique tutorial shows how a small piece of yarn can be transformed into a charming chicken-shaped applique that can decorate many handmade items. Crochet appliques are widely appreciated because they are quick to make, easy to personalize, and perfect for adding character to accessories such as bags, blankets, kitchen towels, and clothing. By following a Crocheted chicken applique tutorial, crafters can learn techniques that are both practical and enjoyable.
Another reason why the Crocheted chicken applique tutorial is so popular among crochet enthusiasts is the flexibility of the design. A crochet applique does not require a large amount of yarn or a complicated pattern. Instead, the project focuses on shaping stitches in a creative way to form a recognizable and decorative chicken figure. The Crocheted chicken applique tutorial encourages experimentation with colors, textures, and stitch styles to create a unique result.
The Crocheted chicken applique tutorial is also an excellent project for beginners who want to practice crochet fundamentals. Techniques such as basic stitches, shaping, and finishing are all included in the process. At the same time, experienced crocheters can enjoy customizing the applique with decorative details. In this guide, you will learn about the materials required, the step-by-step creation process, design variations, and helpful tips that will help you successfully complete a Crocheted chicken applique tutorial.
Before starting the Crocheted chicken applique tutorial, it is important to prepare the necessary materials. Having everything ready makes the crafting process smoother and more enjoyable. Most of the materials required are simple crochet tools that many crafters already have.
The most important supply in the Crocheted chicken applique tutorial is yarn. Cotton yarn is often recommended because it provides clear stitch definition and durability. However, acrylic yarn can also be used depending on personal preference and the intended use of the applique.
A crochet hook is another essential tool in the Crocheted chicken applique tutorial. Choosing the correct hook size helps ensure that the stitches remain even and that the applique maintains its shape.
Scissors are also necessary when working on the Crocheted chicken applique tutorial. Sharp scissors allow for precise cutting of yarn and help maintain a neat finish.
A yarn needle is frequently used during the Crocheted chicken applique tutorial. This tool makes it easier to weave in loose ends and attach the finished applique to fabric items.
Finally, small stitch markers can be useful while completing the Crocheted chicken applique tutorial. They help track important points in the pattern and maintain proper stitch counts.
The first step in the Crocheted chicken applique tutorial is creating the base of the chicken shape. This is often done by crocheting a small circle or oval that will form the body of the chicken.
After forming the base, the Crocheted chicken applique tutorial continues with shaping the wings and body details. Additional stitches are added strategically to give the applique a recognizable silhouette.
The next stage in the Crocheted chicken applique tutorial involves creating the chicken’s head and comb. These small details bring personality and character to the design.
Once the basic structure is complete, the Crocheted chicken applique tutorial focuses on adding the beak and other small features. These details are usually created using simple crochet stitches or embroidery techniques.
The following step in the Crocheted chicken applique tutorial includes securing all loose yarn ends. Proper finishing ensures that the applique remains durable during use.
The final step in the Crocheted chicken applique tutorial is attaching the applique to a fabric item. It can be sewn onto bags, blankets, kitchen accessories, or decorative crafts.
One of the most enjoyable aspects of the Crocheted chicken applique tutorial is experimenting with color combinations. Bright colors can create playful designs, while softer shades produce a more subtle decorative effect.
Another creative idea in the Crocheted chicken applique tutorial is adding textured stitches. These stitches can give the chicken’s body a more detailed and interesting appearance.
Some crafters enjoy incorporating embroidery details into the Crocheted chicken applique tutorial. Embroidered eyes or small patterns can enhance the design and make each applique unique.
Another option within the Crocheted chicken applique tutorial is adjusting the size of the applique. Smaller versions can decorate clothing, while larger ones can be used on blankets or cushions.
Layering multiple crochet pieces is another technique used in the Crocheted chicken applique tutorial. For example, separate wings or feathers can be added to create a more dimensional look.
Finally, the Crocheted chicken applique tutorial allows for seasonal creativity. Different color palettes can be used to match holidays, kitchen decor, or handmade gifts.
Maintaining consistent stitch tension is one of the most important factors in completing the Crocheted chicken applique tutorial successfully. Even stitches help the applique maintain a smooth shape.
Counting stitches carefully is another useful tip in the Crocheted chicken applique tutorial. Proper counting ensures that the design remains balanced and symmetrical.
Using stitch markers can simplify the process of following the Crocheted chicken applique tutorial. They help identify where important changes occur in the pattern.
Choosing the right yarn thickness is also important for the Crocheted chicken applique tutorial. Thinner yarn produces delicate appliques, while thicker yarn creates a more prominent design.
Practicing basic crochet stitches before beginning the Crocheted chicken applique tutorial can help beginners feel more confident and comfortable.
Finally, patience and creativity are key to completing the Crocheted chicken applique tutorial. Taking time with each step often leads to a more polished and attractive finished piece.
Is the Crocheted chicken applique tutorial suitable for beginners?
Yes, the Crocheted chicken applique tutorial is beginner-friendly and focuses on basic crochet stitches.
What type of yarn works best for this project?
Cotton yarn is often recommended for the Crocheted chicken applique tutorial because it provides clear stitch definition.
How long does it take to complete the applique?
A Crocheted chicken applique tutorial project can usually be completed within one hour depending on experience.
Can the applique be used on clothing?
Yes, items created through the Crocheted chicken applique tutorial can be sewn onto clothing, bags, or home decor.
Can the size of the applique be adjusted?
Yes, the Crocheted chicken applique tutorial can be modified by using different yarn weights and hook sizes.
Is this project suitable for handmade gifts?
Yes, pieces made using the Crocheted chicken applique tutorial can be thoughtful handmade gifts.
This article presented a complete Crocheted chicken applique tutorial, explaining the materials required, the step-by-step crochet process, creative design ideas, and useful tips for success. By following this guide, crafters can transform simple yarn into a decorative applique that can enhance many handmade projects.
The Crocheted chicken applique tutorial demonstrates how small crochet projects can be both enjoyable and practical. Whether used as decoration for accessories or as part of a larger crochet project, the applique adds a unique handmade touch.
If you enjoyed learning from this Crocheted chicken applique tutorial, feel free to share your honest opinion and suggestions. Your feedback is valuable and helps inspire future crochet tutorials and creative craft ideas.


