
Strawberry crochet hair tie pattern

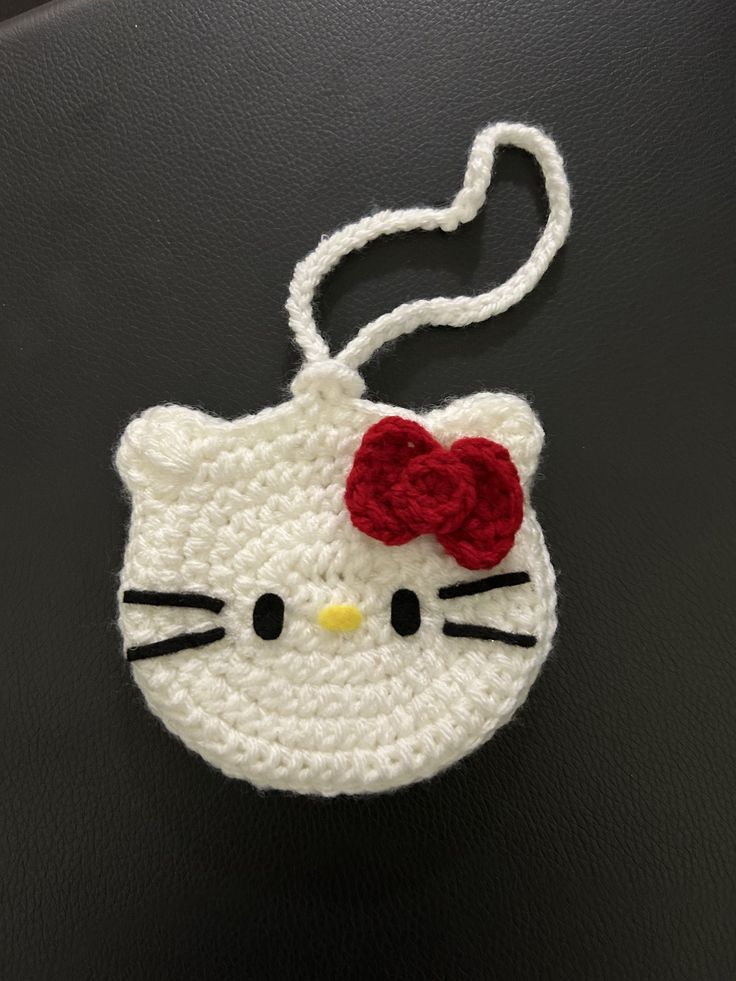
Crocheted cat bag tutorial is a creative and engaging project that combines functionality with adorable design, making it perfect for crochet enthusiasts of all skill levels. A Crocheted cat bag tutorial helps you transform simple yarn and basic stitches into a charming accessory that can be used daily or gifted to someone special. This type of project is especially popular because it merges practicality with personality, resulting in a bag that is both useful and visually appealing. Whether you are crafting for yourself, a child, or as part of a handmade collection, this project offers flexibility and creative freedom.
Learning through a Crocheted cat bag tutorial allows you to explore essential crochet techniques while creating something stylish and unique. The cat-themed design adds character to the bag, making it stand out from standard crochet accessories. By following a structured step-by-step process, you can develop confidence in shaping, assembling, and finishing crochet pieces. The beauty of this project lies in its versatility, as you can customize size, color, and details to match your personal style or the preferences of the recipient.
One of the greatest advantages of working with a Crocheted cat bag tutorial is that it enhances your crochet skills while producing a practical item. You will practice tension control, stitch consistency, and decorative techniques, all while crafting a bag that can hold everyday essentials. Additionally, this type of handmade bag reflects creativity and craftsmanship, which are highly valued in today’s handmade market. By focusing on quality materials and careful assembly, your crocheted cat bag can become a durable and treasured accessory.
Selecting the right yarn is crucial when starting a Crocheted cat bag tutorial. Medium-weight cotton yarn is highly recommended because it provides durability and structure. Cotton yarn helps the bag maintain its shape while supporting daily use.
The crochet hook size should correspond to the yarn weight, but using a slightly smaller hook creates tighter stitches. Tight stitches ensure that the bag is sturdy and does not stretch excessively when carrying items.
You will also need a yarn needle for weaving in ends and sewing parts together. This tool ensures clean finishing and secure attachment of decorative elements like ears and facial features.
Stitch markers are helpful for keeping track of rounds or rows, especially if your design includes shaping elements. They help maintain symmetry in the cat face and body structure.
If your design includes a strap, consider reinforcing it with tighter stitches or lining. A strong strap enhances the bag’s functionality and longevity.
Optional additions such as fabric lining, magnetic closures, or decorative buttons can elevate your Crocheted cat bag tutorial project. These small details add both practicality and aesthetic appeal.
A Crocheted cat bag tutorial typically begins by creating the base of the bag. This can be worked in rounds or rows, depending on whether you prefer a circular or rectangular shape.
Once the base is complete, you build the body of the bag by continuing upward with consistent stitches. Maintaining even tension ensures a uniform and professional appearance.
Shaping the top edge neatly is important for a polished finish. You may add a decorative border or a reinforced round to strengthen the opening.
The cat ears are usually crocheted separately and sewn onto the top corners. Their placement defines the playful and recognizable look of the bag.
Facial features such as eyes, nose, and whiskers can be embroidered directly onto the bag’s surface. This technique ensures safety and durability, especially for children’s accessories.
Finally, attach the strap securely by sewing or crocheting it directly onto the bag. Double-check all seams to guarantee strength and stability.
A Crocheted cat bag tutorial allows for endless customization. You can experiment with different yarn colors to create various cat styles, from classic black and white to playful pastel tones.
Textured stitches can add dimension and personality to the bag. For example, using bobble stitches can simulate fur or add decorative accents.
You may choose to create a crossbody strap for hands-free convenience. This option makes the bag more practical for daily activities.
Adding a zipper or button closure increases security and functionality. These details enhance usability while maintaining the bag’s charming appearance.
Personalized embroidery, such as initials or small decorative motifs, adds sentimental value. Custom touches make each bag unique and meaningful.
For seasonal themes, you can accessorize your cat bag with small crocheted bows, flowers, or scarves. These additions transform the design to match holidays or special occasions.
Maintaining consistent tension throughout your Crocheted cat bag tutorial ensures that the bag retains its shape. Uneven stitches can affect both structure and appearance.
Carefully count stitches in each round or row. Accurate counting prevents accidental increases or decreases that may distort the bag’s symmetry.
When attaching ears and straps, reinforce stitching for durability. Strong seams prevent wear and tear from daily use.
Blocking the finished bag lightly can help smooth out minor imperfections. This process enhances the professional look of your project.
Consider adding a fabric lining if you plan to carry small or delicate items. Lining prevents stretching and improves overall strength.
Practice patience and take your time with finishing touches. Attention to detail significantly enhances the final quality of your crocheted bag.
Is a Crocheted cat bag tutorial suitable for beginners?
Yes, many beginner-friendly patterns use simple stitches and clear instructions, making the project accessible to new crocheters.
What type of yarn is best for durability?
Cotton yarn is highly recommended because it provides structure and resists stretching over time.
How long does it take to complete the bag?
Depending on skill level and size, it typically takes several hours to complete a standard bag.
Can I wash a crocheted cat bag?
Most cotton yarn bags can be hand-washed and air-dried. Always check yarn care instructions before washing.
How do I make the bag sturdier?
Using tighter stitches, reinforcing seams, and adding a fabric lining will improve durability.
Can I sell bags made from a Crocheted cat bag tutorial?
Yes, handmade bags are popular items in craft markets, especially when customized and well-finished.
Conclusion
The Crocheted cat bag tutorial offers a creative way to combine crochet skills with functional design. Throughout this article, we explored essential materials, step-by-step construction, customization ideas, expert tips, and frequently asked questions.
By following a detailed Crocheted cat bag tutorial, you can confidently create a charming and durable accessory that reflects your personal style.
This project enhances your crochet techniques while producing a practical and adorable item suitable for everyday use or gifting. If you enjoyed this comprehensive guide, please share your honest opinion and leave your suggestions. Your feedback helps inspire future tutorials and supports a vibrant crafting community.


