
Strawberry crochet hair tie pattern

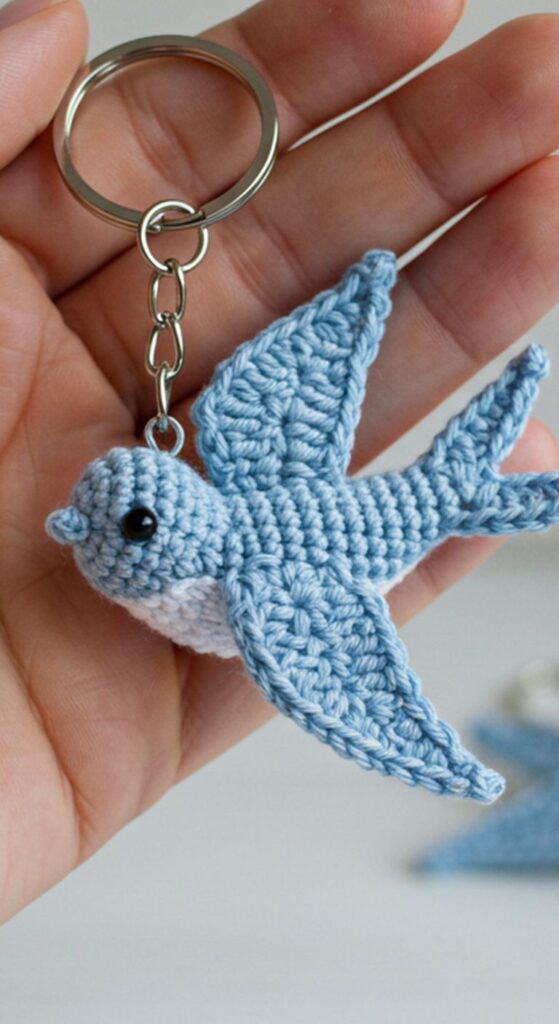
Crocheted Bird Keychain 🕊️ is an adorable and versatile DIY project that combines creativity, functionality, and a touch of whimsy. Whether you’re looking to make a charming accessory for yourself, a thoughtful gift for someone special, or even something to sell, the crocheted bird keychain 🕊️ is an excellent choice. This simple yet delightful project will add a unique handmade touch to your daily life, while also allowing you to practice and improve your crochet skills.
Crocheting a bird keychain is an excellent way to create small, portable items that are both decorative and functional. Not only does it offer a great introduction to basic crochet techniques, but it also allows for customization in terms of colors, sizes, and embellishments. Whether you’re an experienced crocheter or a beginner, this crocheted bird keychain 🕊️ tutorial will guide you through each step, providing you with the skills to make your own personalized version.
The process of making a crocheted bird keychain combines both creative design and practical assembly. It requires only a few basic crochet stitches and a little imagination. The best part is that you can easily adjust the pattern to suit different preferences and styles, from a simple design to one with added details. In this step-by-step guide, we’ll cover everything from gathering the materials you need to adding finishing touches to your creation.
Before you begin your crocheted bird keychain 🕊️, it’s important to gather all the necessary materials. The right supplies will ensure that your keychain turns out well-crafted and durable.
To start, you’ll need some yarn. A lightweight yarn, such as sport or worsted weight, works best for this project. Choose a color that represents the bird species you have in mind, or go for something more whimsical with bright, fun colors. Cotton yarn is a great option for its durability and smooth texture, making it easier to work with.
You’ll also need a crochet hook. A hook that matches the thickness of your yarn is ideal for maintaining consistent stitch tension. For most medium-weight yarns, a 3.5mm to 4mm crochet hook should suffice.
In addition to the yarn and hook, you’ll need scissors to trim your yarn, a yarn needle to weave in loose ends, and a keyring to attach the finished bird. If you want to add extra details like wings, eyes, or beaks, you can use felt, embroidery floss, or beads to give your bird personality and flair.
Lastly, a stitch marker will help keep track of your rows and ensure that your bird’s shape remains consistent as you crochet.
Now that you have all your materials, it’s time to begin the process of creating your crocheted bird keychain 🕊️. Follow this simple, step-by-step tutorial to make your own cute little bird.
Start by making a magic ring with your yarn. This technique allows you to crochet in a circular fashion, creating the bird’s body. Begin by chaining two stitches and then working six single crochet stitches into the ring. Pull the ring tight to close the hole, and continue crocheting in the round.
For the next few rounds, increase the number of stitches gradually to form a smooth, rounded shape. You can do this by crocheting two single crochet stitches into each stitch from the previous round.
To form the bird’s head, you’ll want to start shaping the top of the body with a decrease stitch. This helps create a smaller, rounded top for the head. Work a few rows of single crochet and then begin decreasing by single crocheting two stitches together.
Once the head reaches the desired size, fasten off the yarn and leave a long tail for sewing. This will make it easier to attach the head to the body later on.
Now that the body and head are complete, it’s time to crochet the wings and tail of your crocheted bird keychain 🕊️. For the wings, make two small teardrop-shaped pieces by starting with a chain of five stitches, followed by double crochet stitches along the chain.
Once you have finished crocheting the wings, attach them to either side of the bird’s body using the yarn needle. You can stitch them securely in place and adjust the placement until they look balanced and cute.
For the tail, crochet a small, fluffy piece of yarn that will add a nice finishing touch to the bird’s back. Attach the tail by sewing it onto the body in a place where it looks natural and cohesive.
Now comes the fun part: adding the finishing touches to your crocheted bird keychain 🕊️. Use a small piece of black yarn or a bead to create the bird’s eyes. You can also add a little triangle of orange or yellow yarn for the beak, making the bird look even more realistic.
Once all the parts are in place, weave in any loose ends and trim the yarn. This ensures your keychain looks neat and polished.
Finally, use a keyring to attach your crocheted bird. Thread a piece of yarn through the top of the bird’s head and tie it securely around the keyring. If you prefer, you can use a small metal ring instead of yarn to make the attachment more durable.
Your crocheted bird keychain 🕊️ is now complete and ready to be used. You can proudly hang it on your keys, backpack, or anywhere you want to add a little handmade charm.
One of the best aspects of making a crocheted bird keychain 🕊️ is the ability to personalize it. Here are some ideas for how you can add your own unique touch to the design:
1. Is this project suitable for beginners?
Yes, the crocheted bird keychain 🕊️ is a beginner-friendly project that uses basic crochet stitches.
2. How long does it take to make one keychain?
On average, it takes about 1-2 hours to make a single crocheted bird keychain, depending on your crochet speed.
3. Can I make different bird species using the same pattern?
Yes, you can easily modify the pattern to create various species by changing the colors and shapes of the wings, beak, and tail.
4. What is the best yarn for this project?
A medium-weight cotton yarn is ideal, as it provides structure and durability. However, you can use any yarn you prefer.
5. Can I sell crocheted bird keychains?
Yes, crocheted keychains make great handmade gifts or products to sell at craft fairs or online shops.
In this tutorial, we’ve covered everything you need to know about making a crocheted bird keychain 🕊️, from gathering your materials to adding personal touches.
This project is a wonderful way to practice your crochet skills while creating a functional and charming accessory.
Whether you make it for yourself, as a gift, or to sell, your crocheted bird keychain will surely add a special touch to any set of keys, bags, or other items. We hope you enjoyed this tutorial and encourage you to leave your feedback and suggestions for future projects! Happy crocheting!


