
Strawberry crochet hair tie pattern

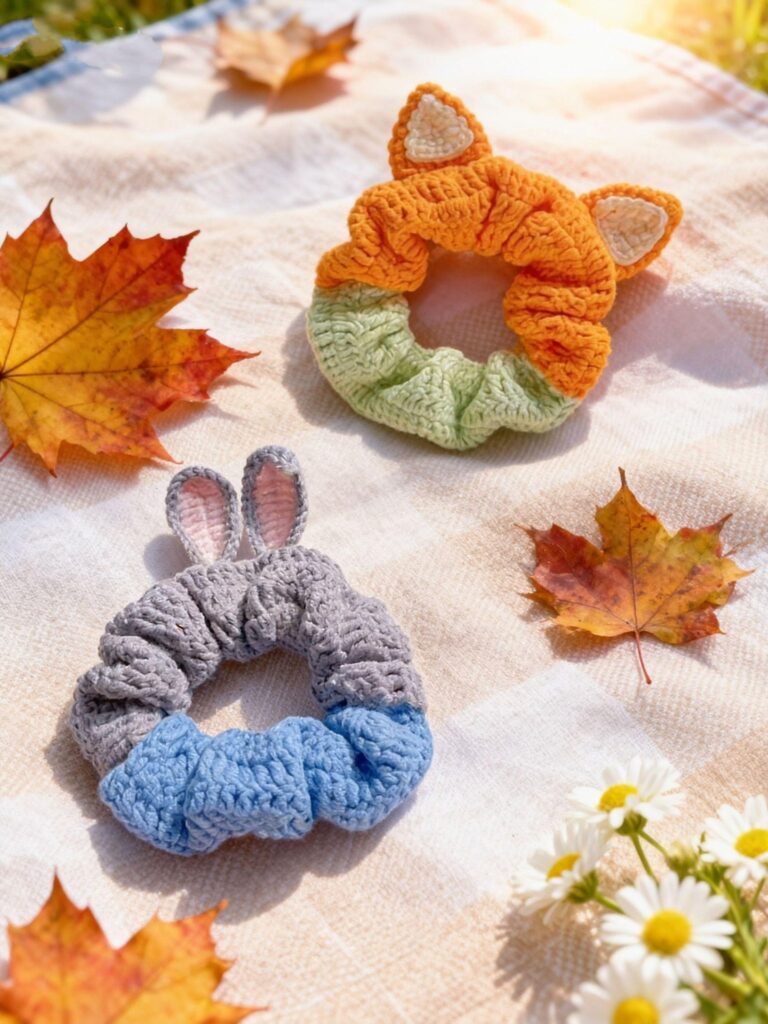
Crochet tutorial for making fox and rabbit shaped hair ties. This complete and creative Crochet tutorial for making fox and rabbit shaped hair ties. will guide you step by step through the process of designing adorable handmade accessories that are both functional and charming. Whether you are a beginner exploring new crochet ideas or an experienced crafter looking for a quick and profitable project, this guide offers practical instructions and inspiration. Handmade hair ties shaped like a fox and a rabbit are especially popular for children, gifts, and seasonal collections.
Learning through a detailed Crochet tutorial for making fox and rabbit shaped hair ties. allows you to combine basic amigurumi techniques with small decorative elements. These projects are compact, making them ideal for using leftover yarn from other creations. In addition, they require minimal materials and can be completed in a short amount of time. With careful stitching and thoughtful finishing, your fox and rabbit hair ties can look polished and professional.
This article follows recommended SEO practices by naturally incorporating the keyword Crochet tutorial for making fox and rabbit shaped hair ties. while delivering helpful and original content. You will discover how to select materials, create animal shapes, attach them securely to hair elastics, and customize your designs. By the end of this guide, you will feel confident in creating unique crochet accessories that are safe, durable, and visually appealing.
Choosing the right materials is essential when following a Crochet tutorial for making fox and rabbit shaped hair ties. Soft cotton yarn is highly recommended because it provides good stitch definition and durability. Lightweight acrylic yarn can also work well, especially for soft and flexible accessories.
A small crochet hook, typically between 2.5 mm and 3.5 mm, is ideal for creating tight stitches. Tight stitching is important in amigurumi-style projects to prevent gaps and maintain a neat appearance. This helps the animal shapes keep their form over time.
You will need small hair elastics as the base for your project. Choose high-quality elastic bands that are gentle on hair but strong enough to hold a ponytail securely. Neutral-colored elastics often blend best with the crochet piece.
Additional tools include a yarn needle for sewing pieces together, scissors, and stitch markers. Stitch markers are especially helpful when working in continuous rounds, which is common in a Crochet tutorial for making fox and rabbit shaped hair ties.
Safety eyes can be used for decorative purposes, but if the hair ties are intended for young children, embroidered eyes are a safer alternative. Always prioritize safety and durability.
Before starting, prepare your workspace with good lighting and organize your yarn colors. For the fox, orange, white, and black are common choices. For the rabbit, white, gray, or pastel shades work beautifully.
The fox design in this Crochet tutorial for making fox and rabbit shaped hair ties. typically begins with a small round head. Start with a magic ring and work single crochet stitches in continuous rounds to form a compact sphere.
Increase evenly in the first few rounds to shape the head. Once the desired width is reached, work even rounds without increases to build height. Proper tension ensures the fox head maintains a smooth shape.
The fox ears are small triangular pieces crocheted separately. Create a small chain, work rows of single crochet, and decrease toward the top to form a pointed shape. Make two identical ears for balance.
The snout can be created using white yarn. This small oval piece is sewn onto the lower part of the face. Adding embroidered details for the nose and mouth enhances the character of your fox.
After assembling the ears and snout, attach the completed fox head securely to the elastic band. In a well-made Crochet tutorial for making fox and rabbit shaped hair ties., strong stitching ensures durability.
Check all attachments carefully before finishing. The fox shape should sit flat against the elastic without twisting or loosening during use.
The rabbit design in this Crochet tutorial for making fox and rabbit shaped hair ties. follows a similar structure but includes longer ears. Begin by crocheting a small round head using single crochet stitches in continuous rounds.
Shape the head with gradual increases and even rounds. Keep the stuffing minimal or avoid stuffing entirely to ensure the accessory remains lightweight and comfortable.
Rabbit ears are longer and slightly oval-shaped. Crochet them in rows, increasing slightly in the middle and decreasing at the top. You may add a contrasting inner ear piece in pink for extra detail.
Attach the ears securely to the top of the rabbit head. Position them symmetrically to create a balanced and attractive look. A neat finish is essential for a professional result.
Embroider simple facial features such as closed eyes or a small nose. Minimalistic designs are especially charming in a Crochet tutorial for making fox and rabbit shaped hair ties.
Finally, sew the rabbit head onto the hair elastic. Ensure tight and reinforced stitching so the piece remains secure even with frequent use.
One of the advantages of a Crochet tutorial for making fox and rabbit shaped hair ties. is the ability to customize colors and expressions. You can experiment with pastel tones for a softer look or bright shades for playful designs.
Adding small accessories like miniature bows or flowers can personalize your creations. However, always ensure embellishments are firmly attached.
You can create matching sets by combining fox and rabbit hair ties in coordinating colors. These sets make thoughtful handmade gifts for birthdays or holidays.
Consider using textured stitches for added dimension. For example, surface crochet details can enhance the fox’s facial features or the rabbit’s ears.
Blocking is generally not necessary for small accessories, but gently shaping the pieces before final assembly ensures a neat appearance.
Before completing your project, inspect all seams and ends. Securely woven ends and tight stitches guarantee that your Crochet tutorial for making fox and rabbit shaped hair ties. results in durable and attractive accessories.
Is this Crochet tutorial for making fox and rabbit shaped hair ties. suitable for beginners?
Yes, beginners who know basic single crochet and simple shaping techniques can complete this project successfully.
What yarn is best for hair tie accessories?
Cotton yarn is highly recommended because it provides structure and durability while remaining soft.
How do I make the hair ties safe for children?
Use embroidered eyes instead of plastic safety eyes and ensure all parts are securely stitched.
How long does it take to make one hair tie?
Depending on experience, one fox or rabbit hair tie can typically be completed within one to two hours.
Can I sell handmade fox and rabbit hair ties?
Yes, handmade crochet accessories can be sold if they are created by you. Focus on quality craftsmanship and accurate product descriptions.
How do I wash crochet hair ties?
Gently hand-wash them with mild soap and allow them to air dry to maintain shape and durability.
Conclusion
In this complete Crochet tutorial for making fox and rabbit shaped hair ties., we explored essential materials, step-by-step construction, customization ideas, and safety considerations. By following these guidelines, you can confidently create charming handmade hair accessories that are both functional and decorative.
These small crochet projects are perfect for gifts, personal use, or even small business ideas. With careful stitching and attention to detail, your fox and rabbit hair ties will stand out as adorable and durable creations.
If you found this tutorial helpful, please leave your honest opinion and share your suggestions. Your feedback is valuable and helps inspire more creative crochet content in the future.


