
Strawberry crochet hair tie pattern

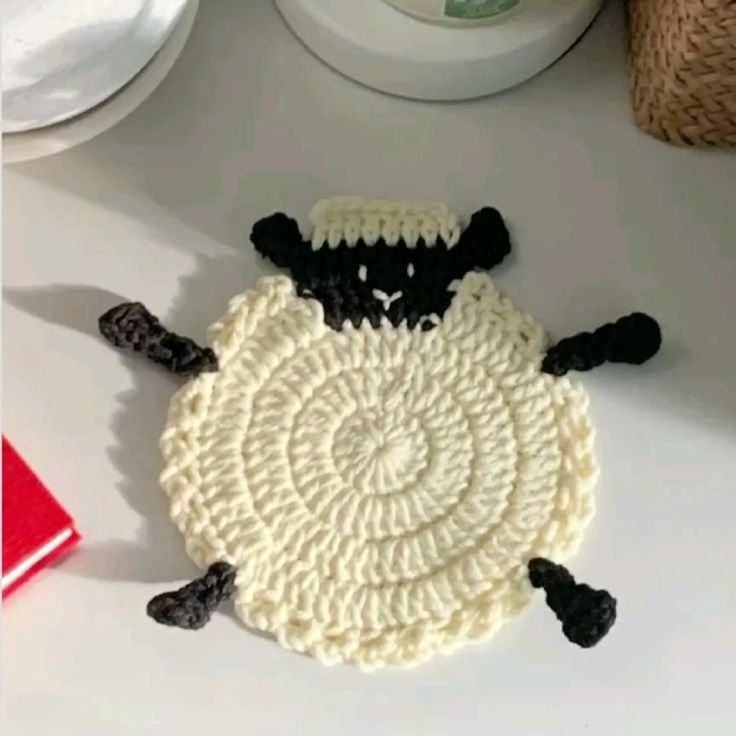
If you are searching for a fun, practical, and adorable project, this Crochet Sheep Shape Coaster – Step by Step Tutorial is the perfect choice for you. Handmade coasters are not only functional but also bring warmth and charm to your home décor. When shaped like cute little sheep, they become even more delightful—ideal for tea time, gifts, or simply adding a cozy farmhouse touch to your table. This tutorial will guide you through every step, making it simple even for beginners to follow along and achieve a beautiful result.
Creating your own crochet sheep shape coaster is an enjoyable way to practice essential crochet stitches while also exploring creativity. You can use soft neutral yarns to make it look realistic or experiment with bright colors for a playful twist. Whether you are crafting for yourself or preparing handmade presents, this pattern allows plenty of customization options. Plus, it’s a great way to use up leftover yarn scraps you may already have in your stash, making it both eco-friendly and cost-effective.
In this Crochet Sheep Shape Coaster – Step by Step Tutorial, you’ll learn how to make the body, add cute details like ears and face, and assemble everything neatly. The project doesn’t require advanced skills—just patience, attention to detail, and love for handmade crafts. Even if you’re new to crochet, this tutorial will help you understand how to bring a fluffy sheep coaster to life while improving your overall crochet skills.
Before you start working on your crochet sheep shape coaster, make sure to gather all the materials and tools. Preparation helps ensure your crafting process is smooth and enjoyable from beginning to end.
First, you’ll need cotton yarn or a similar material suitable for coasters. Cotton is highly absorbent and durable, making it ideal for items that will come into contact with heat and liquids. Choose your main color (usually white or cream for the sheep’s body) and a darker color for the head, ears, and legs. You can also use pastel shades for a soft, cute look.
Next, you’ll need a crochet hook that matches your yarn weight. For most medium-weight yarns, a 3.5 mm to 4 mm hook works perfectly. Make sure your stitches aren’t too tight, as a little softness will add to the sheep’s fluffy texture. Having a yarn needle for sewing parts together and weaving in ends will also be essential.
Don’t forget scissors for cutting yarn, and a stitch marker if you want to keep track of your rounds, especially if you’re working in continuous spirals. A small amount of black embroidery thread or yarn will also be useful for adding facial features like eyes and mouth.
Finally, prepare a comfortable workspace with good lighting. Having your materials neatly arranged will make it easier to follow the step by step tutorial and prevent mistakes. This kind of project is all about enjoying the creative process, so take your time and work comfortably.
Now, let’s dive into the most exciting part of this Crochet Sheep Shape Coaster – Step by Step Tutorial: making your coaster. This section will guide you through the body, face, ears, and final assembly.
Start by crocheting the body of the sheep. This is usually done in a circular pattern, similar to creating a basic coaster. Begin with a magic ring, then work single crochets in rounds, increasing gradually until you achieve your desired size. The body should be fluffy and slightly textured—try using a puff stitch or popcorn stitch to mimic the sheep’s wool.
Once the body is complete, move on to crocheting the head. This piece is slightly oval and smaller than the body. Use a contrasting yarn color, such as gray or brown, to help it stand out. You’ll create the head separately and attach it to the side of the coaster later.
Next, make the ears. Crochet two small oval pieces and fold them slightly for a natural shape. Attach them to the top sides of the head, ensuring they are symmetrical. Small details like these give your sheep coaster its adorable personality.
After that, you’ll work on the legs. These are optional but add charm and character to your design. Crochet four tiny elongated pieces and sew them at the bottom of the body. You can position them to make the sheep look like it’s lying down or standing still.
Lastly, use black yarn or embroidery thread to create facial features. Stitch two small eyes and a tiny smile. You can also add blush details using pink yarn or fabric paint for extra cuteness. Now your crochet sheep shape coaster is complete and ready to use!
Even though this is an easy crochet project, a few expert tips can help your work look more professional and neat. Paying attention to small details makes a big difference when it comes to handmade crafts.
First, always maintain consistent tension. This ensures your stitches look even and the coaster lays flat on a surface. If your tension is too tight, your coaster might curl; if too loose, it might look floppy. Practice a few test stitches before starting the actual project.
Second, use soft yarns with good stitch definition. Cotton yarns highlight texture beautifully and are also practical for cleaning and durability. Avoid fluffy yarns that shed, as they can make your coaster less functional.
Third, make sure to block your coaster after finishing. Blocking helps shape and flatten the piece, giving it a polished look. Simply dampen your coaster slightly and pin it into shape on a towel until it dries completely.
Another tip is to experiment with colors. While traditional sheep are white or cream, you can create a rainbow of sheep for a playful touch. Pastel shades work wonderfully for springtime or baby-themed gifts.
Lastly, don’t hesitate to add personalization. A small bow, embroidered initials, or a tiny flower near the ear can transform your coaster into a unique handmade treasure. These thoughtful touches make great handmade gifts or charming additions to craft fairs.
One of the best things about this Crochet Sheep Shape Coaster – Step by Step Tutorial is how versatile the final result can be. Once you finish your coasters, there are many creative ways to use or share them.
You can start by using them as everyday drink coasters at home. They’re perfect for mugs, cups, or even small bowls, protecting your surfaces from heat and moisture. Plus, they add a delightful rustic touch to your table setting.
These sheep coasters also make adorable handmade gifts. Bundle them up in a small set, tie them with ribbon, and you have a thoughtful and practical present. They’re ideal for birthdays, housewarming parties, or holiday celebrations.
You can also use them as decorative pieces in your kitchen or dining area. Display them on open shelves, use them as part of a table centerpiece, or place one under a small plant pot for a cozy, homey feel.
If you enjoy selling handmade crafts, this project is great for craft fairs or online shops. The design is eye-catching, easy to replicate, and has broad appeal. Just make sure your product photos show the cute details clearly.
Lastly, this project is perfect for group crafting sessions. Whether you’re teaching kids or hosting a crochet night with friends, everyone will enjoy making their own little sheep coaster to take home.
1. What type of yarn is best for making a crochet sheep shape coaster?
Cotton yarn is the best option because it’s durable, absorbent, and heat resistant, making it ideal for coasters.
2. Can beginners make this crochet sheep shape coaster?
Absolutely! The project is beginner-friendly, and this step by step tutorial is designed to be easy to follow, even for those new to crochet.
3. How long does it take to complete one coaster?
Depending on your skill level, each coaster can take between one and two hours to complete.
4. Can I wash my crochet sheep coaster?
Yes, hand washing with mild soap is recommended. Lay it flat to dry to keep its shape intact.
5. Can I change the size of the coaster?
Yes, simply adjust the number of rounds in the body section to make a larger or smaller coaster.
6. What if I don’t have black yarn for the face?
You can use embroidery thread, fabric paint, or even small safety eyes for a similar effect.
Making your own Crochet Sheep Shape Coaster – Step by Step Tutorial is a fun, creative, and rewarding project that blends functionality with cuteness.
You learned how to create the body, add facial features, and personalize your design. This project not only helps you improve your crochet skills but also lets you express your creativity through color and texture. Whether you keep it for yourself or give it as a handmade gift, it’s sure to bring smiles wherever it goes.
We hope this tutorial inspired you to pick up your hook and yarn today! If you try this project, please share your honest opinion and suggestions—we’d love to hear how your crochet sheep coasters turned out and what unique touches you added!


