
Strawberry crochet hair tie pattern

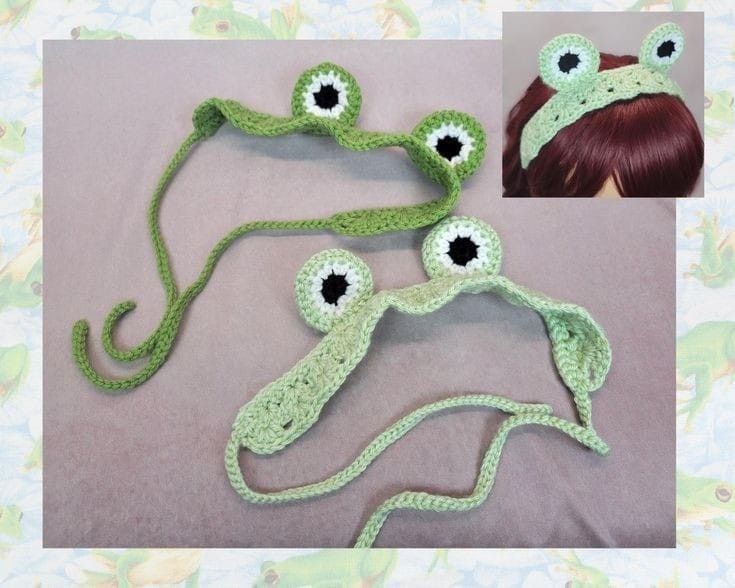
Crochet froggy headband tutorial is the perfect creative project for anyone who loves playful accessories and handmade fashion. A Crochet froggy headband tutorial combines simple crochet techniques with adorable design elements to create a charming and wearable piece. Whether you are a beginner exploring new patterns or an experienced crocheter searching for a quick and satisfying project, this guide will help you understand every detail. Throughout this article, we will explore materials, step-by-step instructions, customization ideas, and practical care tips to ensure your Crochet froggy headband tutorial experience is enjoyable and successful.
The popularity of the Crochet froggy headband tutorial has grown significantly thanks to social media trends and the increasing appreciation for handmade accessories. Cute animal-inspired headbands have become a favorite choice for children, themed events, costume parties, and even casual everyday wear. A frog design adds a fun and friendly character that instantly captures attention. More importantly, this project remains simple enough to complete in just a few hours, making it accessible to crochet enthusiasts of all skill levels.
In addition to being adorable, the Crochet froggy headband tutorial is also practical and customizable. You can adjust the size to fit babies, children, or adults. You can experiment with different shades of green, add blush details, or even personalize the frog’s facial expression. With the right yarn and careful stitching, the final result is comfortable, durable, and lightweight. Let’s now explore the essential materials and techniques needed to create your own frog-inspired crochet headband.
Choosing the right materials is the first step in completing a successful Crochet froggy headband tutorial. Soft yarn is highly recommended, especially if the headband will be worn for extended periods. Cotton yarn works well because it is breathable and gentle on the skin.
Acrylic yarn is another popular option for the Crochet froggy headband tutorial. It offers elasticity and vibrant color choices, making it ideal for creating bright green frog designs. When selecting yarn, always consider comfort and durability.
The crochet hook size should match the yarn weight. Most headbands are made using a medium-weight yarn and a hook size between 4.0 mm and 5.5 mm. Using the correct hook ensures even stitches and a flexible fit.
Additional tools include scissors, a yarn needle for weaving in ends, and stitch markers. Stitch markers are particularly useful when shaping the frog’s eyes to maintain symmetry.
Safety eyes or embroidered details can be used to create the frog’s face. If the headband is intended for young children, embroidered eyes are the safest option.
Finally, a measuring tape is essential to ensure the headband fits properly. Accurate measurements help you customize the Crochet froggy headband tutorial for different head sizes.
The first step in the Crochet froggy headband tutorial is creating the base band. Begin by chaining the required number of stitches based on the desired circumference. Make sure the chain is not twisted before joining.
Work in rows or rounds using single crochet or half-double crochet stitches. These stitches provide structure while keeping the headband soft and comfortable.
Continue crocheting until the band reaches the desired width. A width of two to three inches is common, but you can adjust it according to preference.
Next, create the frog’s eyes separately. The eyes are usually crocheted in small rounds using green yarn for the base and white and black yarn for the eye details.
Attach the eyes securely to the top of the headband. Proper placement is key to achieving the playful look characteristic of a Crochet froggy headband tutorial.
Finish by weaving in loose ends and checking for any uneven stitches. A neat finish enhances both durability and appearance.
One of the most enjoyable aspects of a Crochet froggy headband tutorial is the ability to customize the design. You can experiment with different shades of green to create a unique frog character.
Adding blush details with pink yarn gives the frog a cute and friendly expression. Small embroidered smiles can further personalize the look.
Seasonal variations are also possible. For example, adding a tiny crochet flower next to one eye creates a spring-inspired version of the Crochet froggy headband tutorial.
You can adjust the size of the frog’s eyes to create different expressions. Larger eyes produce a cartoon-style appearance, while smaller eyes offer a subtle look.
For special events or themed parties, consider adding glitter yarn accents or decorative bows. These small touches make the headband stand out.
Elastic inserts can be added to improve stretch and comfort. This ensures that the Crochet froggy headband tutorial remains secure without feeling too tight.
Proper care ensures that your Crochet froggy headband tutorial remains in excellent condition. Hand washing with mild detergent is recommended to preserve the yarn fibers.
After washing, gently reshape the headband and lay it flat to dry. Avoid wringing or twisting, as this may distort the frog’s features.
Store the headband in a cool, dry place to prevent fading or stretching. Proper storage extends the lifespan of the accessory.
Regularly inspect the attached eyes and decorative elements. If any stitches loosen, repair them promptly to maintain safety and durability.
Avoid exposing the headband to excessive heat, as high temperatures may damage certain yarn types.
With consistent care, your Crochet froggy headband tutorial creation can remain vibrant and wearable for a long time.
FAQ About Crochet Froggy Headband Tutorial
Is the Crochet froggy headband tutorial suitable for beginners?
Yes, it uses basic crochet stitches and simple shaping techniques, making it beginner-friendly.
What type of yarn is best for the Crochet froggy headband tutorial?
Soft cotton or acrylic yarn works well, depending on your preference for texture and elasticity.
How long does it take to complete the project?
Most crocheters can finish the headband within a few hours.
Can I adjust the size for adults?
Yes, simply increase the number of foundation chains to fit larger head circumferences.
Are safety eyes recommended?
For young children, embroidered eyes are safer and more secure than plastic safety eyes.
Conclusion
The Crochet froggy headband tutorial is a delightful and creative project that combines simplicity with charm. In this article, we explored essential materials, step-by-step instructions, customization ideas, and proper care techniques. From selecting soft yarn to securely attaching playful frog eyes, each stage contributes to a comfortable and adorable accessory. Whether you create it for yourself, a child, or as a gift, the Crochet froggy headband tutorial offers endless possibilities for personalization. I hope this guide has inspired you to start your own project. Please leave your honest opinion and share your suggestions, as your feedback is greatly appreciated and helps improve future content.Crochet froggy headband tutorial is the perfect creative project for anyone who loves playful accessories and handmade fashion. A Crochet froggy headband tutorial combines simple crochet techniques with adorable design elements to create a charming and wearable piece. Whether you are a beginner exploring new patterns or an experienced crocheter searching for a quick and satisfying project, this guide will help you understand every detail. Throughout this article, we will explore materials, step-by-step instructions, customization ideas, and practical care tips to ensure your Crochet froggy headband tutorial experience is enjoyable and successful.
The popularity of the Crochet froggy headband tutorial has grown significantly thanks to social media trends and the increasing appreciation for handmade accessories. Cute animal-inspired headbands have become a favorite choice for children, themed events, costume parties, and even casual everyday wear. A frog design adds a fun and friendly character that instantly captures attention. More importantly, this project remains simple enough to complete in just a few hours, making it accessible to crochet enthusiasts of all skill levels.
In addition to being adorable, the Crochet froggy headband tutorial is also practical and customizable. You can adjust the size to fit babies, children, or adults. You can experiment with different shades of green, add blush details, or even personalize the frog’s facial expression. With the right yarn and careful stitching, the final result is comfortable, durable, and lightweight. Let’s now explore the essential materials and techniques needed to create your own frog-inspired crochet headband.
Choosing the right materials is the first step in completing a successful Crochet froggy headband tutorial. Soft yarn is highly recommended, especially if the headband will be worn for extended periods. Cotton yarn works well because it is breathable and gentle on the skin.
Acrylic yarn is another popular option for the Crochet froggy headband tutorial. It offers elasticity and vibrant color choices, making it ideal for creating bright green frog designs. When selecting yarn, always consider comfort and durability.
The crochet hook size should match the yarn weight. Most headbands are made using a medium-weight yarn and a hook size between 4.0 mm and 5.5 mm. Using the correct hook ensures even stitches and a flexible fit.
Additional tools include scissors, a yarn needle for weaving in ends, and stitch markers. Stitch markers are particularly useful when shaping the frog’s eyes to maintain symmetry.
Safety eyes or embroidered details can be used to create the frog’s face. If the headband is intended for young children, embroidered eyes are the safest option.
Finally, a measuring tape is essential to ensure the headband fits properly. Accurate measurements help you customize the Crochet froggy headband tutorial for different head sizes.
The first step in the Crochet froggy headband tutorial is creating the base band. Begin by chaining the required number of stitches based on the desired circumference. Make sure the chain is not twisted before joining.
Work in rows or rounds using single crochet or half-double crochet stitches. These stitches provide structure while keeping the headband soft and comfortable.
Continue crocheting until the band reaches the desired width. A width of two to three inches is common, but you can adjust it according to preference.
Next, create the frog’s eyes separately. The eyes are usually crocheted in small rounds using green yarn for the base and white and black yarn for the eye details.
Attach the eyes securely to the top of the headband. Proper placement is key to achieving the playful look characteristic of a Crochet froggy headband tutorial.
Finish by weaving in loose ends and checking for any uneven stitches. A neat finish enhances both durability and appearance.
One of the most enjoyable aspects of a Crochet froggy headband tutorial is the ability to customize the design. You can experiment with different shades of green to create a unique frog character.
Adding blush details with pink yarn gives the frog a cute and friendly expression. Small embroidered smiles can further personalize the look.
Seasonal variations are also possible. For example, adding a tiny crochet flower next to one eye creates a spring-inspired version of the Crochet froggy headband tutorial.
You can adjust the size of the frog’s eyes to create different expressions. Larger eyes produce a cartoon-style appearance, while smaller eyes offer a subtle look.
For special events or themed parties, consider adding glitter yarn accents or decorative bows. These small touches make the headband stand out.
Elastic inserts can be added to improve stretch and comfort. This ensures that the Crochet froggy headband tutorial remains secure without feeling too tight.
Proper care ensures that your Crochet froggy headband tutorial remains in excellent condition. Hand washing with mild detergent is recommended to preserve the yarn fibers.
After washing, gently reshape the headband and lay it flat to dry. Avoid wringing or twisting, as this may distort the frog’s features.
Store the headband in a cool, dry place to prevent fading or stretching. Proper storage extends the lifespan of the accessory.
Regularly inspect the attached eyes and decorative elements. If any stitches loosen, repair them promptly to maintain safety and durability.
Avoid exposing the headband to excessive heat, as high temperatures may damage certain yarn types.
With consistent care, your Crochet froggy headband tutorial creation can remain vibrant and wearable for a long time.
FAQ About Crochet Froggy Headband Tutorial
Is the Crochet froggy headband tutorial suitable for beginners?
Yes, it uses basic crochet stitches and simple shaping techniques, making it beginner-friendly.
What type of yarn is best for the Crochet froggy headband tutorial?
Soft cotton or acrylic yarn works well, depending on your preference for texture and elasticity.
How long does it take to complete the project?
Most crocheters can finish the headband within a few hours.
Can I adjust the size for adults?
Yes, simply increase the number of foundation chains to fit larger head circumferences.
Are safety eyes recommended?
For young children, embroidered eyes are safer and more secure than plastic safety eyes.
Conclusion
The Crochet froggy headband tutorial is a delightful and creative project that combines simplicity with charm. In this article, we explored essential materials, step-by-step instructions, customization ideas, and proper care techniques.
From selecting soft yarn to securely attaching playful frog eyes, each stage contributes to a comfortable and adorable accessory. Whether you create it for yourself, a child, or as a gift, the Crochet froggy headband tutorial offers endless possibilities for personalization.
I hope this guide has inspired you to start your own project. Please leave your honest opinion and share your suggestions, as your feedback is greatly appreciated and helps improve future content.


