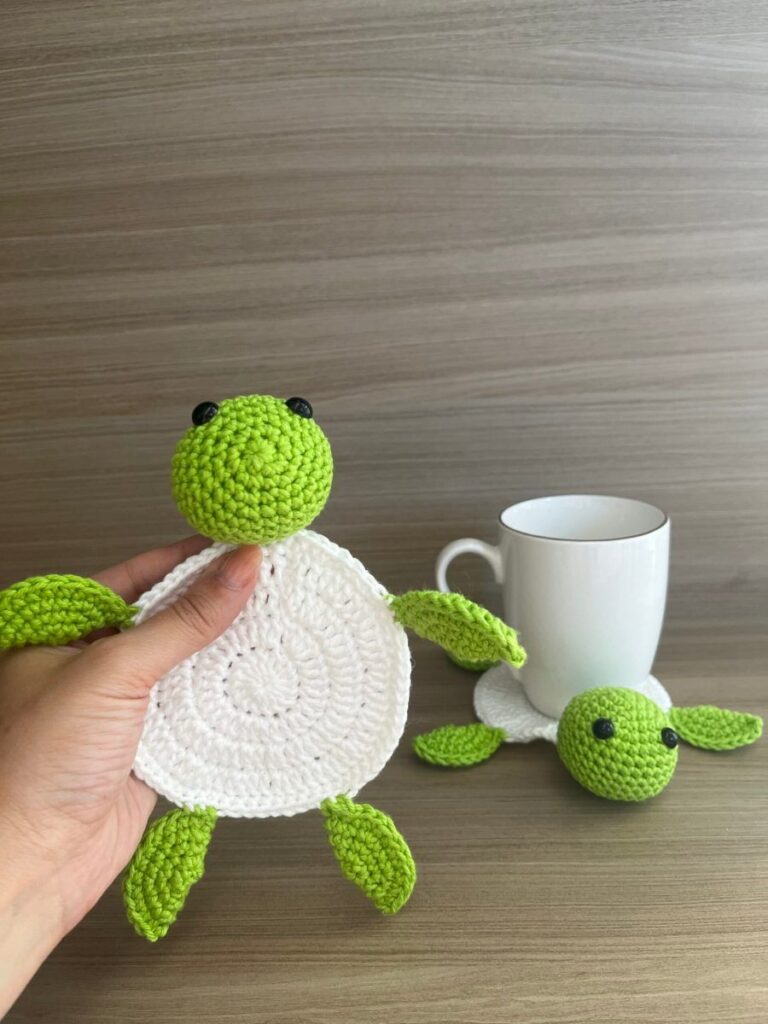
Crocheted turtle coaster pattern

If you have been searching for a fun and practical project, this Crochet frog coaster- Step by Step Tutorial will guide you through everything you need to know. Crochet coasters are a wonderful way to combine creativity and functionality, and when shaped like a frog, they bring extra charm and personality to your home. These coasters not only protect your tables but also add a cheerful, handmade touch to your décor, making them perfect for everyday use or as thoughtful gifts for friends and family.
The beauty of a Crochet frog coaster- Step by Step Tutorial lies in its simplicity and versatility. Whether you are an experienced crocheter or a complete beginner, this project is approachable, enjoyable, and rewarding. The basic stitches used in this pattern allow you to practice foundational skills while creating something truly adorable. By the end, you will have a coaster that is as practical as it is decorative, and you may even feel inspired to create a full set of frogs to brighten up your space.
Following a Crochet frog coaster- Step by Step Tutorial gives you the confidence to take on new creative challenges. You will learn how to work in the round, how to add simple details like eyes and a smile, and how to shape your coaster to resemble a cute frog. With clear guidance, you will discover how small details bring your project to life. Once completed, your coaster will stand out as a handmade treasure that showcases your creativity and skill.
To start the Crochet frog coaster- Step by Step Tutorial, you first need to gather the right materials. Choosing the proper yarn makes a big difference in the final look of your coaster. Cotton yarn is the most popular choice for coasters because it is durable, absorbs moisture well, and lays flat on a table. Green is the classic color for the frog, but you can also experiment with different shades to add variety and personality.
The hook size is equally important. A slightly smaller crochet hook than the recommended size for your yarn works best for coasters. This ensures that your stitches are tight, giving the coaster a neat and sturdy finish. For medium-weight yarn, a 3.5 mm or 4 mm hook is usually ideal. The smaller stitches also prevent the coaster from curling or stretching out of shape after use.
Scissors are another essential tool for trimming yarn ends neatly. Having sharp scissors designed for crafting will help you avoid fraying and make finishing the project easier. A tapestry needle is also necessary for weaving in loose ends and attaching details like the frog’s eyes. These small steps help give your coaster a polished and professional look.
For stuffing, you won’t need large amounts because coasters should remain flat. However, if you want raised features like slightly padded eyes, a tiny bit of fiberfill can be used. Most crocheters prefer to embroider features like smiles, but optional felt or safety eyes can also be added if the coaster will not be used around very young children.
Stitch markers are especially helpful when following the Crochet frog coaster- Step by Step Tutorial. Since the pattern is worked in rounds, it can be easy to lose track of where one round ends and the next begins. A stitch marker makes it easier to count stitches and maintain symmetry, especially for beginners.
Having all these materials organized before you begin will make the entire crocheting process smoother and more enjoyable. With your tools and supplies ready, you can focus fully on the creative side of this charming project.
The first step of the Crochet frog coaster- Step by Step Tutorial is creating a magic ring. This is the foundation of the coaster and allows you to crochet in the round without leaving a hole in the center. Once you have your ring, you will begin by making single crochet stitches into the loop, gradually tightening it as you work. This ensures your coaster has a solid, even base.
After forming the ring, you will continue with rounds of single crochet, increasing stitches evenly to form a flat circle. This is the main body of the coaster and represents the frog’s face. Be careful to count each stitch accurately to prevent the circle from curling or warping. By keeping your tension even, you will create a smooth and symmetrical shape.
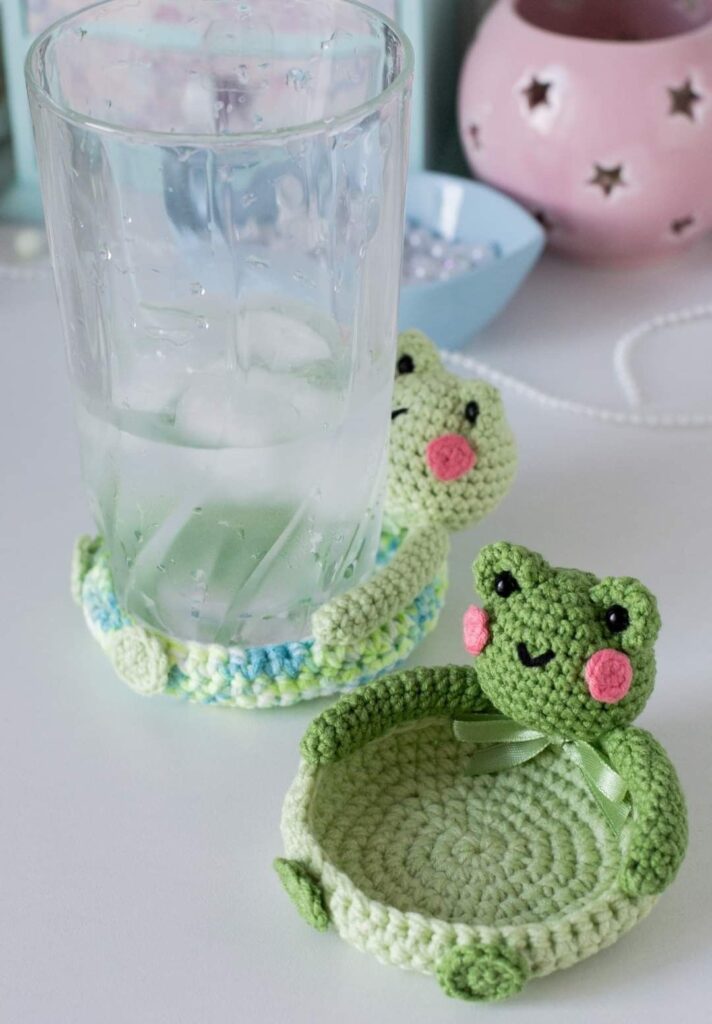
When the base circle reaches the desired size, the next step is creating the frog’s eyes. These are made by crocheting two smaller circles separately, often in white yarn with black centers for pupils. After finishing, you will attach them to the top of the main coaster using a tapestry needle. Placing the eyes close together gives the frog a cute, friendly appearance.
The smile is another important detail. Many crocheters prefer to embroider the smile using black yarn or thread, curving it slightly upward to enhance the cheerful expression. Adding rosy cheeks with small embroidered stitches or pink yarn can also bring extra charm and personality to the frog. These simple additions make a huge difference in the overall look.
Once the face is complete, you may choose to add optional details like small arms or even a decorative border around the coaster. A round of slip stitches or a scalloped edge can make the coaster more decorative without sacrificing functionality. These extra steps are not necessary, but they allow you to personalize your project.
Finally, make sure to weave in all yarn ends neatly using your tapestry needle. This ensures the coaster looks tidy and professional while also preventing loose threads from unraveling during use. At this point, your frog coaster is complete and ready to brighten up your table.
One of the best things about following a Crochet frog coaster- Step by Step Tutorial is the freedom to customize. While the traditional design uses green yarn, you can experiment with other colors for a playful twist. A pastel frog in pink or blue adds a whimsical feel, while bold colors make the coaster stand out as a statement piece.
If you are making a set of coasters, you might consider creating frogs in various shades of green to mimic a group of frogs. This adds variety and makes the set look more lively and fun. Such sets make wonderful handmade gifts that people will cherish and use regularly.
Adding different expressions is another way to personalize your frog coaster. By adjusting the placement of the eyes or changing the curve of the smile, you can create frogs with unique personalities. Some might look cheerful, others curious, and some even playful. This small change adds character to each coaster.
For those who enjoy experimenting, try incorporating textured stitches into the frog’s face. While the standard pattern uses single crochet for simplicity, using bobble stitches or puff stitches can give the frog a unique texture. This can make the coaster more visually interesting and fun to create.
If you want to make the coaster more functional, you can crochet a double layer by creating two circles and stitching them together. This makes the coaster thicker, more durable, and better at protecting surfaces from heat and moisture. A double-layer coaster also feels more substantial in the hand.
Finally, consider adding a small loop at the top so the coaster can be hung on a hook when not in use. This makes storage easier and allows your crochet work to double as wall décor. It’s a practical and creative way to display your handmade frog.
Learning through a Crochet frog coaster- Step by Step Tutorial comes with many benefits beyond just making a coaster. First, it helps you practice basic crochet skills such as working in the round, increasing stitches, and attaching parts. These are essential techniques that build a strong foundation for future projects.
Another benefit is the relaxation that comes with crocheting. Many people find the repetitive motion of crochet soothing and meditative, helping them reduce stress while creating something beautiful. Working on a fun project like a frog coaster makes the experience even more enjoyable.
Creating practical items is another advantage. Unlike purely decorative projects, coasters serve an everyday purpose, making them a useful addition to any home. Each time you place a cup on your frog coaster, you will be reminded of the time and care that went into making it.
The project is also budget-friendly. Crochet coasters use very little yarn, making them perfect for using up leftover yarn from other projects. This allows you to practice and create without spending much on materials. It is a great way to turn small amounts of yarn into something functional and delightful.
Crocheting frog coasters can also bring people together. Whether you make them as gifts or teach others using the tutorial, the process encourages connection and sharing. Handmade items always carry special meaning because they reflect effort and creativity.
Finally, completing a project like this gives you a sense of accomplishment. Even if it is small, finishing a coaster proves that you can follow instructions, apply skills, and create something tangible. This confidence can inspire you to take on bigger and more complex crochet projects in the future.
1. Is the Crochet frog coaster- Step by Step Tutorial suitable for beginners?
Yes, it is a beginner-friendly project because it uses simple stitches like single crochet and basic shaping techniques.
2. What type of yarn should I use for frog coasters?
Cotton yarn is the best choice because it is durable, absorbs moisture, and lays flat.
3. Can I make the coaster larger or smaller?
Yes, simply adjust the number of rounds in the base circle to change the size of the coaster.
4. Do I need special tools to make the eyes?
No, you can crochet small circles, embroider them, or use safety eyes depending on your preference.
5. How long does it take to complete one frog coaster?
Most crocheters can finish one in a couple of hours, making it a quick and satisfying project.
6. Can children use the coasters safely?
Yes, but if you add safety eyes or small parts, make sure they are securely attached or choose embroidered features for safety.
7. How do I keep the coaster flat?
Use tight stitches with a smaller hook and block the coaster if needed to help it stay flat.
8. Can I sell coasters made from this tutorial?
Yes, handmade coasters are popular at craft fairs or as gifts, but always credit the original pattern if required.
In this article, we explored the Crochet frog coaster- Step by Step Tutorial, from gathering materials to creating the base, adding details, and customizing your project.
We also shared tips, variations, and benefits, along with a FAQ to answer common questions. This project is practical, fun, and perfect for crocheters of all levels.
Now it’s your turn to try it out. Follow the steps, add your personal touch, and enjoy the process of creating your own frog coaster. Once finished, don’t forget to share your opinion and suggestions, as your feedback can inspire others and make future tutorials even better.


