
Strawberry crochet hair tie pattern

Crochet flying goose tutorial is an inspiring and creative topic for crafters who enjoy combining traditional crochet skills with imaginative design. A Crochet flying goose tutorial allows makers to explore texture, shaping, and storytelling through yarn, transforming simple stitches into a charming flying goose motif. This type of project is ideal for those who want to create decorative pieces, appliqués, or themed handmade items with personality and meaning.
Learning through a Crochet flying goose tutorial also encourages patience and attention to detail. The flying goose shape often involves curves, wings, and layered elements that help crocheters understand how form is built step by step. Whether used for wall décor, baby items, seasonal crafts, or gifts, the flying goose design adds a sense of movement and warmth to crochet projects.
A Crochet flying goose tutorial fits well within beginner-to-intermediate skill levels, depending on the complexity of the pattern. It introduces foundational techniques while also offering opportunities for growth. This article will guide you through the essential concepts, materials, construction methods, and creative possibilities of a Crochet flying goose tutorial, following best practices for clarity, usefulness, and quality content.
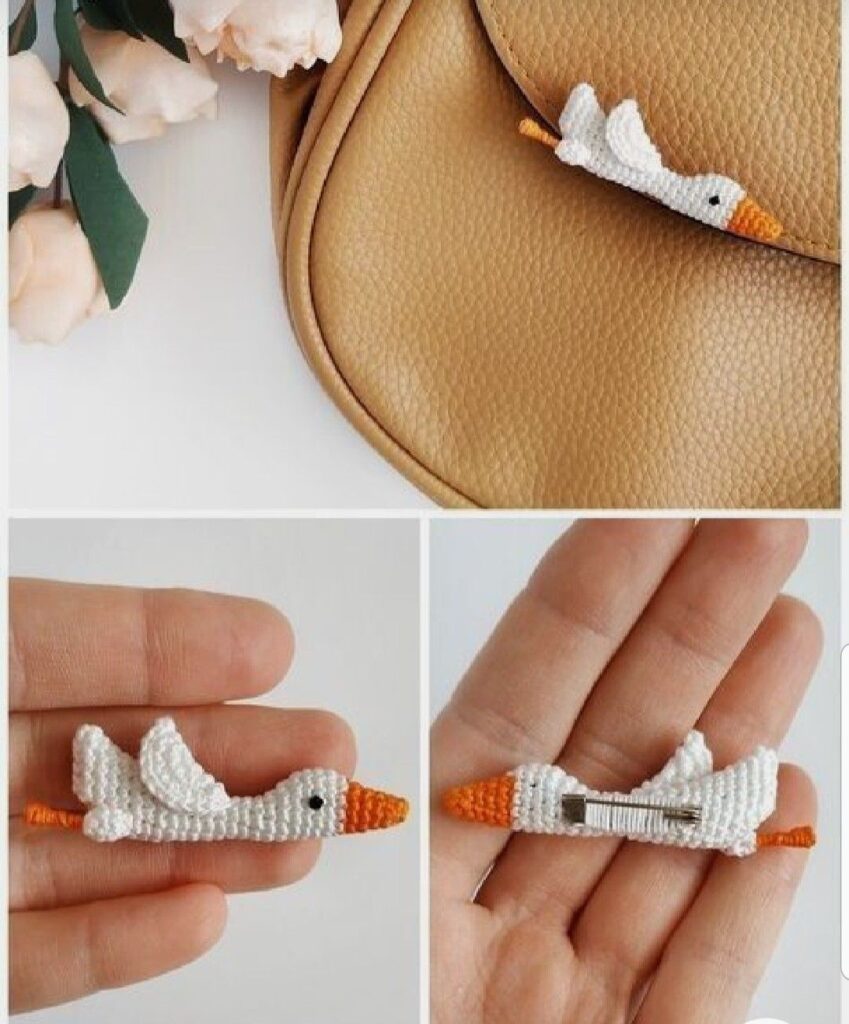
A Crochet flying goose tutorial focuses on creating a goose motif that appears to be in motion, usually with wings extended or angled upward. This sense of movement is achieved through careful shaping and stitch placement.
The inspiration for a Crochet flying goose tutorial often comes from nature, folklore, or classic quilt patterns adapted into crochet form. The flying goose symbolizes travel, freedom, and seasonal change, making it a meaningful design element.
In a Crochet flying goose tutorial, the body of the goose is typically worked first, forming the central structure that supports the wings and head. This helps maintain balance in the final piece.
Wings are a defining feature in a Crochet flying goose tutorial. They are usually created separately or shaped through increases and decreases to give a realistic flying appearance.
The head and beak are smaller details, but they add character. A Crochet flying goose tutorial explains how subtle stitch changes can define these features clearly.
Understanding the overall concept behind a Crochet flying goose tutorial helps crocheters visualize the finished piece and approach each step with confidence.
Choosing the right materials is essential for a successful Crochet flying goose tutorial. Yarn selection affects not only appearance but also stitch definition and durability.
Most Crochet flying goose tutorial projects recommend smooth yarns, such as cotton or acrylic, because they highlight stitch detail and maintain shape well.
Yarn weight plays an important role. A Crochet flying goose tutorial using lightweight yarn creates delicate decorations, while thicker yarn results in bold and cozy designs.
Hook size should be matched carefully to the yarn. In a Crochet flying goose tutorial, a slightly smaller hook often helps achieve tight stitches and clean edges.
Additional tools such as stitch markers, scissors, and yarn needles are useful. A Crochet flying goose tutorial benefits from organized preparation to avoid interruptions.
Preparing materials in advance ensures a smooth workflow when following a Crochet flying goose tutorial, especially for beginners learning multiple shaping techniques.
A Crochet flying goose tutorial usually begins with the main body, often worked in rows or rounds depending on the pattern style. This foundational step sets the scale of the project.
In many Crochet flying goose tutorial designs, increases are used early to shape the chest and torso. These increases help create a rounded and natural form.
Once the body is complete, the wings are addressed. A Crochet flying goose tutorial explains how to angle wings upward or outward using stitch placement and row shaping.
The head and neck are often smaller sections. A Crochet flying goose tutorial demonstrates how to taper stitches to achieve a smooth transition from body to head.
Assembly may be required. Some Crochet flying goose tutorial projects involve sewing separate pieces together for better definition and flexibility.
Finishing techniques such as edging or surface embroidery enhance the final look. A Crochet flying goose tutorial often includes tips for refining details and securing ends neatly.
One of the strengths of a Crochet flying goose tutorial is its versatility. The finished piece can be used in many creative ways, from decorations to accessories.
Color customization adds personality. A Crochet flying goose tutorial can be adapted using realistic tones or playful, imaginative color palettes.
Size adjustments are simple. By changing yarn weight and hook size, a Crochet flying goose tutorial can produce small appliqués or larger decorative items.
Texture variation is another option. While basic stitches are common in a Crochet flying goose tutorial, adding textured stitches can create feathers or layered effects.
Care instructions depend on materials. A Crochet flying goose tutorial made with washable yarns is easy to maintain and reuse.
With thoughtful customization, a Crochet flying goose tutorial becomes a foundation for endless creative exploration and unique handmade projects.
FAQ
What skill level is required for a Crochet flying goose tutorial
A Crochet flying goose tutorial is suitable for beginners with basic crochet skills and for intermediate crafters seeking new challenges.
What yarn works best for a Crochet flying goose tutorial
Smooth yarns like cotton or acrylic are ideal for a Crochet flying goose tutorial because they show stitch detail clearly.
How long does it take to complete a Crochet flying goose tutorial
Most Crochet flying goose tutorial projects can be completed in a few hours, depending on size and complexity.
Can I resize the project in a Crochet flying goose tutorial
Yes, a Crochet flying goose tutorial can be resized by adjusting yarn weight, hook size, and stitch counts.
Is a Crochet flying goose tutorial suitable for decorative projects
A Crochet flying goose tutorial is perfect for decorations, appliqués, gifts, and themed handmade items.
Can beginners follow a Crochet flying goose tutorial successfully
Yes, a well-written Crochet flying goose tutorial provides clear steps that beginners can follow with practice and patience.
Conclusion
This article explored the full concept of a Crochet flying goose tutorial, covering its inspiration, materials, step-by-step structure, and creative possibilities.
By understanding how each part of the flying goose is formed, crocheters can confidently create expressive and meaningful handmade pieces. A Crochet flying goose tutorial combines technique, creativity, and symbolism in a rewarding crochet experience.
We hope this guide has helped you better understand the process and inspired you to try your own project. Please leave your honest opinion and share your suggestions, as your feedback is valuable and helps improve future content.


