
Strawberry crochet hair tie pattern

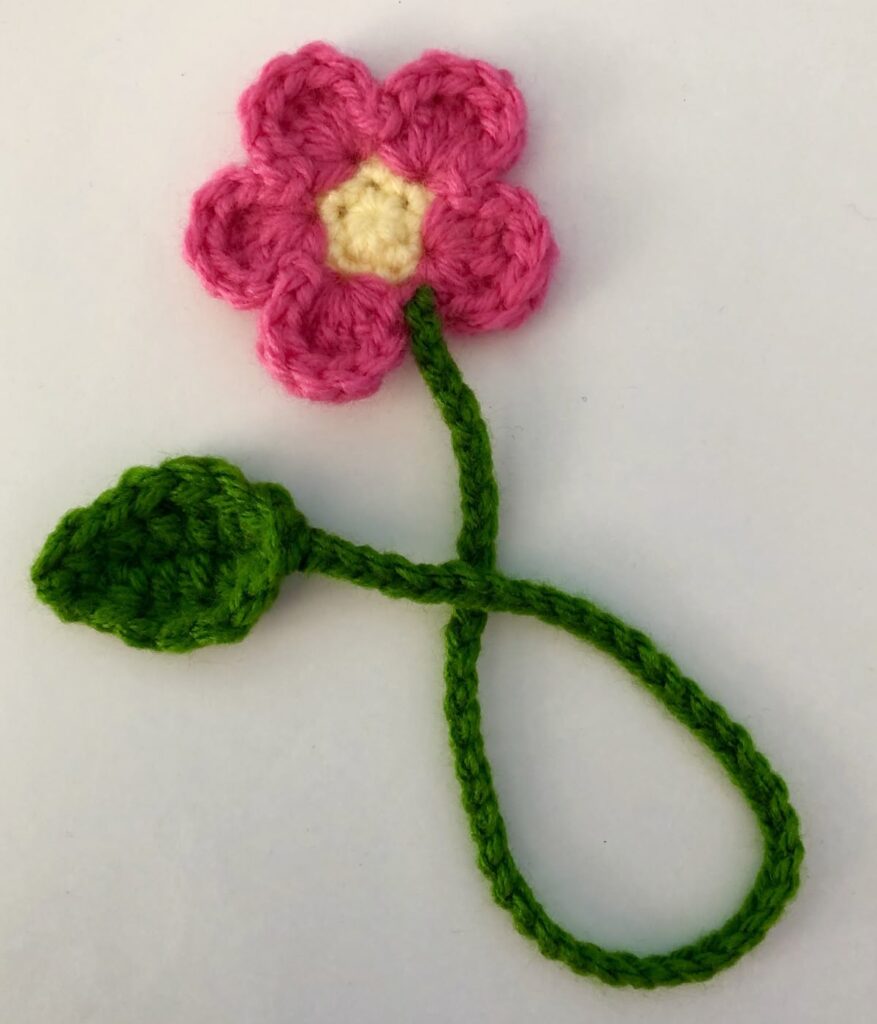
The crochet flower bookmark – Step by Step Tutorial is a charming and practical project that brings a touch of handmade beauty to your reading routine. Whether you’re an avid reader or looking for a thoughtful gift, creating a crochet flower bookmark is an enjoyable and rewarding craft. This tutorial will guide you through the entire process, from selecting materials to finishing your delicate flower bookmark, ensuring you can make your own with confidence. Throughout this article, you will learn not only how to crochet the flower but also how to personalize your bookmark with colors and embellishments, making it truly unique.
Bookmarks are small but meaningful items that help keep your place in your favorite books without damaging the pages. A crochet flower bookmark combines functionality with aesthetic appeal, offering a soft, flexible, and decorative solution that paper or plastic bookmarks cannot match. Using simple crochet techniques, you can create intricate floral patterns that brighten your reading experience and add a handmade touch to your collection.
Moreover, the crochet flower bookmark – Step by Step Tutorial is perfect for crafters at any skill level. Beginners will find this project accessible as it introduces fundamental crochet stitches, while experienced crocheters can enjoy the creative possibilities of customizing the flower design. By following this tutorial, you’ll not only end up with a beautiful bookmark but also strengthen your crochet skills.
To start your crochet flower bookmark – Step by Step Tutorial, gathering the right materials is essential. You’ll want a soft, lightweight yarn that is easy to work with and comfortable to handle. Cotton yarn is an excellent choice because it holds its shape well and feels smooth, ideal for delicate projects like bookmarks. Choose colors that inspire you — bright reds, soft pinks, or pastel shades work wonderfully for flower designs.
A crochet hook sized to match your yarn is important for creating neat and even stitches. Usually, a 3.5mm to 4mm hook suits lightweight cotton yarn. If you’re unsure, check the yarn label recommendations to pick the perfect hook size for your project.
Other useful tools include a yarn needle for weaving in loose ends and scissors to trim excess yarn. Having stitch markers can help keep track of rounds or pattern repeats if needed. Optionally, you may want to have a small piece of felt or a button to sew on the back of the flower for extra durability and a polished finish.
Organizing your materials before you begin helps the crafting process flow smoothly and keeps you focused on the joy of crocheting your flower bookmark.
Begin your crochet flower bookmark – Step by Step Tutorial by making a magic ring, which forms the center of your flower. This technique allows you to crochet tightly without gaps in the middle. Inside the magic ring, crochet a set number of stitches, usually double crochets or half double crochets, depending on your chosen pattern.
After completing the center, work the petals by crocheting groups of stitches in each stitch or space around the ring. This creates the rounded petal shapes that give the flower its signature look. Depending on the design, petals can be simple loops of chains or more textured clusters using puff or bobble stitches.
Pay close attention to your stitch count for each petal to maintain symmetry. If your petals differ in size, the flower might look uneven. Use stitch markers if necessary to mark the beginning of each petal for easier counting.
Once all petals are complete, fasten off the yarn and weave in the ends neatly on the back side of the flower to prevent unraveling. If desired, sew on a small felt circle or button to reinforce the back of the flower and give the bookmark stability.
Finally, create the stem or the base of your bookmark by crocheting a long chain or a narrow strip attached to the flower. This part will slide between the pages of your book, so keep it slim and flexible. The length can be adjusted depending on the size of the books you usually read.
To achieve the best results in your crochet flower bookmark – Step by Step Tutorial, maintain consistent tension throughout your work. Uneven tension can make petals curl or become misshapen, so practice maintaining an even pull on your yarn.
Experiment with different stitch types to add texture and dimension to your flower. Puff stitches, shells, and clusters can create fuller petals, while simple chains give a lighter, more delicate look.
Choose colors thoughtfully to complement each other. A solid color flower is elegant and simple, while mixing shades or using variegated yarn can add visual interest and uniqueness.
If you’re a beginner, try making a few practice flowers to get comfortable with the stitches before starting your final bookmark. This practice will help you understand how many stitches each petal needs and how the flower forms.
Blocking your finished flower bookmark can improve its shape. Lightly dampen it and pin it to the desired shape on a flat surface, then let it dry. This step helps the petals lay flat and look professionally finished.
Keep your crochet flower bookmark clean by hand washing gently if needed, especially if it is handled often. This care preserves the yarn’s softness and color vibrancy.
A crochet flower bookmark is not only a practical tool but also a beautiful handmade gift for book lovers, friends, or family. Personalize your flower by choosing the recipient’s favorite colors or adding embellishments like beads or buttons.
You can attach a small charm or tassel to the end of the bookmark for extra flair. This makes the bookmark easy to find in a bag or book and adds a lovely finishing touch.
Use multiple crochet flower bookmarks to organize different sections in larger books or planners. Their colorful presence makes reading more enjoyable and organized.
Besides bookmarks, these flowers can be adapted for other crafts. Sew several together to make brooches, hair clips, or appliques for clothing and accessories, extending your creative possibilities.
Packaging your crochet flower bookmark in a small gift box or tied with a ribbon enhances its appeal and makes it perfect for special occasions like birthdays, holidays, or book club gifts.
Sharing your handmade bookmarks with others not only spreads joy but also showcases your crochet skills and creativity.
Q: Is the crochet flower bookmark suitable for beginners?
A: Yes, the crochet flower bookmark – Step by Step Tutorial is designed to be beginner-friendly, focusing on simple stitches and clear instructions.
Q: What yarn is best for making a crochet flower bookmark?
A: Lightweight cotton yarn is ideal because it holds shape well and is soft to the touch.
Q: How do I keep my flower petals even?
A: Counting stitches carefully and using stitch markers helps maintain uniform petal size.
Q: Can I make the bookmark longer or shorter?
A: Absolutely! Adjust the length of the chain or strip forming the bookmark stem to fit your book size.
Q: How should I care for my crochet flower bookmark?
A: Hand wash gently and lay flat to dry to preserve shape and color.
Q: Can I add decorations to my crochet flower?
A: Yes, beads, buttons, and small charms can be sewn or attached for personalization.
The crochet flower bookmark – Step by Step Tutorial has shown you how to create a delicate and functional accessory that brightens your reading moments. From selecting materials to mastering petal stitches and customizing your bookmark, this project blends creativity with practicality.
Now equipped with these techniques, you can enjoy crafting beautiful bookmarks for yourself and loved ones. Your feedback and suggestions are welcome to help enhance future tutorials and share the joy of crochet with others. Happy crocheting!


