
Strawberry crochet hair tie pattern

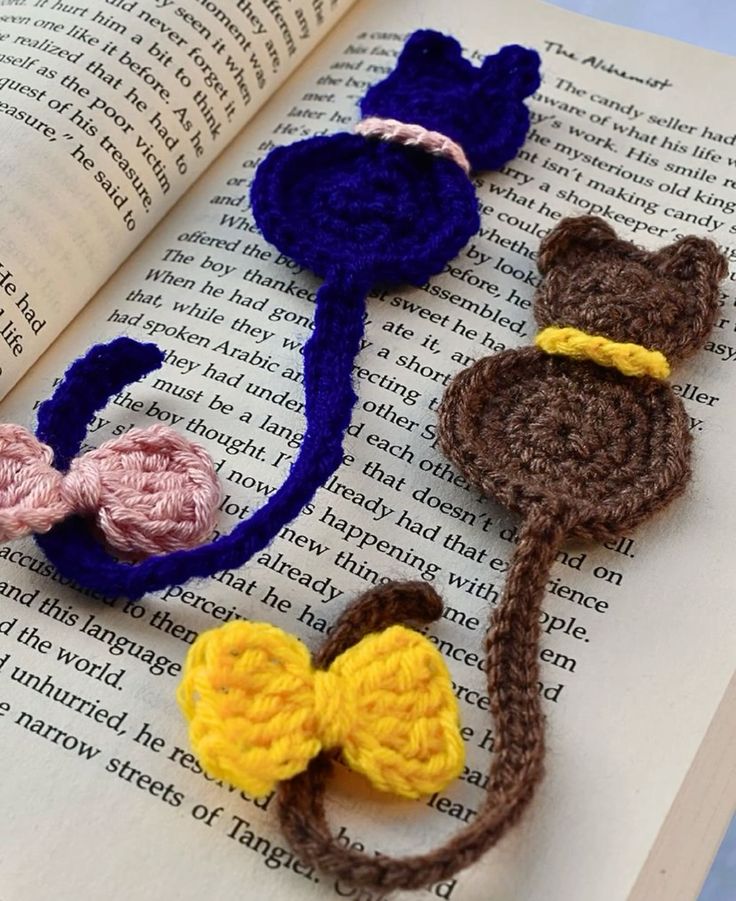
If you love crochet and are always looking for small yet meaningful projects, then the Crochet Cat Bookmark Tutorial – Step by Step Tutorial is the perfect guide for you. This project is not only practical but also a fun way to combine creativity with functionality. A crochet bookmark shaped like a cute cat makes reading more enjoyable and is a fantastic gift idea for book lovers. By following this tutorial, even beginners can create a personalized piece while learning essential crochet techniques.
The beauty of this project lies in its simplicity. With just a few stitches and some yarn, you can make something unique and useful. The Crochet Cat Bookmark Tutorial – Step by Step Tutorial gives you all the tools you need to create a bookmark that represents both your love for reading and your passion for crochet. Whether you make it for yourself or as a thoughtful handmade gift, it is a project that can be cherished.
Another great benefit of this tutorial is how customizable it is. You can choose any yarn color, from natural shades for a realistic look to bright and playful tones for a whimsical feel. The cat’s features, such as eyes, whiskers, and tail, can be personalized as well. In this article, we will walk through everything you need to know: materials, techniques, detailed steps, and tips to make your bookmark not only beautiful but also durable.
To begin with the Crochet Cat Bookmark Tutorial – Step by Step Tutorial, it is essential to gather all the right materials before starting. Having everything ready helps you work more smoothly and ensures your project comes together without interruptions. The good news is that this crochet bookmark does not require many supplies, making it affordable and accessible.
You will need yarn of your choice, and cotton yarn is often recommended since it provides durability and a clean finish. Choosing different yarn thicknesses can slightly change the appearance of your bookmark, so if you want a slim and delicate finish, opt for a lighter weight yarn. A crochet hook suitable for the yarn weight is also crucial. Be sure to check the yarn label to find the recommended hook size.
Scissors are another must-have, as you will need them to cut yarn neatly during and after finishing your project. In addition, a yarn needle will be useful for weaving in the ends and sewing on small details like the eyes or whiskers. Some crafters also like to add safety eyes or embroidery thread to make the cat’s face more expressive.
For beginners, it’s also a good idea to have a stitch marker. This helps you keep track of rounds or important points in your project, especially if you are not yet fully confident with counting stitches. Even though it’s optional, it makes the process smoother.
Finally, having a comfortable and well-lit workspace contributes a lot to the enjoyment of crocheting. Since the project is small, you don’t need much space, but good lighting helps ensure accuracy, especially when working with darker yarns.
With these materials in hand, you are ready to dive into the actual steps of creating your crochet cat bookmark. Having everything prepared ensures you can focus fully on the creative process and enjoy each stage of making your bookmark.
The Crochet Cat Bookmark Tutorial – Step by Step Tutorial provides an easy-to-follow structure for creating this charming accessory. The project typically begins with the cat’s head, followed by the body and the elongated part that functions as the actual bookmark. Each section is simple but rewarding to make.
Start with a magic ring to create the cat’s head. This circular beginning is very common in amigurumi projects and gives you a neat and tight base. By working single crochet stitches into the ring, you’ll gradually build a round shape. Increasing the stitches in each round will help the head grow evenly without looking lopsided.
Once the head is complete, you can move on to the body. The body is usually a simple strip of single crochet stitches, long enough to fit between the pages of a book. The length can be adjusted depending on your preference or the size of the books you usually read. This makes the project versatile and suitable for both pocket-sized books and larger volumes.
The next step is to add the cat’s ears and tail. The ears can be made by crocheting small triangles and sewing them onto the head. The tail can be either a long chain or a slim strip of stitches. Both details are easy but add personality and charm to your bookmark.
To finish, you’ll add facial details. You can use embroidery thread to stitch small eyes, a nose, and whiskers. Alternatively, you can use small safety eyes if you want a more professional look. Whichever method you choose, these features will give your cat character and make your bookmark truly unique.
After completing all the parts, assemble them together neatly. Weave in all loose ends with a yarn needle and make sure everything is securely attached. Your crochet cat bookmark is now ready to use or gift!
While the Crochet Cat Bookmark Tutorial – Step by Step Tutorial is straightforward, there are several tips that can make your project even more enjoyable and polished. First, always maintain consistent tension in your yarn. Uneven tension can lead to a lopsided head or an uneven body. Practicing a few rows on scrap yarn can help you get comfortable before starting.
Choosing the right yarn color can also enhance the final result. If you want a realistic look, choose neutral tones like gray, brown, or black. For a playful version, opt for pastel or bright colors. Mixing yarn textures, like adding fluffy yarn for the tail, can also add a fun twist.
Another tip is to block your bookmark once it is finished. Blocking is the process of gently wetting and shaping your crochet piece so that it lies flat and looks neat. This step makes a big difference, especially since bookmarks should fit neatly inside books.
When making the face, try sketching it out first on paper or with removable stitch markers on the yarn. This allows you to experiment with placement before committing with stitches. A well-placed face adds charm and gives your cat a more expressive look.
If you plan to give your bookmark as a gift, consider adding a small ribbon or attaching it to a handmade card. These little extras make your handmade present even more special. Personal touches like these are what make crochet gifts so memorable.
Lastly, don’t rush. Crocheting is meant to be relaxing, and taking your time will help you enjoy the process more. Even though the bookmark is a small project, treating it as a mini work of art will ensure you create something you’re proud of.
There are many reasons why the Crochet Cat Bookmark Tutorial – Step by Step Tutorial is a great project for crafters of all levels. One of the biggest advantages is that it is a quick project. Unlike large blankets or garments, this bookmark can be completed in just a few hours, giving you a sense of accomplishment in less time.
It is also beginner-friendly. The stitches involved are usually simple ones, such as chain stitches, single crochet, and slip stitches. This makes it a great way for new crocheters to practice their skills while still creating something functional and pretty.
Another benefit is that bookmarks are lightweight and portable. You can easily carry your yarn and hook in a small bag and work on your bookmark while traveling, waiting at an appointment, or relaxing at home. Its compact size makes it a perfect on-the-go project.
The bookmark is also a thoughtful gift idea. Handmade items always carry a personal touch, and a crochet cat bookmark is both practical and adorable. It’s suitable for all ages, from children who love animals to adults who appreciate handmade crafts.
Moreover, this project is eco-friendly. By using yarn scraps left over from other projects, you can reduce waste and still create something beautiful. This makes it a sustainable crafting choice while also saving money.
Lastly, making crochet cat bookmarks can even be turned into a small business idea. Many people love purchasing handmade bookmarks, especially those with unique designs like cats. Selling them online or at craft fairs could be a fun way to share your talent.
Q1: Can beginners follow the Crochet Cat Bookmark Tutorial – Step by Step Tutorial?
Yes! This tutorial is beginner-friendly and uses simple stitches, making it a great starting project.
Q2: What type of yarn is best for crochet bookmarks?
Cotton yarn is usually the best choice since it holds its shape well and is less stretchy compared to acrylic yarn.
Q3: How long does it take to make a crochet cat bookmark?
On average, it takes 2–3 hours, depending on your skill level and the details you want to add.
Q4: Can I customize the size of my bookmark?
Absolutely! You can make the body longer or shorter depending on the size of the books you usually read.
Q5: What if I don’t have safety eyes for the cat’s face?
You can easily embroider eyes and a nose with embroidery thread. This option is also safer for children.
Q6: Is blocking necessary for this project?
While not mandatory, blocking helps your bookmark look neat and ensures it lays flat in books.
In this article, we explored the Crochet Cat Bookmark Tutorial – Step by Step Tutorial, from materials and instructions to helpful tips and reasons why this project is so rewarding.
We also answered some common questions to help you feel more confident before starting. This small project is practical, adorable, and suitable for all skill levels.
Now that you’ve learned how to create your very own crochet cat bookmark, I’d love to hear from you. Share your honest opinion and leave suggestions in the comments—your feedback is always appreciated and helps improve future tutorials. Happy crocheting!


