
Strawberry crochet hair tie pattern

The Crochet bow with cord 🎀 – Step by Step Tutorial is a delightful and creative project that combines style and functionality. Handmade accessories are more than just decorations; they express personality, bring uniqueness to everyday items, and make wonderful gifts for friends and loved ones. Creating a crochet bow with a cord allows you to explore your creativity while also learning useful stitches and techniques that can be applied to other crochet projects. This makes it perfect for beginners who want to practice and for experienced crafters who want something quick, cute, and versatile.
When we think of a crochet bow, we often imagine a small, delicate piece of art that can be added to hair ties, bags, keychains, or even clothing. The addition of a cord makes it even more practical, as you can easily tie it to any accessory or use it as a functional decoration. With this Crochet bow with cord 🎀 – Step by Step Tutorial, you will not only learn how to create the bow but also how to attach the cord properly, giving you a durable and charming handmade item.
The popularity of crochet accessories continues to grow, especially with the trend of personalizing fashion and home décor. Small, easy-to-make projects like this one provide crafters with a sense of accomplishment and a chance to practice key crochet skills. This tutorial will guide you through each stage, from choosing materials to finishing touches, making sure you can confidently create your very own crochet bow with cord 🎀 that you can use or gift proudly.
Before starting any crochet project, preparation is key. For this Crochet bow with cord 🎀 – Step by Step Tutorial, you will need some basic materials such as yarn, a crochet hook, scissors, and a yarn needle. A medium-weight cotton yarn is often recommended because it provides good structure for the bow while still being soft and flexible. Choosing the right yarn color can also make a big difference; pastel shades give a delicate look, while bright or contrasting colors make your bow stand out.
Another important element is the crochet hook size. The hook should match the thickness of your yarn to ensure a balanced stitch. If the hook is too large, the bow will be too loose and floppy. On the other hand, a hook that is too small may make the stitches too tight, making it difficult to shape the bow. Always check the yarn label for the recommended hook size, but feel free to adjust based on the look you want to achieve.
The cord can be made with the same yarn as the bow or a different one for contrast. Some people prefer making a crocheted cord, while others use a ribbon or leather string. For beginners, a simple crocheted chain cord is usually the easiest option. Remember that preparation is not just about gathering materials but also ensuring you are comfortable, have good lighting, and are ready to focus on your craft.
A good tip is to practice the stitches you will use before starting the project. The bow usually requires basic stitches such as chain, single crochet, and double crochet. If you are new to crochet, practicing these will help you feel more confident when working on the bow itself. You might also want to prepare a stitch marker if you find it hard to keep track of your starting points.
Taking time to prepare properly will make your crocheting smoother and more enjoyable. With your materials ready, you are set to start this Crochet bow with cord 🎀 – Step by Step Tutorial and create a charming accessory that you will treasure.
The first step in making your crochet bow is to create a simple rectangle. This rectangle will later be folded and shaped into the bow. To start, make a slip knot and chain a base of about 15 to 20 stitches, depending on how big you want your bow to be. Then, work several rows of single crochet until the rectangle has a nice proportion, usually about twice as wide as it is tall. This simple shape forms the foundation of your bow.
Once you have the rectangle, it is time to shape it into a bow. To do this, pinch the middle of the rectangle together with your fingers. You will see the two sides naturally flare out, forming the bow shape. Take a piece of yarn and wrap it several times around the center to secure it. This wrapping is what creates the classic bow appearance, and you can adjust how tightly you wrap it depending on how structured you want your bow to look.
Next comes the cord. For a beginner-friendly option, create a long chain with the same yarn you used for the bow. This chain can be as long or short as you need, depending on where you want to attach the bow. If you prefer, you can make the cord thicker by working a slip stitch into each chain. This strengthens the cord and gives it a more finished appearance.
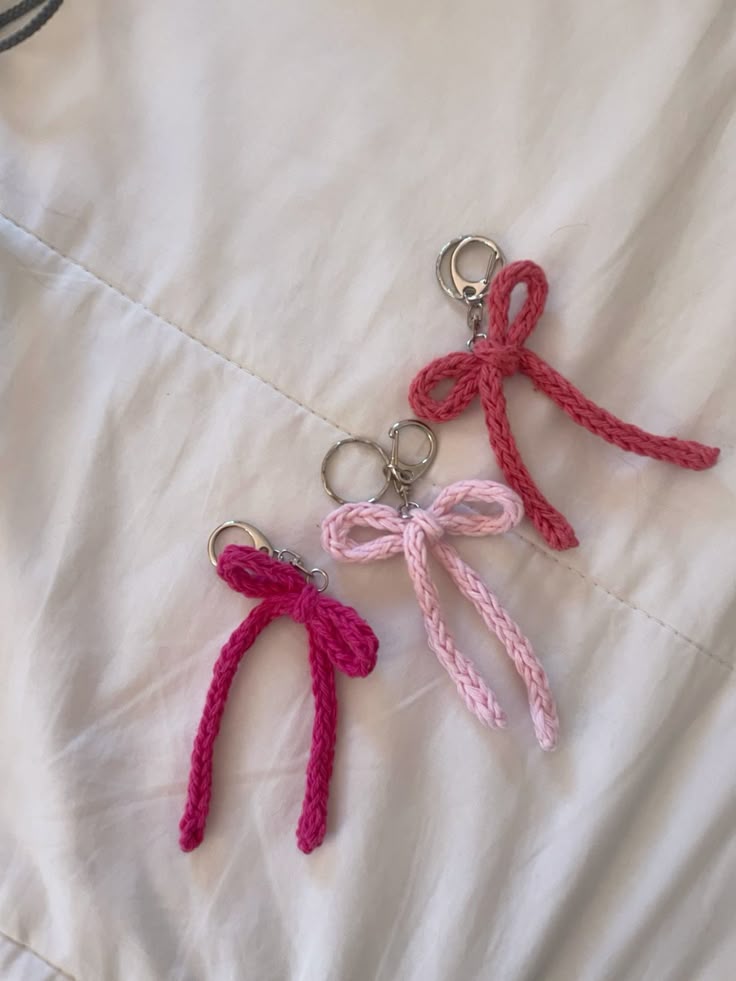
Once the cord is ready, attach it to the bow by threading it through the center wrapping or sewing it securely at the back. If you want the bow to be adjustable, leave the cord long so you can tie it easily. This makes it versatile, as you can use it to decorate hair, bags, or even tie around gifts for a handmade touch.
After securing the cord, you should weave in any loose ends using a yarn needle. This step is important for a neat finish and also prevents the bow from unraveling over time. Taking a few extra minutes to tidy up your work will make your finished bow look polished and professional.
Finally, fluff up your bow and adjust the loops to make sure they look symmetrical. At this point, your Crochet bow with cord 🎀 – Step by Step Tutorial is complete, and you have a lovely handmade accessory that you can use in many different ways.
One of the best things about this project is its versatility. A crochet bow with cord 🎀 can be used in countless ways to add a handmade touch to everyday items. For example, you can tie it around a ponytail holder for an adorable hair accessory. The softness of the yarn makes it comfortable to wear, while the bow adds a stylish detail.
You can also use it as a bag accessory. Simply tie the cord around the handle of your handbag or backpack to instantly give it a personalized charm. Because you can make bows in different colors and sizes, you can switch them out depending on your outfit or mood. This makes it both fashionable and practical.
Another creative use is to add it as a gift decoration. Instead of a regular ribbon, tie your handmade bow around a wrapped present. This makes the gift even more special because it includes something crafted with care. The recipient can also reuse the bow later, giving your crochet work an extra purpose.
The crochet bow with cord can also be used in home décor. For example, you could tie small bows onto curtain tiebacks, jars, or even napkin rings for festive occasions. The handmade look adds warmth and personality to your space.
Additionally, you can turn the bow into a keychain by attaching it to a metal ring. This transforms your bow into a functional accessory that you can carry everywhere. It’s a simple yet stylish way to keep your keys organized and add a touch of creativity to your daily life.
With so many possible uses, the Crochet bow with cord 🎀 – Step by Step Tutorial is not just about making one bow but about opening a world of creative possibilities.
While the project is simple, there are always little tips that can make your work easier and neater. One important tip is to keep your tension consistent. Uneven tension can cause the bow to look lopsided or too loose. Practicing a few swatches before making the bow can help you improve consistency.
Choosing the right yarn is another crucial factor. While cotton yarn works beautifully, you can also experiment with other types. Acrylic yarns give more stretch, while wool adds warmth and texture. Each type of yarn will give your bow a slightly different look and feel, so don’t hesitate to experiment.
When making the cord, consider doubling up the yarn or making a thicker stitch if you want more durability. This is especially useful if you plan to use the bow as a keychain or bag charm, where it will face more wear and tear.
Another trick is to block your bow after finishing it. Blocking helps the bow hold its shape better and look more professional. To do this, dampen your bow slightly, shape it as desired, and let it dry flat. This small step can make a big difference in the final result.
If you want your bow to stand out even more, try adding embellishments. A small button, bead, or pearl sewn into the center can elevate the design. Just make sure any decoration is securely attached, especially if the bow will be used by children.
Finally, always take care when finishing your work. Weaving in ends neatly and trimming excess yarn carefully are simple steps, but they give your bow a polished and professional appearance. These details ensure your Crochet bow with cord 🎀 will be something you’re proud to display and share.
1. Is the crochet bow with cord 🎀 suitable for beginners?
Yes, this project is perfect for beginners. It uses simple stitches like chains and single crochets, making it a great starting point for learning crochet.
2. How long does it take to make a crochet bow with cord?
On average, it takes about 30 to 45 minutes to complete one bow, depending on your skill level and the size of the bow you want to make.
3. Can I use different yarns for this project?
Absolutely. While cotton yarn is recommended, you can use acrylic, wool, or even novelty yarns for unique textures and effects.
4. How can I make my bow sturdier?
You can double the yarn, use a smaller hook for tighter stitches, or block the bow after finishing to give it more structure.
5. What are some creative ways to use a crochet bow with cord 🎀?
You can use it as a hair accessory, bag charm, gift decoration, keychain, or home décor item. Its versatility makes it suitable for many purposes.
6. Do I need special tools to make the cord?
No, you can simply crochet a long chain with the same yarn. However, you can also experiment with ribbons or other materials if you prefer.
In this article, we explored the Crochet bow with cord 🎀 – Step by Step Tutorial, covering everything from materials and preparation to step-by-step instructions, creative uses, and helpful tips.
This project is simple, quick, and highly versatile, making it ideal for both beginners and experienced crocheters.
By following these steps, you can create a charming accessory that can be worn, gifted, or used to decorate your home. Now it’s your turn to try making one and see how fun and rewarding it can be. If you enjoyed this tutorial, please leave your honest opinion and share your suggestions for future projects. Your feedback is always welcome and helps improve future crochet guides.


