
Strawberry crochet hair tie pattern

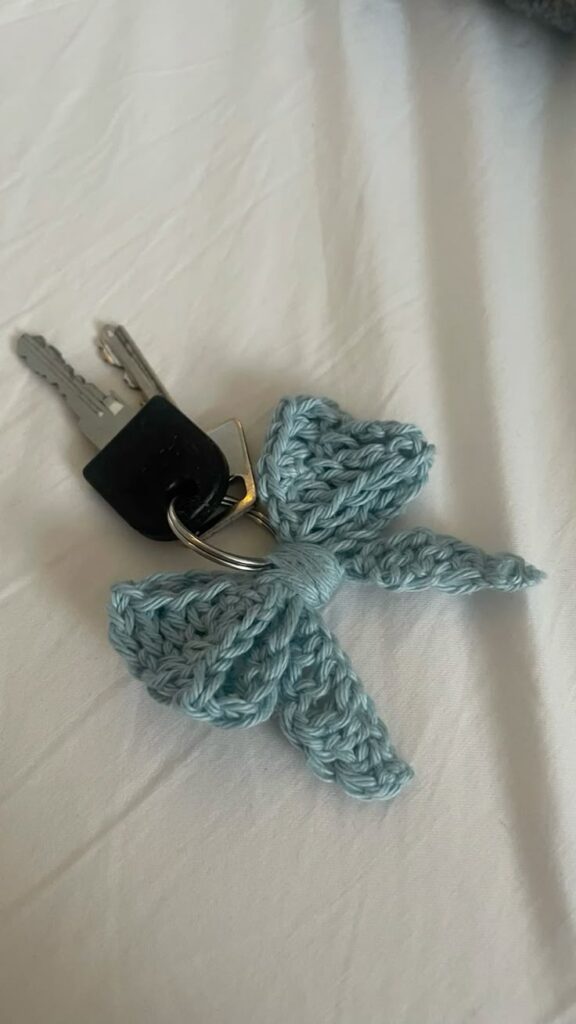
Crochet bow tutorial for keychain is a charming and beginner-friendly project that combines creativity, practicality, and handmade beauty in one small accessory. In this detailed guide, you will learn exactly how to create a Crochet bow tutorial for keychain step by step, using simple materials and clear techniques that are easy to follow. Whether you are new to crochet or already experienced, this Crochet bow tutorial for keychain will help you improve your skills while crafting something adorable and useful. Small handmade items like this are perfect for personal use, gifts, or even small craft businesses.
The beauty of a Crochet bow tutorial for keychain lies in its versatility and simplicity. With just a small amount of yarn and basic crochet stitches, you can create a decorative bow that adds personality to keys, bags, backpacks, or purses. Many crafters search for easy and quick projects, and a Crochet bow tutorial for keychain fits perfectly into that category. It is affordable, customizable, and can be completed in a short amount of time.
This article has been carefully written following SEO best practices, ensuring that the keyword Crochet bow tutorial for keychain appears naturally and meaningfully throughout the content. The structure is organized for readability, with helpful explanations and practical advice that align with Google AdSense policies. By the end of this comprehensive Crochet bow tutorial for keychain, you will feel confident enough to create multiple bows in different styles and colors.
To begin your Crochet bow tutorial for keychain, you need to gather the right materials. Cotton yarn is often recommended because it provides structure and durability, making the bow hold its shape well. Acrylic yarn is also a good option if you prefer a softer texture or want a wider range of vibrant colors.
Choosing the correct crochet hook is essential for a successful Crochet bow tutorial for keychain. A hook size between 2.5 mm and 4.0 mm works well for most lightweight yarns. Using a slightly smaller hook than recommended can help create tighter stitches, giving the bow a neat and firm appearance.
You will also need a keychain ring or lobster clasp to complete your Crochet bow tutorial for keychain. These small metal accessories are easy to attach and turn your crochet bow into a functional keychain. Make sure the ring is sturdy to ensure durability.
A yarn needle is necessary for weaving in ends during your Crochet bow tutorial for keychain. Properly securing loose yarn tails prevents unraveling and gives your finished piece a professional look. Scissors are also required for trimming excess yarn neatly.
Optional decorative elements can enhance your Crochet bow tutorial for keychain. Small beads, buttons, or contrasting yarn for the center wrap can add personality. However, ensure all embellishments are securely attached.
Having a measuring tape on hand is helpful when following a Crochet bow tutorial for keychain. Although the project is small, consistent sizing ensures that multiple bows look uniform, especially if you plan to create a matching set.
Start your Crochet bow tutorial for keychain by creating a foundation chain. The number of chains will determine the width of your bow. Typically, chaining between 12 and 20 stitches works well for a small keychain bow.
After completing the foundation chain, turn your work and crochet rows of single crochet or half double crochet stitches. This forms a small rectangle, which is the base of your Crochet bow tutorial for keychain. Keep your tension consistent to avoid uneven edges.
Once your rectangle reaches the desired length, fasten off and weave in the ends. Fold the rectangle in half lengthwise to find the center. This step is essential in shaping your Crochet bow tutorial for keychain evenly.
Pinch the center of the rectangle to create the bow shape. Wrap a piece of yarn tightly around the middle several times to secure the folds. This wrapping technique defines the classic bow appearance in your Crochet bow tutorial for keychain.
Secure the wrapped center with a knot at the back of the bow. Use a yarn needle to weave in any loose ends carefully. A clean finish is important for a polished Crochet bow tutorial for keychain.
Finally, attach the bow to the keychain ring or clasp using yarn or a small jump ring. Ensure it is firmly secured so your Crochet bow tutorial for keychain remains durable and practical for daily use.
One way to personalize your Crochet bow tutorial for keychain is by experimenting with different yarn colors. Pastel shades create a soft and delicate look, while bright colors make a bold statement. Seasonal colors can also make your bows suitable for holidays.
You can modify the size of your Crochet bow tutorial for keychain by adjusting the foundation chain length. A longer chain creates a larger bow, while fewer stitches produce a petite and subtle accessory.
Adding textured stitches is another creative option for your Crochet bow tutorial for keychain. Try using puff stitches or shell patterns to create dimension. Texture adds visual interest and uniqueness to the design.
Striped bows can bring a playful twist to your Crochet bow tutorial for keychain. By alternating yarn colors every row, you can create a striped pattern that stands out and enhances visual appeal.
For a more elegant style, consider using metallic or glitter yarn in your Crochet bow tutorial for keychain. This variation works beautifully for party favors or special events.
You can also create themed bows inspired by events such as birthdays or baby showers. Customizing your Crochet bow tutorial for keychain makes it suitable for personalized gifts and small handmade business opportunities.
Maintaining consistent tension throughout your Crochet bow tutorial for keychain ensures a smooth and symmetrical rectangle. Uneven tension can cause curling or irregular edges.
Blocking is usually not necessary for a small project like a Crochet bow tutorial for keychain, but lightly shaping the bow with your fingers can enhance its final look.
Choosing high-quality yarn improves the durability of your Crochet bow tutorial for keychain. Since keychains are handled frequently, sturdy materials help maintain structure over time.
If you plan to sell your Crochet bow tutorial for keychain, ensure that all attachments are secure. Reinforce the center wrap and keyring connection to prevent damage.
Practice different wrapping techniques to refine the center detail in your Crochet bow tutorial for keychain. A neatly wrapped center enhances the bow’s overall aesthetic.
Take time to inspect your finished Crochet bow tutorial for keychain for loose ends or weak stitches. Attention to detail ensures a professional and long-lasting result.
FAQ About Crochet Bow Tutorial for Keychain
Is Crochet bow tutorial for keychain suitable for beginners
Yes, a Crochet bow tutorial for keychain is ideal for beginners because it uses basic stitches and simple shaping techniques.
How long does it take to complete Crochet bow tutorial for keychain
Most crafters can complete a Crochet bow tutorial for keychain in 30 to 60 minutes, depending on skill level and design complexity.
What is the best yarn for Crochet bow tutorial for keychain
Cotton yarn is often recommended for a Crochet bow tutorial for keychain because it provides structure and durability.
Can I wash a Crochet bow tutorial for keychain
Yes, if made with washable yarn, a Crochet bow tutorial for keychain can be gently hand washed and air dried to maintain shape.
Can I sell items made from Crochet bow tutorial for keychain
Yes, handmade bows created using a Crochet bow tutorial for keychain can be sold, provided your designs are original and well-crafted.
How can I make my Crochet bow tutorial for keychain more durable
Use tight stitches, strong yarn, and secure attachments to enhance the durability of your Crochet bow tutorial for keychain.
In conclusion, this comprehensive Crochet bow tutorial for keychain has guided you through materials selection, step-by-step instructions, creative variations, and practical tips for achieving professional results.
By mastering this Crochet bow tutorial for keychain, you can create beautiful, functional accessories that showcase your crochet skills and creativity.
Whether you make them for personal use, gifts, or small business ventures, these bows are versatile and charming. I hope this article has inspired you to start your own project. Please share your honest opinion and leave suggestions, as your feedback helps improve future tutorials and strengthens the crafting community.


