
Strawberry crochet hair tie pattern

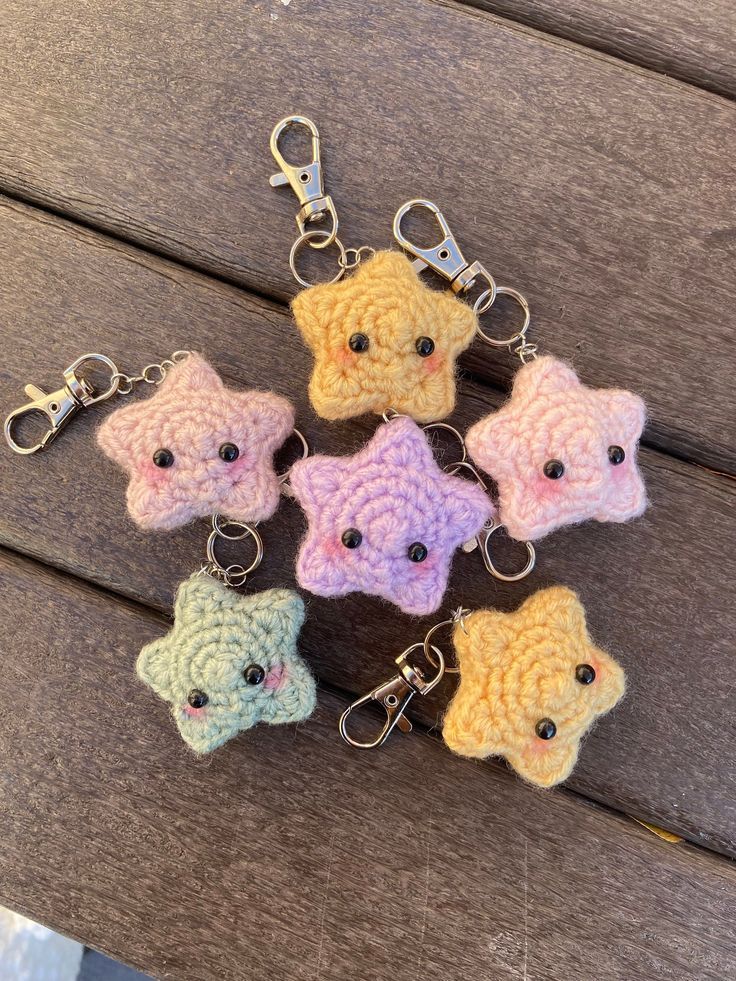
Amigurumi Star – A quick, simple, and charming project.-Step by Step Tutorial is one of the most delightful patterns for beginners and experienced crafters who want to create something cute, meaningful, and easy to complete. This project is versatile and works wonderfully as a decoration, a keychain, a gift topper, or a thoughtful handmade present. By following this Amigurumi Star – A quick, simple, and charming project.-Step by Step Tutorial, you will learn the essential stitches and shaping techniques that make amigurumi so exciting and rewarding. With only a few materials and a bit of patience, you can bring your own adorable crocheted star to life.
The beauty of this Amigurumi Star – A quick, simple, and charming project.-Step by Step Tutorial is that it is genuinely accessible to anyone. Even if you are new to amigurumi, this guide is designed to help you understand each step in a clear, structured, and enjoyable way. Creating a small, charming star helps build confidence while teaching you how to work in the round, increase, decrease, and assemble pieces neatly. Because the star is small and completed quickly, it makes the perfect project for moments when you want to crochet something beautiful without committing to a long-term task.
Another great aspect of this Amigurumi Star – A quick, simple, and charming project.-Step by Step Tutorial is its flexibility. You can use any color you like—from classic yellow to pastels or bold shades. You can make it solid or decorate it with embroidery, beads, or faces to give it personality. Whether you want a cheerful star to hang on your Christmas tree, a soft toy for a child, or a cute accessory for your bag, this pattern adapts effortlessly. The joy of amigurumi lies in the freedom to express yourself creatively, and this small star is the perfect canvas for that.
To begin your Amigurumi Star – A quick, simple, and charming project.-Step by Step Tutorial, selecting the right materials will ensure your final piece is soft, well-shaped, and durable. You will need yarn in your preferred color, a crochet hook that matches the yarn weight, stuffing material, scissors, and a tapestry needle. Cotton yarn is recommended for clean stitch definition, but acrylic yarn works beautifully as well.
The hook size is important because amigurumi pieces require tight stitches to prevent stuffing from showing through. A smaller hook than typically recommended for the yarn helps achieve this effect. This detail greatly influences the overall look and firmness of your star, so choosing the correct hook increases the quality of your work.
Stuffing material is another key element. Soft polyester fiberfill is commonly used because it allows you to shape the star evenly and gives it a plush, consistent appearance. Make sure to use enough stuffing to help the star hold its shape but avoid overfilling, which can distort the structure.
You may also want to prepare safety eyes or embroidery thread if you wish to add a face to your amigurumi star. These small details give your star charm and personality, making it even more delightful as a decoration or gift. Simple embellishments can turn a basic star into an adorable handmade character.
Keeping your tools organized will help ensure a smooth crafting process. Having everything ready before starting avoids interruptions and keeps your focus on the tutorial. A tidy workspace creates a calm environment that enhances creativity and productivity.
Once your materials are gathered, you are fully prepared to begin creating your star. Following the Amigurumi Star – A quick, simple, and charming project.-Step by Step Tutorial will guide you through every detail, ensuring your project is enjoyable from start to finish.
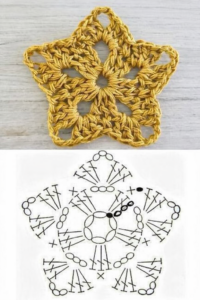
The first step in the Amigurumi Star – A quick, simple, and charming project.-Step by Step Tutorial is to start crocheting a magic ring, the foundation of most amigurumi designs. This technique allows you to close the center tightly, preventing any gaps. After forming the ring, you will begin adding stitches in a circular pattern to shape the star’s first side.
As you continue, you will incorporate increases to help the star expand outward. These increases determine the star’s size and structure, so following the stitch count carefully is important. Maintaining even tension ensures cleaner edges and a smooth surface, contributing to a more polished finish.
Once the circle reaches the desired size, you will start forming the first point of the star. This is done by working a short row of stitches that gradually decrease to create a pointed shape. Each point adds charm and dimension to your amigurumi star, giving it the classic five-point silhouette.
After completing a point, you return to the circular base and begin the next. Repeating this process ensures all five points are consistent in shape and length. Consistency is important for achieving a balanced and symmetrical design, making your star more visually appealing.
When all points are completed, you will move on to crocheting the second side of the star. This side mirrors the first side, following the same steps to ensure a perfect match. Once both sides are ready, you can join them together using slip stitches or single crochet, depending on your preference.
Before completely closing the star, remember to add stuffing. Filling the star gradually helps you control the shape and avoid bulges. Once sealed, your Amigurumi Star – A quick, simple, and charming project.-Step by Step Tutorial project will look full, soft, and ready for final touches.
One helpful tip to improve your Amigurumi Star – A quick, simple, and charming project.-Step by Step Tutorial is to keep your yarn tension steady. Tight stitches give shape and definition, while loose stitches may cause gaps. Practicing tension control is one of the most important skills in amigurumi.
Another useful tip is to use stitch markers. Since amigurumi is often worked in continuous rounds, it can be easy to lose track of where the round begins. A stitch marker helps you maintain accuracy and prevents mistakes that affect the shape of your star.
To keep your star symmetrical, count your stitches frequently. Even a small counting error can cause one point to look longer or shorter. Taking a moment to check your work helps maintain the professional appearance of your finished piece.
Stuffing the star evenly is also essential. Adding small amounts of stuffing gradually prevents lumps and helps you shape the star more accurately. Proper stuffing also enhances durability, ensuring your star keeps its form over time.
If you want to give your star more personality, consider adding embroidered features such as eyes, cheeks, or a smile. These small details add warmth and charm, giving your star a unique expression. Many crafters enjoy customizing each star to reflect different moods or themes.
Finally, consider blocking your star lightly if the edges curl. Gently shaping it can help the points look sharper and more defined. This optional step adds a clean, polished finish to your Amigurumi Star – A quick, simple, and charming project.-Step by Step Tutorial creation.
One of the wonderful features of an Amigurumi Star – A quick, simple, and charming project.-Step by Step Tutorial is its versatility. These stars can be used as adorable home decorations, bringing warmth and charm to bedrooms, living rooms, or holiday displays. Hanging a few stars on a string creates a beautiful garland.
Amigurumi stars also make thoughtful gifts. Handmade items hold sentimental value, and a small star can be a meaningful token for birthdays, celebrations, or holidays. Adding embroidered initials makes them even more personal and special.
For those who enjoy seasonal crafts, these stars can be used for Christmas ornaments or festive decor. Their soft texture and cheerful shape fit perfectly with winter themes. You can create multiple stars in different colors for a fun and joyful display.
Another creative use is attaching a keychain ring to transform your star into a keychain or bag accessory. Many people love having a small handmade charm on their backpack, purse, or keys. It adds a unique and personal touch to everyday items.
These stars also make great craft fair or market items. They are quick to produce, highly appealing, and can be crafted in various colors to attract different tastes. Their simple yet beautiful design makes them popular handmade products.
Lastly, you can incorporate amigurumi stars into children’s toys or baby mobiles. Their soft texture makes them safe, and their charming shape stimulates visual interest. This makes your Amigurumi Star – A quick, simple, and charming project.-Step by Step Tutorial creation even more meaningful.
1. Is the amigurumi star suitable for beginners?
Yes, this project is ideal for beginners because it uses basic stitches and simple shaping techniques. The tutorial guides you step by step.
2. What yarn works best for the star?
Cotton yarn is recommended for good stitch definition, but acrylic yarn also works well and produces soft results.
3. How long does it take to finish the star?
It usually takes one to two hours, depending on your crochet speed and experience.
4. Can I make the star in different sizes?
Absolutely. Adjusting hook size, yarn thickness, or increasing the stitch count allows you to create stars of any size.
5. Is stuffing necessary?
Yes, stuffing helps the star hold its shape, giving it a full and plush appearance.
This Amigurumi Star – A quick, simple, and charming project.-Step by Step Tutorial has guided you through everything you need to know to create a soft, adorable, and versatile star.
From materials and step-by-step instructions to helpful tips and creative uses, this article has covered the essential techniques for crafting your own amigurumi star.
I hope this tutorial inspires your creativity and encourages you to explore more handmade projects. Please leave your sincere opinion and suggestions—I would love to know what you thought of this guide and how your star turned out!


