
Strawberry crochet hair tie pattern

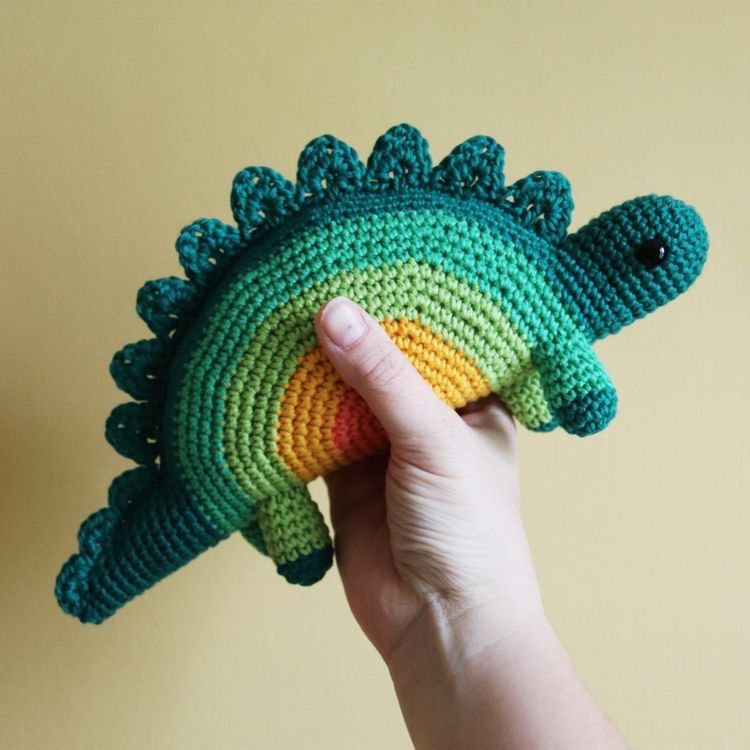
Amigurumi Dinosaur Pencil Case Tutorial is a creative and engaging project that combines the charm of amigurumi with the functionality of a handmade pencil case. When you start an Amigurumi Dinosaur Pencil Case Tutorial, you are not only learning crochet techniques but also creating a playful and practical item that can be used daily. This type of project is perfect for crafters who enjoy making cute, character-based designs while also producing something useful and durable.
One of the most appealing aspects of an Amigurumi Dinosaur Pencil Case Tutorial is its ability to blend creativity with skill development. As you follow the steps of an Amigurumi Dinosaur Pencil Case Tutorial, you will learn how to shape yarn into a recognizable dinosaur form while ensuring the structure is sturdy enough to function as a storage case. This balance between aesthetics and practicality makes the Amigurumi Dinosaur Pencil Case Tutorial an ideal project for both beginners and more experienced crocheters.
Another reason why the Amigurumi Dinosaur Pencil Case Tutorial has gained popularity is its versatility and personalization potential. You can easily customize colors, facial expressions, and details to make your dinosaur unique. Whether you are making it for yourself, a child, or as a thoughtful gift, the Amigurumi Dinosaur Pencil Case Tutorial offers endless possibilities to express your creativity while improving your crochet skills.
The first step in any Amigurumi Dinosaur Pencil Case Tutorial is gathering the necessary materials to ensure a smooth crafting process.
Yarn is the main component of an Amigurumi Dinosaur Pencil Case Tutorial, and choosing soft yet durable yarn will ensure both comfort and longevity.
A crochet hook is essential in an Amigurumi Dinosaur Pencil Case Tutorial, and selecting the appropriate size helps achieve tight and even stitches.
Scissors are required during an Amigurumi Dinosaur Pencil Case Tutorial to cut yarn neatly and efficiently.
A yarn needle is used in an Amigurumi Dinosaur Pencil Case Tutorial to sew parts together and weave in loose ends.
Stitch markers are helpful tools in an Amigurumi Dinosaur Pencil Case Tutorial, especially when working in continuous rounds.
A zipper is a key addition to an Amigurumi Dinosaur Pencil Case Tutorial, transforming the crochet piece into a functional pencil case.
The first step in an Amigurumi Dinosaur Pencil Case Tutorial is creating the base structure, usually starting with a chain or magic ring.
Next, the Amigurumi Dinosaur Pencil Case Tutorial involves crocheting in rounds to form the cylindrical body of the pencil case.
As you continue the Amigurumi Dinosaur Pencil Case Tutorial, you will shape the dinosaur features such as the head, tail, and small decorative spikes.
Maintaining consistent tension is important throughout the Amigurumi Dinosaur Pencil Case Tutorial to ensure a neat and uniform appearance.
The next step in the Amigurumi Dinosaur Pencil Case Tutorial is attaching all parts securely and inserting the zipper.
Finally, completing the Amigurumi Dinosaur Pencil Case Tutorial includes weaving in ends and checking all seams for durability.
One fun idea in an Amigurumi Dinosaur Pencil Case Tutorial is experimenting with bright and unusual colors to create a unique dinosaur.
You can personalize your Amigurumi Dinosaur Pencil Case Tutorial by adding embroidered eyes or facial expressions.
Another creative approach to an Amigurumi Dinosaur Pencil Case Tutorial is adding textured stitches for a more detailed appearance.
Some crafters expand their Amigurumi Dinosaur Pencil Case Tutorial into themed sets, such as matching school accessories.
The finished piece from an Amigurumi Dinosaur Pencil Case Tutorial can also be used as a decorative item in addition to being functional.
Creating multiple versions through an Amigurumi Dinosaur Pencil Case Tutorial allows you to explore different styles and designs.
Using tight stitches is important in an Amigurumi Dinosaur Pencil Case Tutorial to ensure the structure holds its shape.
Keeping track of your rounds helps maintain accuracy in an Amigurumi Dinosaur Pencil Case Tutorial.
Choosing high-quality yarn improves the durability of your Amigurumi Dinosaur Pencil Case Tutorial.
Taking your time during assembly ensures a cleaner finish in an Amigurumi Dinosaur Pencil Case Tutorial.
Working in a comfortable environment improves focus when completing an Amigurumi Dinosaur Pencil Case Tutorial.
Practicing basic amigurumi techniques can make an Amigurumi Dinosaur Pencil Case Tutorial easier to follow.
What is an Amigurumi Dinosaur Pencil Case Tutorial?
It is a step-by-step guide that teaches how to crochet a dinosaur-shaped pencil case.
Is the Amigurumi Dinosaur Pencil Case Tutorial suitable for beginners?
Yes, with basic crochet knowledge, beginners can follow an Amigurumi Dinosaur Pencil Case Tutorial successfully.
What materials are needed for an Amigurumi Dinosaur Pencil Case Tutorial?
You will need yarn, a crochet hook, scissors, a yarn needle, and a zipper.
How long does it take to complete the project?
The time required for an Amigurumi Dinosaur Pencil Case Tutorial depends on your skill level and the level of detail.
Can I customize the design?
Yes, an Amigurumi Dinosaur Pencil Case Tutorial allows for many creative variations in color and details.
What can I use the finished item for?
The finished product from an Amigurumi Dinosaur Pencil Case Tutorial can be used as a pencil case, storage pouch, or decorative item.
The Amigurumi Dinosaur Pencil Case Tutorial is a fun and rewarding project that combines creativity, skill, and practicality. By following this guide, you can create a unique handmade item that is both adorable and useful.
Throughout this article, we explored the materials needed, step-by-step instructions, creative ideas, and helpful tips for successfully completing an Amigurumi Dinosaur Pencil Case Tutorial. This project highlights how crochet can be both imaginative and functional, allowing you to create items that reflect your personality.
If you enjoyed learning about the Amigurumi Dinosaur Pencil Case Tutorial, please leave your honest opinion and suggestions. Your feedback is very important and helps inspire new ideas and future tutorials for the crafting community.


