
Strawberry crochet hair tie pattern

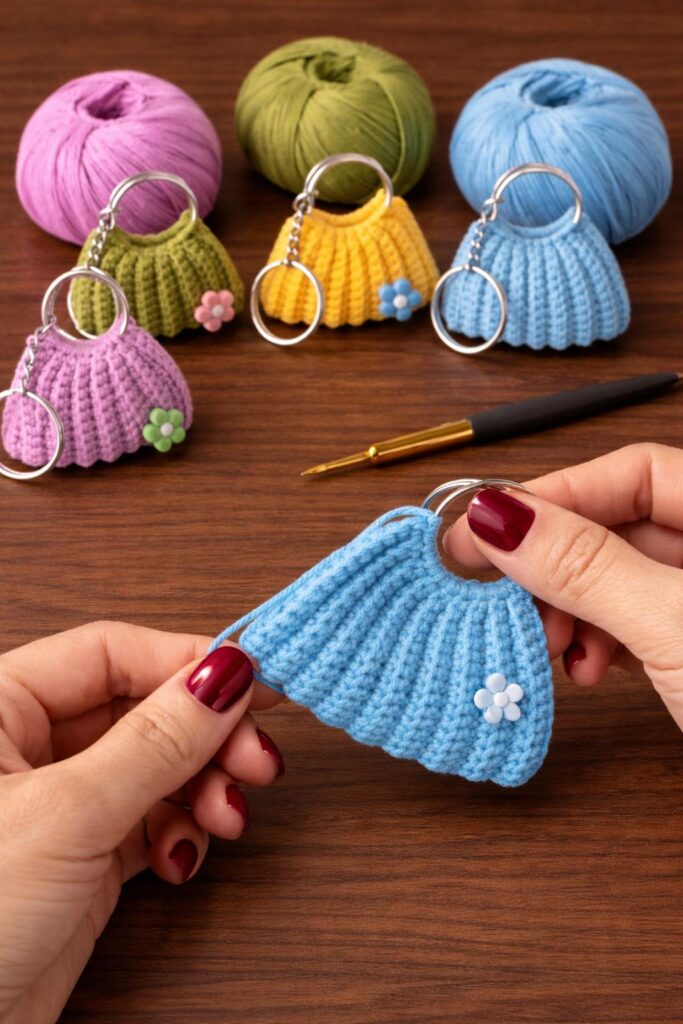
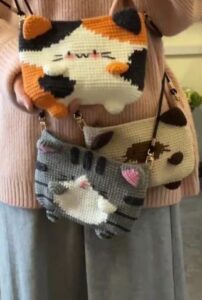
👜 Amigurumi bag keychain tutorial is the perfect creative project for anyone who loves small, charming crochet accessories that are both decorative and functional. This 👜 Amigurumi bag keychain tutorial will guide you through every essential step, from understanding the basics of amigurumi techniques to finishing a polished miniature bag that can be attached to keys, backpacks, or purses. Whether you are a beginner looking for a simple project or an experienced crocheter searching for a quick and satisfying make, this detailed guide will provide clarity, inspiration, and practical tips. Throughout this article, you will learn how to create a beautiful and durable piece while improving your crochet skills.
Creating a 👜 Amigurumi bag keychain tutorial project is not only enjoyable but also highly rewarding. Small crochet items are ideal for practicing stitch consistency, tension control, and shaping techniques. Because the project is compact, it allows you to complete it in a short time while still achieving a professional look. Additionally, mini amigurumi accessories are popular handmade gifts and can even become small items for craft fairs or online shops. By following this comprehensive guide, you will understand the structure of a tiny bag, how to shape it correctly, and how to add secure hardware for everyday use.
In this article, we will focus on clear instructions, SEO-friendly explanations, and safe crafting practices that align with family-friendly content standards. The 👜 Amigurumi bag keychain tutorial will be explained step by step, ensuring that you can confidently follow along. You will also find helpful insights into yarn selection, hook sizes, finishing techniques, and durability tips. By the end, you will have the knowledge needed to create your own adorable amigurumi bag keychain and customize it according to your personal style.
To begin your 👜 Amigurumi bag keychain tutorial, you need to gather the right materials. Choosing quality supplies ensures that your finished keychain will look neat and last a long time. Basic materials include cotton or acrylic yarn, a crochet hook suitable for your yarn weight, stuffing (optional for shaping), a yarn needle, scissors, and a keychain ring with a small metal chain. Selecting the appropriate tools makes the process smoother and more enjoyable.
Yarn choice plays a significant role in the final appearance of your 👜 Amigurumi bag keychain tutorial project. Cotton yarn is often recommended because it provides structure and durability. Acrylic yarn can also work well, especially if you prefer softer textures or vibrant color options. Make sure the yarn is not too thick, as miniature projects require fine stitches for clean results.
The crochet hook size should match your yarn, but many amigurumi artists prefer using a slightly smaller hook than recommended. This technique creates tighter stitches, preventing gaps and keeping the stuffing secure. Tight stitches are especially important in small projects like a 👜 Amigurumi bag keychain tutorial, where detail and firmness matter.
You will also need a yarn needle for sewing pieces together and weaving in ends. Finishing details carefully enhances the professional look of your miniature bag. Clean finishing ensures that your keychain remains durable even with daily use.
Keychain hardware is another essential component of the 👜 Amigurumi bag keychain tutorial. Choose sturdy metal rings that can support the weight of the crochet piece. High-quality hardware prevents breakage and ensures your handmade accessory remains secure.
Optional decorative elements include small buttons, beads, or embroidered details. These additions can personalize your project and make each keychain unique. However, ensure that all attachments are securely fastened to maintain safety and longevity.
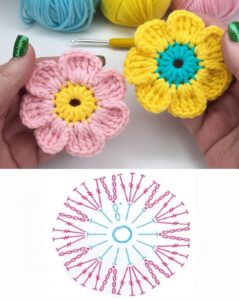
The foundation of your 👜 Amigurumi bag keychain tutorial begins with creating a magic ring. This adjustable loop allows you to start crocheting in the round, which is a common technique in amigurumi projects. Working in continuous rounds helps achieve a seamless appearance.
After forming the magic ring, crochet a set number of single crochet stitches into the loop. Gradually increase stitches in the following rounds to shape the base of the miniature bag. Even increases are essential to maintain a symmetrical circular or oval base.
Once the base reaches the desired size, stop increasing and begin crocheting evenly around. This step forms the body of the bag. Maintaining consistent tension throughout the 👜 Amigurumi bag keychain tutorial ensures the structure remains firm and neat.
If you want a slightly structured bag, you can insert a small piece of felt or lightweight plastic canvas at the base. This reinforcement helps the keychain keep its shape over time. Structured pieces are especially useful if the keychain will carry tiny decorative items.
To create the bag flap or opening detail, crochet a small flat piece separately and sew it onto the body. Alternatively, you can shape the top directly by working rows instead of rounds. Both methods are effective in a 👜 Amigurumi bag keychain tutorial, depending on your design preference.
Finally, attach the keychain hardware securely. Use strong yarn or thread to stitch the metal ring firmly to the top of the bag. Reinforce the stitches several times to ensure durability and long-term use.
One of the best aspects of the 👜 Amigurumi bag keychain tutorial is its versatility. You can experiment with different color combinations to match seasonal themes, personal style, or gift preferences. Bright colors create playful designs, while neutral tones offer a classic look.
Adding embroidery details can elevate your design. Small stitched hearts, initials, or floral motifs can transform a simple project into a personalized keepsake. Embroidery is an easy way to enhance your 👜 Amigurumi bag keychain tutorial without complicating the base pattern.
You can also incorporate textured stitches such as half double crochet or slip stitch accents. These subtle variations add depth and character to your miniature bag. Textured stitches provide visual interest while keeping the structure intact.
Consider creating themed collections. For example, pastel mini bags for spring or bold jewel tones for winter. The flexibility of the 👜 Amigurumi bag keychain tutorial allows endless creativity while keeping the core technique simple.
If you sell handmade items, packaging plays an important role. Presenting your keychains on small display cards with care instructions enhances professionalism. High-quality presentation can increase perceived value.
Another creative option is turning the miniature bag into a tiny coin pouch by adding a small zipper. While slightly more advanced, this modification can add functionality and uniqueness to your project.
Durability is essential in any 👜 Amigurumi bag keychain tutorial. Since keychains are handled frequently, tight stitching and secure attachments are crucial. Avoid loose loops or exposed knots that may unravel over time.
Weaving in ends properly is one of the most important finishing steps. Use a yarn needle to thread the tail through multiple stitches in different directions. This method locks the yarn in place and prevents it from loosening.
Blocking is optional but can improve the final shape. Lightly steaming or shaping the piece helps even out stitches. However, always follow yarn care recommendations to avoid damage.
Reinforce stress points such as the handle and hardware attachment area. Adding extra stitches ensures that your 👜 Amigurumi bag keychain tutorial creation remains intact even with daily use.
If gifting the item, consider including simple care instructions. Advising gentle hand washing and air drying helps preserve the shape and texture of the crochet piece.
Consistency is key in achieving professional results. Practice maintaining even tension and counting stitches accurately. The more you practice the 👜 Amigurumi bag keychain tutorial, the more refined your technique will become.
About 👜 Amigurumi Bag Keychain Tutorial
What is the best yarn for a 👜 Amigurumi bag keychain tutorial?
Cotton yarn is often recommended because it provides structure and durability. Acrylic yarn can also be used for softer designs, but tight stitches are essential for both options.
Is this project suitable for beginners?
Yes, the 👜 Amigurumi bag keychain tutorial is beginner-friendly if you understand basic stitches like single crochet and how to work in the round.
How long does it take to complete one keychain?
Most crocheters can complete a small amigurumi bag keychain in one to two hours, depending on experience level and detailing.
Do I need stuffing for this project?
Stuffing is optional. Some designs remain flat and structured without it, while others use a small amount for shaping.
How can I make my keychain more durable?
Use tight stitches, high-quality hardware, and reinforce attachment points. Proper finishing significantly improves durability.
Can I sell items made from this tutorial?
Yes, handmade crochet keychains are popular at craft fairs and online shops. Ensure your finishing quality is professional and consistent.
Conclusion
In this comprehensive 👜 Amigurumi bag keychain tutorial, you learned how to select materials, follow step-by-step instructions, customize your design, and ensure durability for everyday use.
This project is ideal for beginners and experienced crocheters alike, offering creativity, practicality, and the joy of handmade craftsmanship. By mastering the techniques described above, you can confidently create charming miniature accessories that make thoughtful gifts or unique products. I hope this guide has inspired you to start your own project today.
Please leave your honest opinion and share your suggestions, as your feedback helps improve future tutorials and supports a creative crochet community.


