
Twisted Post Quilt Pattern

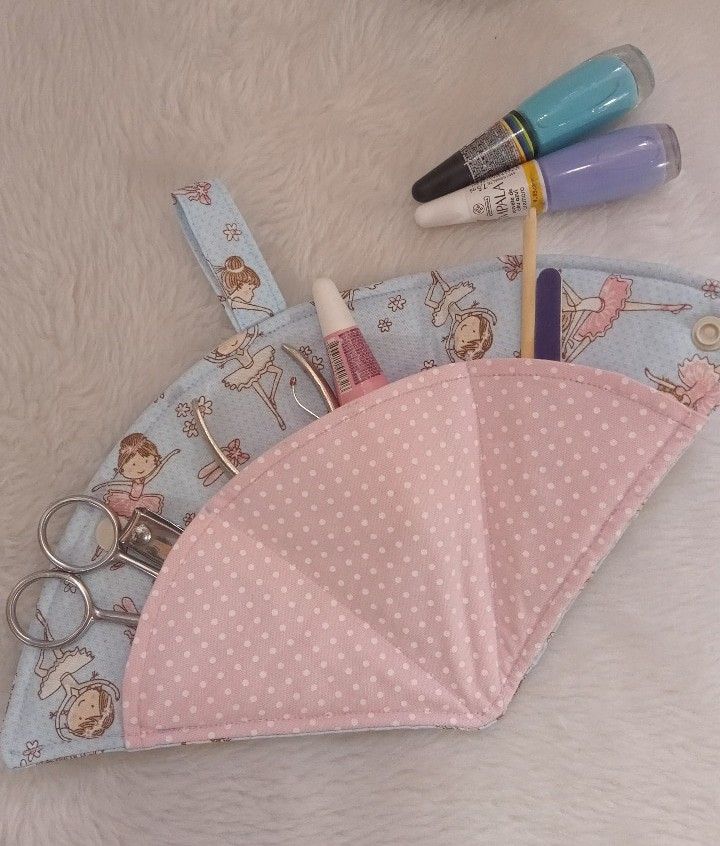
Fabric manicure kit tutorial is a practical and creative sewing project that allows you to organize your personal care tools in a stylish and functional way. If you enjoy crafting and want to create something useful for everyday life, this guide will walk you through every step of the process. By following this detailed Fabric manicure kit tutorial, you will learn how to design, sew, and customize your own fabric case with ease and confidence.
The charm of a Fabric manicure kit tutorial lies in its versatility and usefulness. Instead of storing your manicure tools loosely in drawers or bags, you can create a dedicated organizer that keeps everything in place. This project is perfect for beginners and experienced crafters alike, offering a balance between simplicity and creativity. With the right materials and a bit of patience, you can achieve a professional-looking result.
In this complete Fabric manicure kit tutorial, you will explore essential sewing techniques, smart design ideas, and helpful tips to enhance your final product. Whether you are making it for yourself or as a thoughtful handmade gift, this project is both rewarding and practical. By the end of this article, you will feel confident enough to create a personalized manicure kit that reflects your style and meets your needs.
To start your Fabric manicure kit tutorial, gathering the right materials is the first and most important step. You will need fabric for the exterior and lining, preferably cotton, as it is easy to sew and durable enough for daily use.
Interfacing is another essential component in this Fabric manicure kit tutorial. It adds structure and stability to your fabric, ensuring that the kit holds its shape over time. Choose a medium-weight interfacing for the best results.
Basic sewing tools such as scissors, pins, a measuring tape, and a sewing machine are necessary for this project. While hand sewing is possible, a sewing machine will provide stronger seams and a more polished finish.
You may also need elastic bands to hold your manicure tools securely in place. These bands help keep items like nail clippers and files organized and easy to access.
Closures are another important detail. You can use buttons, snaps, or Velcro, depending on your preference. Each option offers a different look and level of convenience.
Preparing your workspace is crucial for a smooth experience. A clean, well-lit area will help you focus on the details and enjoy your Fabric manicure kit tutorial without distractions.
The first step in your Fabric manicure kit tutorial is cutting your fabric pieces. Measure and cut the exterior fabric, lining, and interfacing according to your desired size.
Next, attach the interfacing to the wrong side of your exterior fabric. This step is essential for adding structure and ensuring your kit maintains its shape.
Once prepared, place the exterior and lining fabrics together, right sides facing each other. Sew around the edges, leaving a small opening to turn the piece right side out.
In this Fabric manicure kit tutorial, creating compartments is a key step. Sew vertical lines to form pockets or attach elastic bands where your tools will be held securely.
After forming the compartments, turn the fabric right side out through the opening. Carefully push out the corners for a neat and professional look.
Finally, close the opening with a neat stitch and add your chosen closure. Your Fabric manicure kit tutorial is now complete and ready to use.
Achieving a clean and professional result in your Fabric manicure kit tutorial requires attention to detail. Pressing your fabric before and after sewing helps create crisp edges and smooth seams.
Using matching thread colors can also enhance the overall appearance of your project. It creates a cohesive and polished look.
Take your time when measuring and cutting fabric. Accuracy is essential for ensuring that all pieces fit together perfectly in your Fabric manicure kit tutorial.
Reinforce areas that will experience frequent use, such as elastic bands and closures. This ensures durability and longevity.
Adding decorative elements like embroidery or contrasting fabric can elevate your design and make it more unique.
Lastly, always inspect your finished project for loose threads or uneven stitches. These small adjustments can make a big difference in the final presentation.
One of the best aspects of a Fabric manicure kit tutorial is the ability to customize your design. You can choose fabrics with patterns, colors, or textures that match your personal style.
Adding labels or monograms can make your manicure kit feel more personalized and special. This is especially useful if you plan to give it as a gift.
You can also experiment with different sizes and layouts. A larger kit can hold more tools, while a compact version is perfect for travel.
Incorporating additional pockets can increase functionality. This allows you to store items like nail polish or small accessories.
Using eco-friendly fabrics is another great idea. It aligns your project with sustainable practices while maintaining quality.
With creativity and imagination, your Fabric manicure kit tutorial can become a unique and practical accessory that stands out.
Many beginners ask if a Fabric manicure kit tutorial is easy to follow. Yes, this project is beginner-friendly and requires only basic sewing skills.
Another common question is how long it takes to complete. Depending on your experience, it can take between one to three hours.
People often wonder which fabric is best. Cotton is highly recommended due to its durability and ease of handling.
A frequent concern is how to keep tools secure. Using elastic bands and well-stitched compartments will ensure everything stays in place.
Some ask if the kit is washable. Yes, most fabric kits can be gently hand-washed and air-dried.
Lastly, many want to know how to improve durability. Reinforced stitching and quality materials are key to a long-lasting Fabric manicure kit tutorial.
In this complete Fabric manicure kit tutorial, you have learned how to create a functional and stylish organizer for your manicure tools. From selecting materials to sewing and customizing your design, each step contributes to a practical and beautiful final product.
This project is an excellent way to improve your sewing skills while creating something useful for everyday life. It also offers endless opportunities for creativity and personalization.
Now it’s your turn to try this Fabric manicure kit tutorial and create your own unique version. Share your honest opinion and feel free to suggest improvements or new ideas. Your feedback is valuable and helps inspire future projects.


