
Twisted Post Quilt Pattern

Tutorial for making your own triangular fabric trivet is a practical and creative sewing project that combines functionality with artistic expression, making it a perfect addition to any kitchen or dining space. Learning a Tutorial for making your own triangular fabric trivet allows you to craft heat-resistant pieces that not only protect surfaces but also enhance your home décor with a handmade touch. This project is suitable for beginners and experienced crafters alike, offering a rewarding experience with useful results.
When exploring a Tutorial for making your own triangular fabric trivet, one of the most appealing aspects is the ability to customize every detail. From selecting fabric patterns to choosing color combinations, you can create a trivet that perfectly matches your personal style or seasonal themes. This flexibility makes the project enjoyable and encourages creativity, especially for those who love working with textiles.
Another advantage of following a Tutorial for making your own triangular fabric trivet is its sustainability. By using leftover fabric scraps, you can reduce waste and create something meaningful from materials you already have. This eco-friendly approach not only saves money but also promotes mindful crafting. As you continue reading, you will discover step-by-step insights, essential techniques, and helpful tips to successfully complete your project.
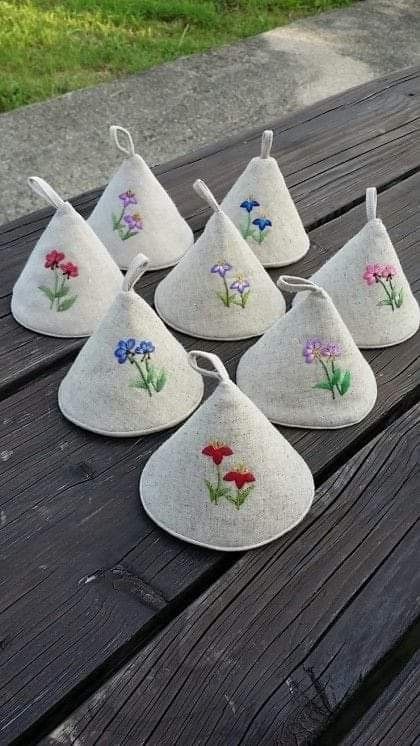
Before starting your Tutorial for making your own triangular fabric trivet, it is important to understand the structure of the design. A triangular trivet typically consists of three equal sides, creating a balanced and visually appealing shape. This geometric form is both functional and decorative, making it ideal for holding hot dishes.
Fabric selection plays a crucial role in the success of your Tutorial for making your own triangular fabric trivet. Heat-resistant materials such as cotton are commonly used because they can withstand high temperatures while maintaining their integrity. Choosing the right fabric ensures both safety and durability.
Another important concept in the Tutorial for making your own triangular fabric trivet is layering. Most trivets include multiple layers of fabric and batting to provide insulation. This layering helps protect surfaces from heat damage and enhances the trivet’s effectiveness.
Accurate measuring and cutting are essential steps in the Tutorial for making your own triangular fabric trivet. Precise dimensions ensure that all pieces fit together perfectly, resulting in a clean and professional finish. Taking time to measure carefully can prevent errors during assembly.
Understanding seam allowances is also vital in the Tutorial for making your own triangular fabric trivet. Consistent seam allowances help maintain the shape and strength of the trivet. This attention to detail contributes to a polished final product.
Finally, familiarizing yourself with basic sewing techniques will make the Tutorial for making your own triangular fabric trivet easier to follow. Skills such as straight stitching, pressing seams, and corner turning are fundamental to achieving a high-quality result.
Selecting the right materials is a key step in the Tutorial for making your own triangular fabric trivet. High-quality cotton fabric is often recommended because it is durable, easy to sew, and heat-resistant. Using reliable materials ensures the longevity of your trivet.
Batting is another essential component in the Tutorial for making your own triangular fabric trivet. Insulated batting provides the necessary thickness and heat protection. This layer is what allows the trivet to safely hold hot cookware.
Thread quality is equally important in the Tutorial for making your own triangular fabric trivet. Strong thread ensures that your stitches remain secure, even with frequent use. Matching thread color to your fabric also enhances the overall appearance.
Basic sewing tools are required for completing the Tutorial for making your own triangular fabric trivet. These include scissors, pins, a measuring tape, and a sewing machine. Having the right tools makes the process more efficient and enjoyable.
Color and pattern choices add personality to your Tutorial for making your own triangular fabric trivet. Combining different prints or coordinating colors can create a visually appealing design that complements your kitchen décor.
Optional embellishments can also be included in your Tutorial for making your own triangular fabric trivet. Decorative stitching or simple quilting patterns can enhance the texture and uniqueness of your project.
The first step in the Tutorial for making your own triangular fabric trivet is cutting your fabric into the desired triangular shapes. Ensuring that all pieces are uniform is crucial for proper assembly and a balanced final look.
Next, you will layer the fabric and batting in your Tutorial for making your own triangular fabric trivet. Typically, this involves placing the batting between two fabric layers to create insulation. Proper layering is essential for functionality.
Sewing the layers together is a key stage in the Tutorial for making your own triangular fabric trivet. Stitch along the edges, leaving a small opening for turning the piece right side out. This step forms the basic structure of the trivet.
Turning the fabric right side out is an important part of the Tutorial for making your own triangular fabric trivet. Carefully push out the corners to achieve sharp edges and a clean shape. Pressing the fabric afterward helps set the seams.
Topstitching is often included in the Tutorial for making your own triangular fabric trivet to secure the layers and add a decorative touch. This step reinforces the trivet and improves its durability.
Finally, finishing touches complete your Tutorial for making your own triangular fabric trivet. This includes closing the opening, trimming excess threads, and ensuring all seams are secure. These details give your project a professional appearance.
Practice is essential when following a Tutorial for making your own triangular fabric trivet. The more projects you complete, the more confident you will become with sewing techniques and patterns.
Paying attention to detail can significantly improve your Tutorial for making your own triangular fabric trivet results. Small adjustments, such as aligning edges and maintaining straight seams, make a big difference.
Experimenting with different fabrics and batting types can enhance your experience with the Tutorial for making your own triangular fabric trivet. Trying new materials helps you discover what works best for your needs.
Time management is helpful when working on a Tutorial for making your own triangular fabric trivet. Breaking the project into smaller steps makes it easier to complete without feeling overwhelmed.
Learning from mistakes is part of the process in the Tutorial for making your own triangular fabric trivet. If something doesn’t turn out as expected, use it as an opportunity to improve your skills.
Staying patient and creative will help you succeed in the Tutorial for making your own triangular fabric trivet. Enjoying the process is just as important as completing the project.
What fabric is best for a triangular fabric trivet?
For a Tutorial for making your own triangular fabric trivet, cotton fabric is the most popular choice due to its heat resistance and durability.
Is this project suitable for beginners?
Yes, the Tutorial for making your own triangular fabric trivet is beginner-friendly and requires only basic sewing skills.
How long does it take to complete?
A Tutorial for making your own triangular fabric trivet can typically be completed in a few hours, depending on your experience level.
Can I wash my fabric trivet?
Yes, most projects from a Tutorial for making your own triangular fabric trivet can be machine washed, but always follow fabric care instructions.
Do I need special tools?
No special tools are required for a Tutorial for making your own triangular fabric trivet, just basic sewing equipment.
Can I customize the design?
Absolutely! A Tutorial for making your own triangular fabric trivet allows for endless customization in colors, patterns, and finishes.
In this complete Tutorial for making your own triangular fabric trivet, you learned how to create a functional and stylish kitchen accessory from start to finish.
From understanding the basics and selecting materials to following a step-by-step process and improving your skills, each stage plays an important role in achieving a high-quality result. This project not only enhances your sewing abilities but also provides a practical item for everyday use.
Now that you have explored the Tutorial for making your own triangular fabric trivet, it’s time to start your own project and bring your ideas to life. Your feedback is valuable, so feel free to share your honest opinion and suggestions to help improve future tutorials.


