
Twisted Post Quilt Pattern

DIY tutorial for supporting laptops and/or remote controls. is a practical and creative guide designed to help people organize their everyday devices using simple materials and basic crafting techniques. The concept behind DIY tutorial for supporting laptops and/or remote controls. focuses on building a functional support accessory that can keep laptops stable on a desk or sofa while also providing a convenient place to store remote controls. With the growing use of technology in daily life, projects like the DIY tutorial for supporting laptops and/or remote controls. have become increasingly popular among people who enjoy combining creativity with practical solutions.
Many individuals search for projects such as the DIY tutorial for supporting laptops and/or remote controls. because they want to improve their workspace or living room organization without spending a large amount of money. Creating a handmade support accessory can be both cost-effective and highly customizable. The DIY tutorial for supporting laptops and/or remote controls. encourages creativity while solving common problems, such as keeping devices stable or preventing remote controls from getting lost around the house. By following a thoughtful process, anyone can build a useful accessory that enhances comfort and organization.
Another reason why the DIY tutorial for supporting laptops and/or remote controls. is gaining attention is the flexibility of design options. This type of project can be adapted using various materials such as fabric, wood, foam, or recycled items. The DIY tutorial for supporting laptops and/or remote controls. allows users to choose colors, textures, and shapes that match their home decor or workspace style. Because the project is customizable, it appeals to beginners and experienced DIY enthusiasts who enjoy making functional items that improve daily routines.
Preparing the correct materials is the first step toward successfully completing the DIY tutorial for supporting laptops and/or remote controls.. Organizing the necessary tools in advance will make the process smoother and more efficient.
The most common material used in the DIY tutorial for supporting laptops and/or remote controls. is durable fabric or strong textile material. Fabric is often chosen because it allows flexibility while providing a comfortable surface for electronic devices.
Foam padding or soft filling is another useful component when following the DIY tutorial for supporting laptops and/or remote controls.. This padding helps create a cushioned base that stabilizes laptops and protects surfaces.
Thread and sewing needles are essential when constructing the DIY tutorial for supporting laptops and/or remote controls. if the project involves fabric assembly.
Scissors or fabric cutters are required for shaping materials when creating the structure for the DIY tutorial for supporting laptops and/or remote controls..
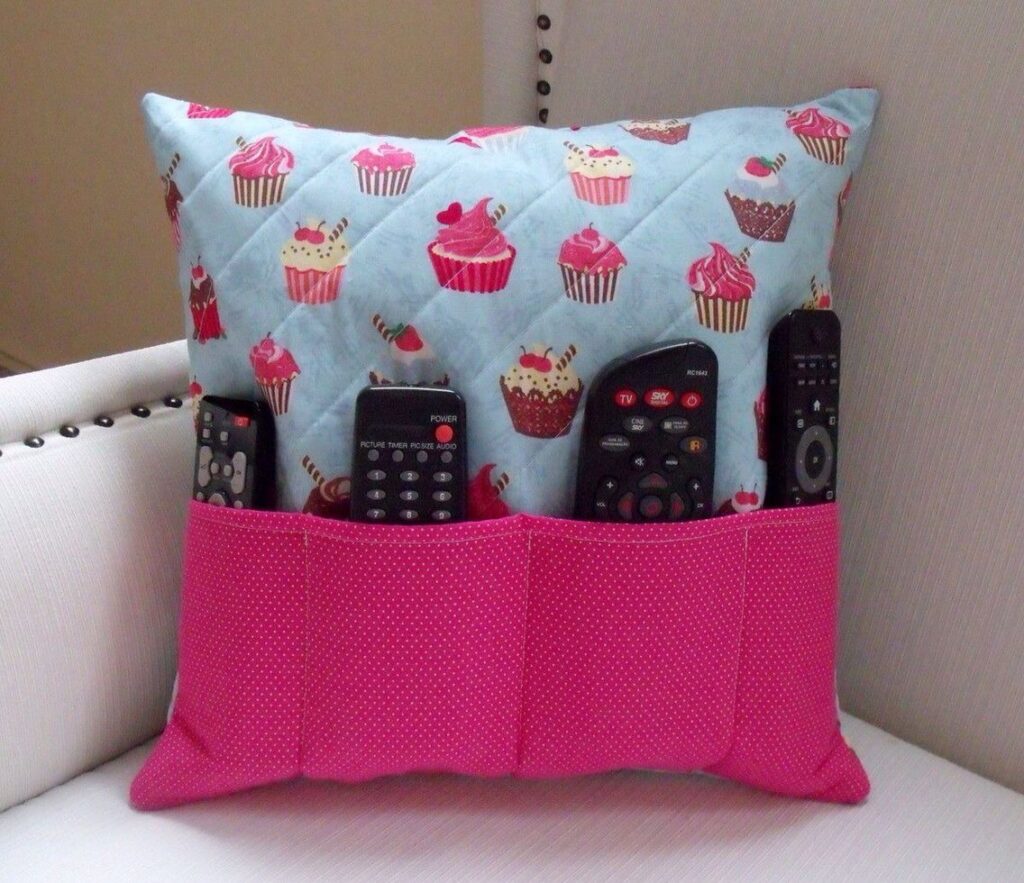
Some makers prefer to include small pockets as part of the DIY tutorial for supporting laptops and/or remote controls., allowing remote controls to be stored conveniently.
Optional elements such as decorative stitching or patterned fabrics can enhance the visual appeal of the DIY tutorial for supporting laptops and/or remote controls..
The first stage in the DIY tutorial for supporting laptops and/or remote controls. is designing the size and shape of the support structure. Measuring the laptop or remote control space helps determine the correct dimensions.
After determining measurements, the next step in the DIY tutorial for supporting laptops and/or remote controls. is cutting the fabric or material pieces that will form the base and sides of the support.
The following step in the DIY tutorial for supporting laptops and/or remote controls. involves sewing or assembling the main body of the support. This forms the structure that will hold the laptop securely.
Once the main shape is complete, the DIY tutorial for supporting laptops and/or remote controls. continues with adding foam or filling inside the support to provide cushioning and stability.
Another step in the DIY tutorial for supporting laptops and/or remote controls. may include sewing small pockets or compartments designed specifically to hold remote controls.
Finally, the last stage of the DIY tutorial for supporting laptops and/or remote controls. involves closing the structure and adding finishing touches such as decorative edges or reinforced stitching.
One interesting idea for the DIY tutorial for supporting laptops and/or remote controls. is designing a triangular cushion shape that supports laptops comfortably on a couch or bed.
Another creative variation of the DIY tutorial for supporting laptops and/or remote controls. is adding multiple compartments that can store several remote controls at once.
Some people personalize the DIY tutorial for supporting laptops and/or remote controls. by choosing fabrics that match their living room furniture or workspace design.
Another design option for the DIY tutorial for supporting laptops and/or remote controls. is incorporating recycled materials such as leftover fabric or old cushions.
Many DIY enthusiasts experiment with different textures while working on the DIY tutorial for supporting laptops and/or remote controls., creating visually interesting accessories.
The DIY tutorial for supporting laptops and/or remote controls. can also be adapted into a portable accessory that is easy to move between rooms.
Maintaining accurate measurements is essential when following the DIY tutorial for supporting laptops and/or remote controls. because the size of the support determines its stability.
Choosing strong stitching techniques will improve durability when building the DIY tutorial for supporting laptops and/or remote controls..
Selecting breathable fabrics may help prevent heat buildup when using the support created through the DIY tutorial for supporting laptops and/or remote controls..
Adding a non-slip surface to the bottom can improve the effectiveness of the DIY tutorial for supporting laptops and/or remote controls..
Testing the support with a device before completing the final stitching is a useful step in the DIY tutorial for supporting laptops and/or remote controls..
Finally, creativity and patience will help produce the best results when completing the DIY tutorial for supporting laptops and/or remote controls..
What is the purpose of the DIY tutorial for supporting laptops and/or remote controls.?
The purpose of the DIY tutorial for supporting laptops and/or remote controls. is to create a practical accessory that improves device stability and organization at home.
Is the DIY tutorial for supporting laptops and/or remote controls. suitable for beginners?
Yes, the DIY tutorial for supporting laptops and/or remote controls. can be adapted for beginners because it uses simple materials and basic crafting techniques.
What materials work best for the DIY tutorial for supporting laptops and/or remote controls.?
Durable fabric, foam padding, and strong thread are commonly used materials in the DIY tutorial for supporting laptops and/or remote controls..
How long does it take to complete the DIY tutorial for supporting laptops and/or remote controls.?
The time needed for the DIY tutorial for supporting laptops and/or remote controls. depends on the design complexity, but most projects can be completed within a few hours.
Can the DIY tutorial for supporting laptops and/or remote controls. be customized?
Yes, the DIY tutorial for supporting laptops and/or remote controls. offers many customization options including size, color, and additional storage compartments.
Is this project useful for small living spaces?
Absolutely. The DIY tutorial for supporting laptops and/or remote controls. is ideal for small spaces because it helps organize devices efficiently.
The DIY tutorial for supporting laptops and/or remote controls. demonstrates how a simple handmade project can improve comfort, organization, and functionality in everyday life. By combining creativity with practical design, this project offers a useful solution for keeping laptops stable and remote controls organized.
Throughout this article, we explored the materials needed, the step-by-step process, creative design ideas, and helpful tips for successfully completing the DIY tutorial for supporting laptops and/or remote controls.. Each stage of the process encourages creativity while providing practical benefits for home or workspace organization.
If you enjoyed learning about the DIY tutorial for supporting laptops and/or remote controls., feel free to share your honest opinion and suggestions. Your feedback is always valuable and helps inspire new ideas and creative DIY tutorials in the future.


