
Twisted Post Quilt Pattern

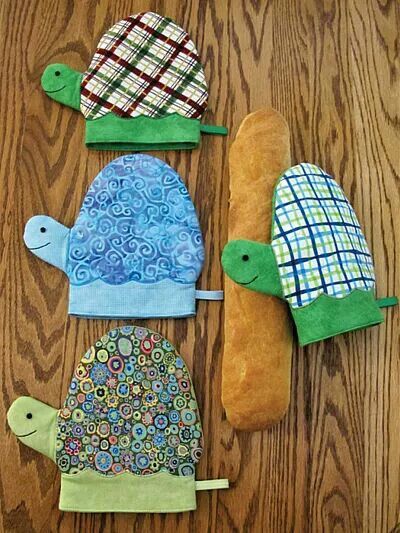
Turtle-shaped oven mitt tutorial is a creative and functional sewing project that allows crafters to design a charming kitchen accessory shaped like a turtle. The Turtle-shaped oven mitt tutorial combines practicality with playful design, transforming an everyday kitchen tool into a decorative handmade item. Oven mitts are essential for protecting hands from heat while handling hot cookware, and following a Turtle-shaped oven mitt tutorial gives sewing enthusiasts the opportunity to create something both useful and visually delightful. This project is especially appealing for people who enjoy crafting items that bring personality and warmth to their kitchen environment.
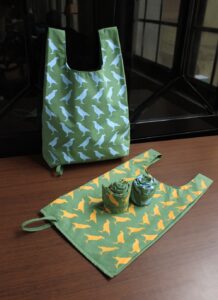
Many people are drawn to the Turtle-shaped oven mitt tutorial because it blends creativity with everyday functionality. Traditional oven mitts are often simple and plain, but a turtle-shaped design introduces fun shapes, textures, and colors. The Turtle-shaped oven mitt tutorial allows crafters to experiment with fabric combinations that represent the turtle’s shell, head, and flippers. As a result, the finished product becomes more than just a kitchen tool—it becomes a unique decorative accessory that adds character to the cooking space.
Another reason the Turtle-shaped oven mitt tutorial is popular among sewing enthusiasts is its versatility and accessibility. This project can be adapted for beginners who are learning basic sewing techniques, as well as experienced crafters who enjoy adding detailed embellishments. The Turtle-shaped oven mitt tutorial encourages creativity while teaching practical skills such as fabric cutting, layering insulation, and assembling shaped designs. By following the steps in the Turtle-shaped oven mitt tutorial, anyone can create a durable and charming oven mitt that is both safe and stylish.
Before beginning the Turtle-shaped oven mitt tutorial, gathering the right materials is an important step. Having the necessary tools and fabrics prepared will help make the project smoother and more enjoyable.
The most essential material used in the Turtle-shaped oven mitt tutorial is cotton fabric. Cotton is commonly recommended because it is durable, heat-resistant when layered properly, and easy to sew.
Another important component in the Turtle-shaped oven mitt tutorial is heat-resistant batting or thermal insulation. This layer provides protection from hot surfaces and makes the oven mitt safe to use.
A sewing machine or hand sewing kit is also required for the Turtle-shaped oven mitt tutorial. Both methods can be used successfully depending on the crafter’s preference.
Scissors or a rotary cutter are helpful tools in the Turtle-shaped oven mitt tutorial for cutting fabric pieces accurately according to the turtle shape pattern.
Pins or fabric clips are commonly used when working through the Turtle-shaped oven mitt tutorial because they help hold layers of fabric together before stitching.
Finally, optional decorative materials such as embroidery thread or fabric appliqués can enhance the appearance of the finished project in the Turtle-shaped oven mitt tutorial.
The first step in the Turtle-shaped oven mitt tutorial is preparing the pattern pieces. These pieces typically include the turtle shell, body, and flippers.
After cutting the pattern shapes, the Turtle-shaped oven mitt tutorial continues by layering the outer fabric, insulation batting, and lining fabric.
The next stage of the Turtle-shaped oven mitt tutorial involves stitching the shell design. Quilting lines can be added to imitate the natural pattern of a turtle shell.
Once the shell is completed, the Turtle-shaped oven mitt tutorial focuses on assembling the remaining pieces, including the head and flippers.
After assembling the main structure, the Turtle-shaped oven mitt tutorial involves sewing the front and back layers together while leaving an opening for turning.
The final step in the Turtle-shaped oven mitt tutorial is turning the mitt right side out, closing the opening, and adding any decorative details such as embroidered eyes or stitched outlines.
One creative option in the Turtle-shaped oven mitt tutorial is using contrasting fabrics to highlight the turtle shell pattern. Bright colors can make the design more playful and eye-catching.
Another idea within the Turtle-shaped oven mitt tutorial is adding patchwork sections to the shell. Patchwork can create a textured appearance while using fabric scraps efficiently.
Many crafters personalize the Turtle-shaped oven mitt tutorial by embroidering facial features on the turtle’s head, giving the mitt a friendly character.
Seasonal color themes can also be incorporated into the Turtle-shaped oven mitt tutorial. For example, earthy greens and browns create a natural look, while bright colors add a modern twist.
Some variations of the Turtle-shaped oven mitt tutorial include adding a hanging loop so the mitt can be displayed conveniently in the kitchen.
Finally, using textured or quilted fabrics can enhance the durability and visual appeal of the finished piece in the Turtle-shaped oven mitt tutorial.
One important tip when following the Turtle-shaped oven mitt tutorial is choosing high-quality heat-resistant materials. This ensures the oven mitt performs its protective function safely.
Accurate pattern cutting is another essential step in the Turtle-shaped oven mitt tutorial because the turtle shape relies on balanced proportions.
Using quilting stitches in the shell section is a helpful technique in the Turtle-shaped oven mitt tutorial because it secures the insulation layers and adds decorative texture.
Taking time to pin fabric layers carefully will make the sewing process easier when working on the Turtle-shaped oven mitt tutorial.
Testing the fit of your hand inside the mitt during the project can help ensure comfort and usability in the Turtle-shaped oven mitt tutorial.
Finally, patience and creativity are key elements in achieving the best results when completing the Turtle-shaped oven mitt tutorial.
Is the Turtle-shaped oven mitt tutorial suitable for beginners?
Yes, the Turtle-shaped oven mitt tutorial can be adapted for beginners who are learning basic sewing techniques and simple pattern assembly.
What type of fabric works best for this project?
Cotton fabric combined with heat-resistant batting is commonly recommended for the Turtle-shaped oven mitt tutorial.
How long does it take to complete the project?
The Turtle-shaped oven mitt tutorial typically takes a few hours depending on the complexity of the design and the sewing experience of the crafter.
Can the oven mitt be washed?
Yes, most items made using the Turtle-shaped oven mitt tutorial can be washed gently if durable cotton fabric and proper stitching are used.
Can the design be customized?
Absolutely. The Turtle-shaped oven mitt tutorial allows many variations including different shell patterns, colors, and decorative details.
Is this project suitable as a handmade gift?
Yes, the Turtle-shaped oven mitt tutorial creates a thoughtful and unique handmade gift for friends or family who enjoy cooking.
The Turtle-shaped oven mitt tutorial is a fun and creative sewing project that transforms a practical kitchen tool into a charming decorative accessory. Throughout this article, we explored the materials needed, step-by-step instructions, creative design ideas, and helpful tips for successfully completing this project.
By following the Turtle-shaped oven mitt tutorial, crafters can create a handmade oven mitt that combines safety, durability, and artistic expression. This project is ideal for both beginners and experienced sewing enthusiasts who enjoy crafting functional items for the home.
If you enjoyed learning about the Turtle-shaped oven mitt tutorial, feel free to share your honest opinion and suggestions. Your feedback is valuable and helps inspire new creative sewing tutorials and craft ideas for future projects.


