
Twisted Post Quilt Pattern

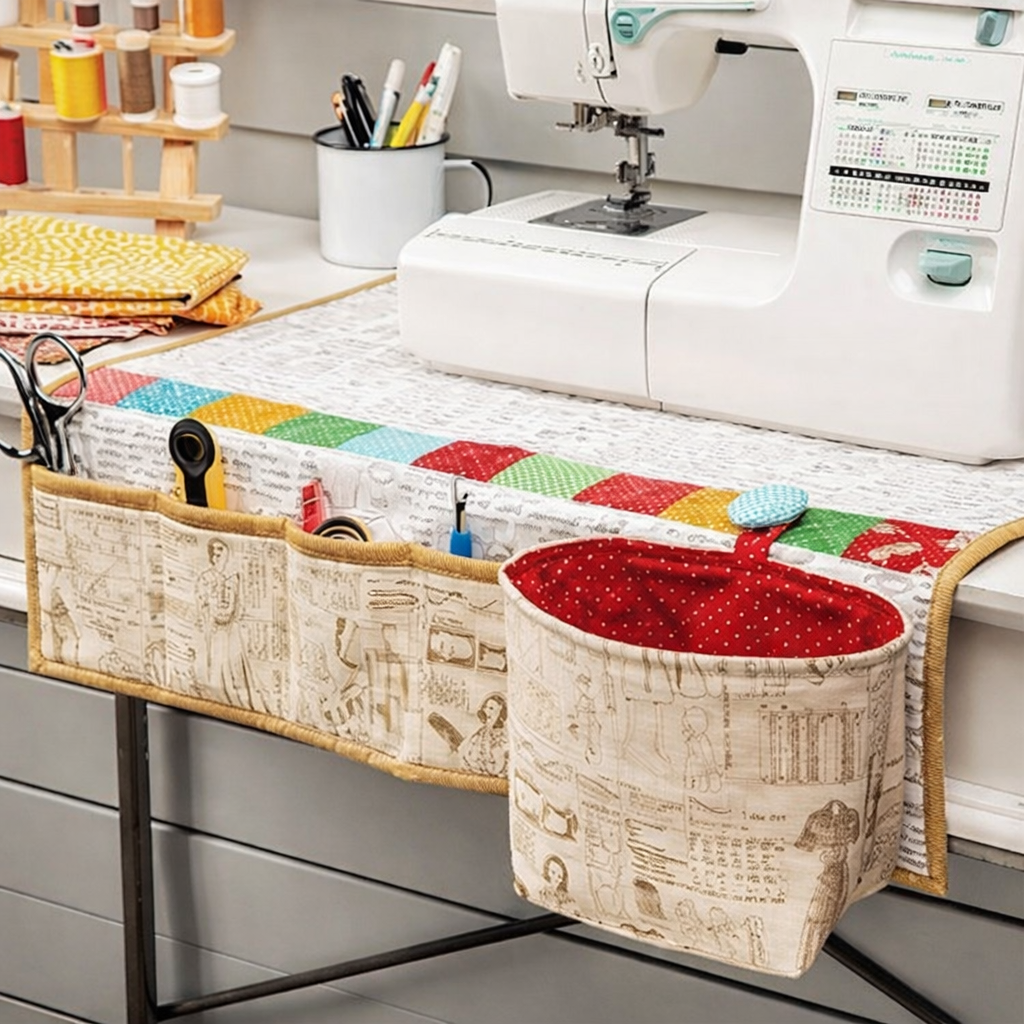
Beginner’s tutorial on how to make a sewing machine organizer is a practical and creative guide designed to help anyone improve their sewing workspace while developing useful crafting skills. This Beginner’s tutorial on how to make a sewing machine organizer introduces a simple project that allows beginners to create a functional accessory for storing essential sewing tools. Having a well-organized sewing area can make projects easier, faster, and more enjoyable. By following the steps explained in this guide, you can transform basic fabric into a practical organizer that sits neatly around your sewing machine.
A well-planned Beginner’s tutorial on how to make a sewing machine organizer is ideal for people who want to combine organization with creativity. Sewing machine organizers are designed to hold scissors, measuring tapes, threads, and other small tools that are often needed while sewing. Instead of searching for supplies in drawers or boxes, the organizer keeps everything within reach. This project is also a great way for beginners to practice cutting fabric, sewing straight seams, and assembling layered pieces.
Another benefit of following a Beginner’s tutorial on how to make a sewing machine organizer is the opportunity to personalize your sewing space. Every crafter has different preferences, tools, and working habits. Creating your own organizer allows you to choose the colors, fabric patterns, and pocket sizes that best suit your needs. Throughout this article, you will learn how to prepare materials, assemble the organizer step by step, customize the design, and improve your sewing techniques while completing this beginner-friendly project.
Before starting a Beginner’s tutorial on how to make a sewing machine organizer, it is important to gather all necessary materials. Having everything prepared in advance helps keep the project smooth and organized. Most of the items required for this project are common sewing supplies that many crafters already have at home.
The main material in a Beginner’s tutorial on how to make a sewing machine organizer is fabric. Cotton fabric is often recommended because it is easy to cut, sew, and maintain. Choosing a sturdy fabric helps the organizer hold its shape while supporting small sewing tools.
Another useful material in a Beginner’s tutorial on how to make a sewing machine organizer is interfacing or batting. This layer adds structure and stability to the organizer. It helps the fabric remain firm and prevents the organizer from collapsing when pockets are filled.
Thread is another essential component in a Beginner’s tutorial on how to make a sewing machine organizer. Selecting a strong thread that matches or complements the fabric color will give the project a clean and polished look.
Pins or sewing clips are also important tools during a Beginner’s tutorial on how to make a sewing machine organizer. They help hold fabric layers together while sewing and ensure that seams remain aligned and accurate.
Finally, a sewing machine or hand sewing needle is required to complete the Beginner’s tutorial on how to make a sewing machine organizer. While a sewing machine speeds up the process, beginners can also complete this project by hand with patience and care.
The first step in a Beginner’s tutorial on how to make a sewing machine organizer is measuring the sewing machine table or base. These measurements determine the size of the organizer and ensure it fits comfortably around the machine without interfering with its operation.
Once the measurements are taken, the Beginner’s tutorial on how to make a sewing machine organizer continues by cutting the main fabric pieces. Typically, one piece forms the base of the organizer while additional pieces are used to create pockets.
After cutting the fabric, the next step in the Beginner’s tutorial on how to make a sewing machine organizer is preparing the pocket sections. The pockets can be folded and sewn onto the main panel before attaching the final backing layer.
Another stage in the Beginner’s tutorial on how to make a sewing machine organizer involves reinforcing the fabric with interfacing or batting. This step helps the organizer maintain its shape and provides extra durability.
Once the pockets and layers are assembled, the Beginner’s tutorial on how to make a sewing machine organizer moves on to stitching the edges. Carefully sewing around the borders secures all layers and creates a finished appearance.
The final step in the Beginner’s tutorial on how to make a sewing machine organizer is placing the organizer under the sewing machine. The machine’s weight helps keep the organizer stable while allowing the pockets to hang conveniently along the side.
One of the most enjoyable aspects of a Beginner’s tutorial on how to make a sewing machine organizer is customizing the design. Fabric choice plays a major role in the overall look of the organizer. Bright prints can make the sewing space more cheerful, while neutral tones create a calm and minimalist appearance.
Another creative option in a Beginner’s tutorial on how to make a sewing machine organizer is varying the pocket sizes. Some pockets can be narrow for pens and seam rippers, while others can be larger for scissors or measuring tapes.
Decorative stitching can also enhance a Beginner’s tutorial on how to make a sewing machine organizer. Using contrasting thread colors or decorative stitch patterns can add visual interest and highlight the handmade quality of the organizer.
Labels are another helpful addition to a Beginner’s tutorial on how to make a sewing machine organizer. Small fabric labels can identify where specific tools belong, helping maintain an organized workspace.
Many crafters also enjoy adding quilting details during a Beginner’s tutorial on how to make a sewing machine organizer. Light quilting stitches can add texture and help secure the layers of fabric together.
Finally, color coordination is an excellent way to enhance a Beginner’s tutorial on how to make a sewing machine organizer. Matching the organizer to your sewing room décor can create a cohesive and inspiring workspace.
One useful tip for a successful Beginner’s tutorial on how to make a sewing machine organizer is pressing the fabric before sewing. Ironing helps remove wrinkles and ensures accurate measurements.
Another important suggestion in a Beginner’s tutorial on how to make a sewing machine organizer is sewing slowly and carefully. Taking time to align the fabric properly leads to cleaner seams and better results.
Maintaining consistent seam allowances is also crucial in a Beginner’s tutorial on how to make a sewing machine organizer. Even seam allowances help the organizer maintain its shape and balance.
Testing your sewing machine settings before starting the project is another helpful step in a Beginner’s tutorial on how to make a sewing machine organizer. Adjusting tension and stitch length may be necessary depending on the fabric.
Practicing pocket placement before sewing permanently can also improve the results of a Beginner’s tutorial on how to make a sewing machine organizer. This allows you to adjust the layout for better functionality.
Finally, patience and creativity are essential for completing a Beginner’s tutorial on how to make a sewing machine organizer successfully. Taking your time ensures that every detail is carefully crafted.
What skill level is required for a Beginner’s tutorial on how to make a sewing machine organizer?
A Beginner’s tutorial on how to make a sewing machine organizer is designed specifically for beginners, so basic sewing knowledge is usually enough to complete the project.
What fabrics work best for a Beginner’s tutorial on how to make a sewing machine organizer?
Cotton and canvas fabrics are commonly used in a Beginner’s tutorial on how to make a sewing machine organizer because they are durable and easy to sew.
How long does it take to complete a Beginner’s tutorial on how to make a sewing machine organizer?
Most people can finish a Beginner’s tutorial on how to make a sewing machine organizer in two to three hours depending on their sewing speed and experience.
Can the organizer be customized?
Yes, a Beginner’s tutorial on how to make a sewing machine organizer can be customized with different pocket sizes, colors, and decorative details.
What tools can be stored in the organizer?
A Beginner’s tutorial on how to make a sewing machine organizer allows you to store scissors, measuring tapes, thread spools, seam rippers, pins, and other small sewing tools.
Is this project useful for improving sewing skills?
Yes, completing a Beginner’s tutorial on how to make a sewing machine organizer helps beginners practice measuring, cutting, sewing straight seams, and assembling layered fabric pieces.
This article presented a complete Beginner’s tutorial on how to make a sewing machine organizer, explaining the materials needed, the step-by-step construction process, creative design ideas, and useful tips for achieving better results. By following this guide, beginners can create a practical sewing accessory that improves organization while also strengthening basic sewing skills.
Working through a Beginner’s tutorial on how to make a sewing machine organizer not only results in a useful handmade item but also encourages creativity and confidence in sewing projects. The organizer keeps essential tools within reach, making the sewing process more efficient and enjoyable.
If you found this guide helpful, feel free to share your honest opinion and suggestions. Your feedback is valuable and can inspire new ideas and future tutorials for creative sewing projects.


