
Twisted Post Quilt Pattern

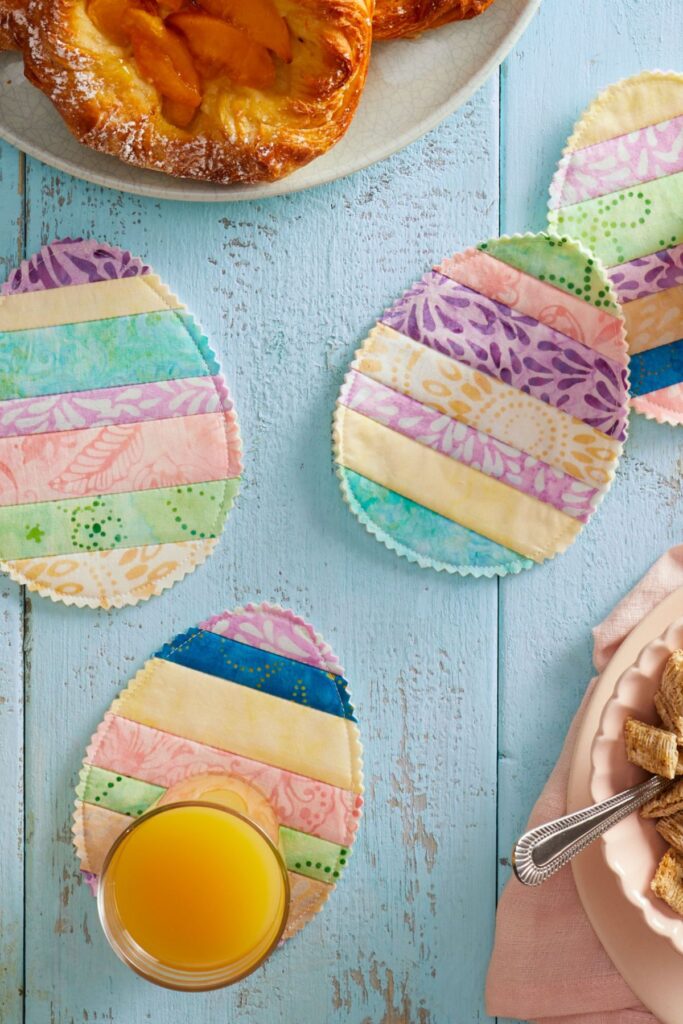
Easter egg-shaped coaster tutorial: a DIY sewing project for Easter. is a creative and enjoyable craft idea that combines seasonal decoration with practical handmade design. This charming Easter egg-shaped coaster tutorial: a DIY sewing project for Easter. helps crafters transform simple fabrics into beautiful and festive table accessories. With its playful shape and colorful patterns, this project is perfect for celebrating the joyful spirit of Easter while exploring the art of sewing.
Many people love crafting during seasonal holidays, and the Easter egg-shaped coaster tutorial: a DIY sewing project for Easter. offers a wonderful opportunity to create something both decorative and functional. Handmade coasters can protect surfaces from heat and moisture while adding a personalized touch to the table. By following a clear Easter egg-shaped coaster tutorial: a DIY sewing project for Easter., even beginners can create charming pieces that reflect creativity and attention to detail.
Another reason why the Easter egg-shaped coaster tutorial: a DIY sewing project for Easter. has become popular is its accessibility. The project does not require complicated tools or expensive materials, making it ideal for people who are just beginning their sewing journey. As each coaster takes shape, the process becomes both relaxing and rewarding, allowing crafters to enjoy the satisfaction of creating something useful with their own hands.
The Easter egg-shaped coaster tutorial: a DIY sewing project for Easter. has gained attention among craft lovers because it perfectly blends seasonal celebration with practical sewing skills. Easter decorations often include colorful eggs, flowers, and soft pastel tones, making the egg shape a natural inspiration for creative projects.
One appealing aspect of the Easter egg-shaped coaster tutorial: a DIY sewing project for Easter. is that it allows people to decorate their homes in a unique handmade way. Instead of using store-bought decorations, crafters can design their own coasters that reflect their personal style.
The egg shape itself carries strong symbolic meaning during Easter celebrations. By following the Easter egg-shaped coaster tutorial: a DIY sewing project for Easter., crafters transform that symbol into a practical piece that can be used every day.
Another reason for the popularity of the Easter egg-shaped coaster tutorial: a DIY sewing project for Easter. is its versatility. These coasters can be used during Easter brunch, family dinners, seasonal parties, or simply as cheerful decorations throughout the spring season.
The project also encourages creativity in color selection. Many people enjoy choosing fabrics with floral prints, pastel tones, or playful patterns when working through the Easter egg-shaped coaster tutorial: a DIY sewing project for Easter..
Finally, the Easter egg-shaped coaster tutorial: a DIY sewing project for Easter. is suitable for various skill levels, allowing beginners and experienced sewers alike to enjoy the creative process.
Before beginning the Easter egg-shaped coaster tutorial: a DIY sewing project for Easter., it is important to gather the right materials. Fortunately, most of the required items are simple and easy to find in any sewing workspace.
Fabric is the most important element in the Easter egg-shaped coaster tutorial: a DIY sewing project for Easter.. Cotton fabric is often recommended because it is durable, easy to sew, and available in a wide variety of colors and patterns.
Another essential material for the Easter egg-shaped coaster tutorial: a DIY sewing project for Easter. is batting or interfacing. This layer provides thickness and insulation, helping the coaster protect surfaces from heat.
Basic sewing tools are also required. Scissors, pins, thread, and a sewing machine or hand-sewing needle are all useful when following the Easter egg-shaped coaster tutorial: a DIY sewing project for Easter..
A template shaped like an egg is also helpful for achieving consistent results. Many crafters create a reusable pattern to simplify the process when making multiple pieces using the Easter egg-shaped coaster tutorial: a DIY sewing project for Easter..
With these simple materials ready, the Easter egg-shaped coaster tutorial: a DIY sewing project for Easter. becomes an approachable and enjoyable sewing project.
The first step in the Easter egg-shaped coaster tutorial: a DIY sewing project for Easter. is preparing the egg-shaped template. This template will guide the cutting process and ensure that all coasters maintain a consistent size and shape.
After preparing the template, fabric pieces are cut according to the pattern. The Easter egg-shaped coaster tutorial: a DIY sewing project for Easter. usually requires two fabric pieces for the outer layers and one piece of batting for the center.
Next, the layers are arranged together with the batting placed between the fabric pieces. This step is essential in the Easter egg-shaped coaster tutorial: a DIY sewing project for Easter. because it provides structure and durability.
The pieces are then sewn around the edges, leaving a small opening. Following the Easter egg-shaped coaster tutorial: a DIY sewing project for Easter., this opening allows the fabric to be turned right side out.
Once turned, the edges are carefully pressed and the opening is stitched closed. This step gives the Easter egg-shaped coaster tutorial: a DIY sewing project for Easter. a clean and polished appearance.
Finally, decorative stitching can be added around the edges. This finishing touch enhances the look of the Easter egg-shaped coaster tutorial: a DIY sewing project for Easter. while also reinforcing the structure of the coaster.
One of the most exciting parts of the Easter egg-shaped coaster tutorial: a DIY sewing project for Easter. is adding creative decorative details. Simple touches can transform each coaster into a small piece of seasonal art.
Some crafters enjoy using patchwork techniques within the Easter egg-shaped coaster tutorial: a DIY sewing project for Easter.. By combining different fabric prints, the coaster gains a vibrant and playful look.
Embroidery is another creative option. Adding small stitched flowers or patterns enhances the charm of the Easter egg-shaped coaster tutorial: a DIY sewing project for Easter. while showcasing sewing skills.
Appliqué designs can also be incorporated into the Easter egg-shaped coaster tutorial: a DIY sewing project for Easter.. Small fabric shapes such as rabbits, flowers, or leaves add personality to the project.
Color coordination is another important element. Many people select pastel colors to highlight the spring atmosphere when working through the Easter egg-shaped coaster tutorial: a DIY sewing project for Easter..
By experimenting with different decorative techniques, each Easter egg-shaped coaster tutorial: a DIY sewing project for Easter. result becomes unique and visually appealing.
What is the Easter egg-shaped coaster tutorial: a DIY sewing project for Easter?
The Easter egg-shaped coaster tutorial: a DIY sewing project for Easter. is a seasonal craft project that teaches how to sew coasters shaped like Easter eggs using fabric and basic sewing techniques.
Is the Easter egg-shaped coaster tutorial: a DIY sewing project for Easter suitable for beginners?
Yes, the Easter egg-shaped coaster tutorial: a DIY sewing project for Easter. is beginner-friendly because it uses simple sewing steps and minimal materials.
What fabric works best for the Easter egg-shaped coaster tutorial: a DIY sewing project for Easter?
Cotton fabric is commonly recommended for the Easter egg-shaped coaster tutorial: a DIY sewing project for Easter. because it is easy to sew and durable.
How long does it take to complete the Easter egg-shaped coaster tutorial: a DIY sewing project for Easter?
The Easter egg-shaped coaster tutorial: a DIY sewing project for Easter. can usually be completed in about 30 to 60 minutes depending on the level of decoration added.
Can these coasters be reused every year?
Yes, coasters made through the Easter egg-shaped coaster tutorial: a DIY sewing project for Easter. are durable and can be stored and reused for many Easter celebrations.
Can children participate in the Easter egg-shaped coaster tutorial: a DIY sewing project for Easter?
With supervision, children can participate in simple parts of the Easter egg-shaped coaster tutorial: a DIY sewing project for Easter., making it a fun family craft activity.
The Easter egg-shaped coaster tutorial: a DIY sewing project for Easter. is a wonderful way to combine creativity, seasonal decoration, and practical sewing skills. Throughout this article, we explored why this project is so popular, the materials required, the step-by-step sewing process, and several creative decoration ideas.
By following the Easter egg-shaped coaster tutorial: a DIY sewing project for Easter., anyone can create charming handmade coasters that brighten a table and celebrate the joyful spirit of Easter.
These small projects provide a relaxing crafting experience while also producing meaningful decorations that can be used year after year.
If you enjoyed learning about the Easter egg-shaped coaster tutorial: a DIY sewing project for Easter., feel free to share your honest opinion and suggestions. Your feedback and creative ideas can inspire even more wonderful sewing projects in the future.


