
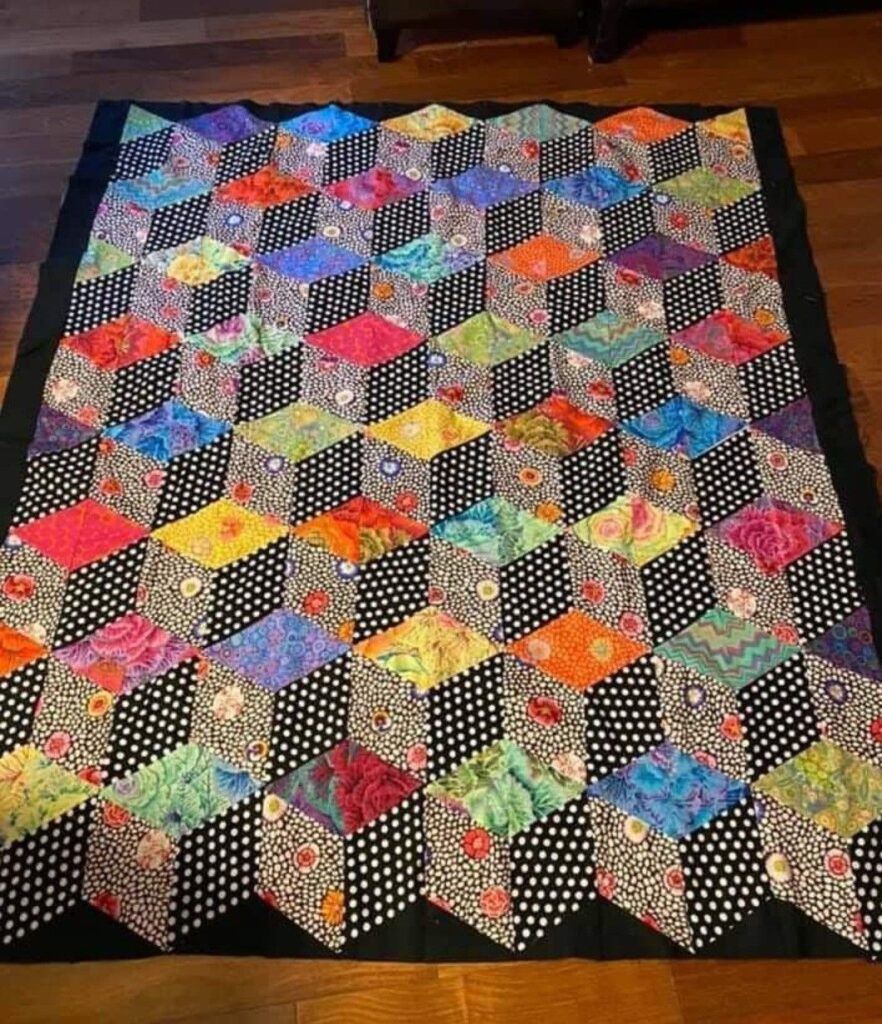
Twisted Post Quilt Pattern

How to make Tumbling blocks fabric strips is a popular question among quilting enthusiasts who want to create visually striking geometric designs with depth and dimension. Understanding How to make Tumbling blocks fabric strips allows crafters to transform simple fabric pieces into a three-dimensional illusion pattern that has been admired for generations. The tumbling blocks design is known for its cube-like effect, which creates the appearance of stacked blocks across a quilt surface. With the right preparation, careful cutting, and accurate piecing, this classic pattern becomes both achievable and rewarding.
Learning How to make Tumbling blocks fabric strips requires attention to color selection, strip alignment, and consistent seam allowances. The illusion of three-dimensional cubes depends heavily on the correct placement of light, medium, and dark fabrics. When arranged properly, these tones create shading that gives the quilt visual depth. By focusing on precision during each step, quilters can ensure that the pattern flows seamlessly across the finished piece.
Another reason many crafters research How to make Tumbling blocks fabric strips is because strip piecing techniques save time and improve accuracy. Instead of cutting individual diamonds one by one, fabric strips can be sewn together first and then cut into precise shapes. This method reduces fabric waste and helps maintain uniformity throughout the project. In this comprehensive guide, you will find clear explanations, structured sections with optimized keyword placement in bold, and detailed steps designed to help you master this timeless quilting technique.
Selecting the right fabrics is the foundation of learning How to make Tumbling blocks fabric strips successfully. The tumbling blocks pattern relies on three distinct shades to create its signature 3D effect. Typically, quilters choose one light, one medium, and one dark fabric within the same color family.
Contrast is essential when planning your color palette. Without clear contrast between the three shades, the cube illusion may appear flat. Carefully audition fabrics side by side before cutting to ensure the tones are visually distinct.
Cotton quilting fabric is highly recommended for this project. It is stable, easy to press, and holds precise seams well. High-quality cotton also minimizes stretching during strip assembly.
Consider the scale of fabric prints. Small or subtle prints work best because large patterns can distract from the geometric effect. Solids and tone-on-tone prints are particularly effective.
Pre-washing your fabric can prevent shrinking and color bleeding later. Although some quilters skip this step, it adds long-term stability to your finished quilt.
Finally, calculate yardage carefully. Strip piecing can be efficient, but accurate measurements ensure you have enough material to complete your desired quilt size.
Precision cutting is crucial when learning How to make Tumbling blocks fabric strips. Start by cutting your fabrics into long strips of equal width, typically between 2.5 and 3.5 inches, depending on your desired finished block size.
Use a rotary cutter, self-healing cutting mat, and quilting ruler for clean and accurate cuts. Sharp tools help prevent uneven edges and fabric distortion.
After cutting individual strips for each shade, sew one strip of each tone together lengthwise. The order should remain consistent throughout the project to maintain the cube illusion.
Press seams carefully, preferably to one side or open depending on your preference. Consistent pressing ensures flat and stable strip sets.
Once your strip set is assembled, use a quilting ruler with a 60-degree angle marking to cut diamond shapes. This angle is essential for forming the tumbling block design.
Take your time when cutting diamonds from the strip set. Accurate angles and measurements directly impact how well the blocks align during assembly.
The assembly stage is where How to make Tumbling blocks fabric strips truly comes together. Begin by arranging three diamond pieces to form a single cube. Each cube consists of one light, one medium, and one dark diamond.
Carefully sew two diamonds together along one edge using a consistent quarter-inch seam allowance. Accuracy at this stage ensures precise alignment later.
Add the third diamond to complete the cube unit. Pay attention to matching seams at the intersections for a polished finish.
Once several cube units are completed, arrange them on a design wall or flat surface. This allows you to preview the layout and adjust color placement if necessary.
Sew cube units into rows, aligning edges carefully to maintain the 3D illusion. Patience during this step prevents distortion and uneven seams.
Press each completed row before joining them together. Proper pressing helps the quilt top remain flat and professional-looking.
Consistency is key when mastering How to make Tumbling blocks fabric strips. Maintaining an accurate quarter-inch seam allowance throughout the project ensures all pieces fit together correctly.
Chain piecing can increase efficiency when sewing multiple units. This technique speeds up production while maintaining consistency.
Labeling strip sets before cutting can help prevent mixing up color orders. Organization reduces errors during assembly.
If you are new to 60-degree angles, practice cutting a few sample diamonds first. Familiarity with the ruler improves accuracy.
Consider using starch or fabric stabilizer to reduce stretching along bias edges. Diamonds have bias sides that can distort if handled roughly.
Finally, take breaks and review your progress regularly. Careful inspection helps catch alignment issues early, saving time and effort later.
What makes the tumbling blocks pattern look three-dimensional?
The 3D effect comes from arranging light, medium, and dark fabrics to simulate shading on cube faces.
Do I need special tools to learn How to make Tumbling blocks fabric strips?
A rotary cutter, quilting ruler with a 60-degree angle, and cutting mat are highly recommended for accuracy.
Can beginners try this pattern?
Yes, beginners can succeed by working slowly and focusing on precise cutting and seam allowances.
How wide should fabric strips be?
Strip width depends on the desired block size, but 2.5 to 3.5 inches is common for many quilts.
Why is accurate pressing important?
Pressing keeps seams flat and ensures blocks align properly during assembly.
Can I use scraps for this project?
Yes, scrap fabrics can create a vibrant and unique tumbling blocks design as long as contrast is maintained.
Conclusion
Understanding How to make Tumbling blocks fabric strips opens the door to creating one of the most visually impressive geometric quilt patterns. In this detailed guide, we explored fabric selection, precision cutting techniques, assembly methods, and expert tips to achieve professional results.
By carefully choosing contrasting shades, cutting accurate 60-degree diamonds, and maintaining consistent seam allowances, you can successfully create the iconic cube illusion. Whether you are a beginner or an experienced quilter, mastering How to make Tumbling blocks fabric strips enhances your quilting skills and expands your creative possibilities.
We hope this comprehensive article has inspired you to start your next project. Please share your honest opinion and suggestions, as your feedback helps improve future content and supports a thriving quilting community.


