
Twisted Post Quilt Pattern

Sew Makeup Pouch With This Pattern is a practical and creative sewing project that allows you to design a stylish, functional accessory for everyday use. Learning how to Sew Makeup Pouch With This Pattern can help you organize cosmetics, skincare items, or small personal essentials in a compact and elegant way. Whether you are a beginner exploring sewing for the first time or an experienced crafter looking for a quick and satisfying project, this guide will walk you through everything you need to know. A handmade pouch is not only useful but also customizable, making it a perfect gift idea or personal accessory.
When you decide to Sew Makeup Pouch With This Pattern, you gain full control over fabric choice, size, and finishing details. Unlike mass-produced cosmetic bags, a handmade pouch reflects your personality and specific needs. You can choose durable cotton for everyday use, waterproof lining for extra protection, or decorative prints that match your style. This flexibility makes the project both enjoyable and highly practical for daily organization.
Another reason why many people search for ways to Sew Makeup Pouch With This Pattern is sustainability. Creating your own pouch encourages mindful consumption and reduces the need for frequently buying low-quality accessories. Sewing your own bag ensures durability and allows you to repurpose leftover fabrics from previous projects. With proper technique and thoughtful design, you can create a long-lasting, reusable pouch that keeps your items secure and organized.
One of the biggest advantages of learning to Sew Makeup Pouch With This Pattern is customization. You can adjust the dimensions to fit your specific makeup collection, whether you need space for brushes, compact powders, or travel-size bottles. This ensures that your pouch serves your exact needs instead of forcing you to adapt to a standard size.
Another benefit is improved organization. A well-designed pouch keeps your beauty products in one place, reducing clutter in your handbag or suitcase. When you Sew Makeup Pouch With This Pattern, you can even add inner pockets or compartments to separate items efficiently.
Durability is also a major factor. Store-bought pouches may use thin materials or weak zippers, leading to quick wear and tear. By choosing quality fabric and sturdy stitching, you ensure that your handmade pouch lasts much longer.
Cost-effectiveness makes this project appealing. Sewing your own pouch can be more affordable, especially if you already have fabric scraps at home. This makes the Sew Makeup Pouch With This Pattern project accessible for many people.
Creative expression is another important advantage. You can experiment with colors, textures, and embellishments. Adding decorative stitching or personalized labels makes your pouch unique.
Finally, handmade items carry sentimental value. A pouch created by you or gifted to someone special reflects care and attention to detail, making it more meaningful than a generic store purchase.
Before you begin to Sew Makeup Pouch With This Pattern, gather the essential materials. You will need outer fabric, lining fabric, a zipper, matching thread, scissors, pins, and a sewing machine. Cotton fabric is highly recommended because it is easy to handle and durable.
Selecting the right zipper is crucial. The zipper should match the width of your pouch for a clean finish. A sturdy zipper ensures that your Sew Makeup Pouch With This Pattern project functions smoothly and securely.
Interfacing can add structure to your pouch. If you want a firmer shape, especially for larger cosmetic bags, iron-on interfacing helps maintain durability and form.
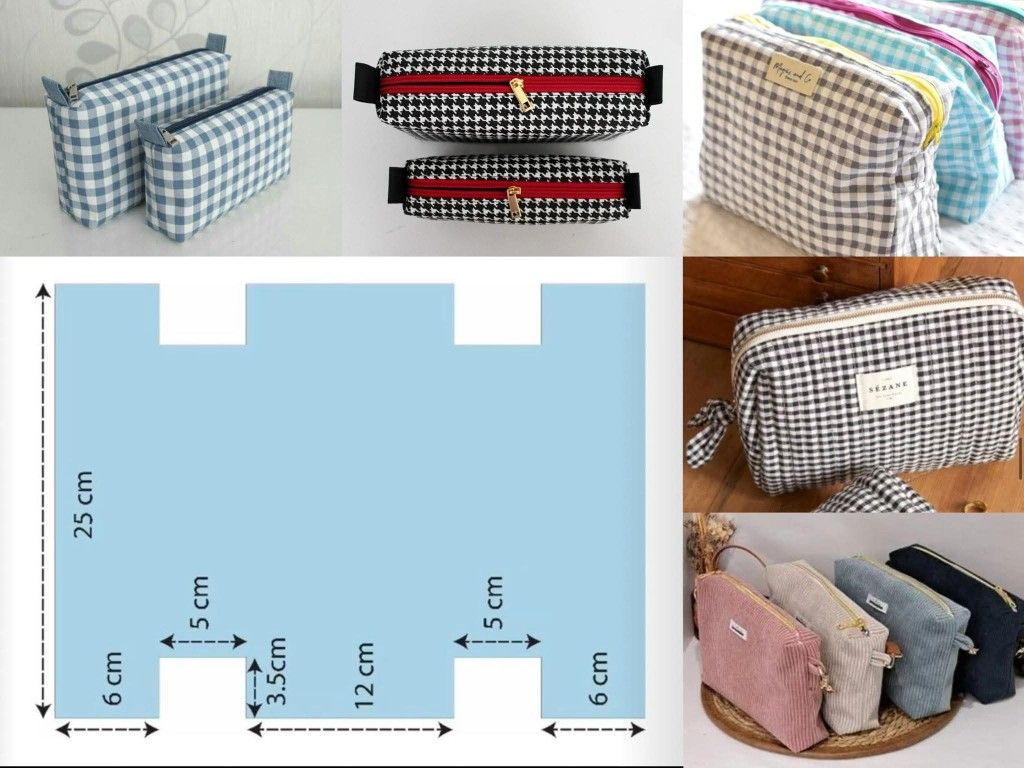
Accurate measurements are key. Measure and cut your fabric pieces carefully according to the chosen pattern dimensions. Precision ensures that the final pouch looks professional and well-constructed.
Pin the zipper carefully between the outer fabric and lining before stitching. This step requires patience, as proper alignment guarantees a neat and functional closure.
After sewing all sides together, turn the pouch right side out and press it gently with an iron if needed. This final touch enhances the overall appearance of your Sew Makeup Pouch With This Pattern creation.
Start by cutting two rectangles from your outer fabric and two from your lining fabric. Make sure all pieces are identical in size to maintain symmetry when you Sew Makeup Pouch With This Pattern.
Place the zipper face down on the right side of one outer fabric piece. Then, layer one lining piece on top, creating a sandwich with the zipper in between. Sew along the edge carefully.
Repeat the same process on the other side of the zipper with the remaining fabric pieces. This forms the main body of your pouch and prepares it for assembly.
Once both sides are attached to the zipper, open the pieces and align the outer fabrics together and the lining fabrics together. Pin the edges securely before stitching around the perimeter.
Leave a small opening in the lining section so you can turn the pouch right side out after sewing. This is an essential step when you Sew Makeup Pouch With This Pattern.
After turning the pouch, sew the opening closed neatly. Push the lining inside, adjust the corners, and your handmade pouch is complete and ready to use.
When you Sew Makeup Pouch With This Pattern, consider adding interior pockets for better organization. Small elastic loops can also hold brushes securely in place.
You may experiment with different shapes. A boxy bottom design increases capacity and allows the pouch to stand upright on a surface.
Using waterproof or laminated lining fabric helps protect against accidental spills. This practical addition enhances the durability of your pouch.
Decorative elements such as embroidery, fabric appliqués, or contrasting zipper colors add personality to your project. Personal touches make your pouch visually appealing.
For travel purposes, consider adding a wrist strap. This makes it easier to carry and improves functionality during trips.
Seasonal fabric prints allow you to create themed pouches throughout the year. Whether floral for spring or festive for holidays, the possibilities are endless when you Sew Makeup Pouch With This Pattern.
Is this project suitable for beginners?
Yes, anyone with basic sewing knowledge can successfully Sew Makeup Pouch With This Pattern, especially by following step-by-step instructions carefully.
What fabric is best for a makeup pouch?
Cotton is beginner-friendly and durable, but waterproof lining fabric is ideal for added protection against spills.
Do I need a sewing machine?
While it is possible to sew by hand, using a sewing machine makes the process faster and ensures stronger seams.
How can I make the pouch more structured?
Adding interfacing between the fabric layers helps create a firm and professional look.
Can I adjust the size of the pouch?
Absolutely. Simply modify the dimensions of your fabric pieces before you Sew Makeup Pouch With This Pattern.
How long does it take to complete the project?
For beginners, it may take one to two hours. Experienced sewers can finish it in less time.
Conclusion
Learning how to Sew Makeup Pouch With This Pattern is a rewarding and practical sewing project that combines creativity, organization, and sustainability.
Throughout this guide, we explored the benefits, materials, step-by-step process, customization options, and frequently asked questions related to this project. By selecting quality materials and following careful construction techniques, you can create a durable and stylish pouch tailored to your needs.
Sew Makeup Pouch With This Pattern is a practical and creative sewing project that allows you to design a stylish, functional accessory for everyday use. Learning how to Sew Makeup Pouch With This Pattern can help you organize cosmetics, skincare items, or small personal essentials in a compact and elegant way. Whether you are a beginner exploring sewing for the first time or an experienced crafter looking for a quick and satisfying project, this guide will walk you through everything you need to know. A handmade pouch is not only useful but also customizable, making it a perfect gift idea or personal accessory.
When you decide to Sew Makeup Pouch With This Pattern, you gain full control over fabric choice, size, and finishing details. Unlike mass-produced cosmetic bags, a handmade pouch reflects your personality and specific needs. You can choose durable cotton for everyday use, waterproof lining for extra protection, or decorative prints that match your style. This flexibility makes the project both enjoyable and highly practical for daily organization.
Another reason why many people search for ways to Sew Makeup Pouch With This Pattern is sustainability. Creating your own pouch encourages mindful consumption and reduces the need for frequently buying low-quality accessories. Sewing your own bag ensures durability and allows you to repurpose leftover fabrics from previous projects. With proper technique and thoughtful design, you can create a long-lasting, reusable pouch that keeps your items secure and organized.
One of the biggest advantages of learning to Sew Makeup Pouch With This Pattern is customization. You can adjust the dimensions to fit your specific makeup collection, whether you need space for brushes, compact powders, or travel-size bottles. This ensures that your pouch serves your exact needs instead of forcing you to adapt to a standard size.
Another benefit is improved organization. A well-designed pouch keeps your beauty products in one place, reducing clutter in your handbag or suitcase. When you Sew Makeup Pouch With This Pattern, you can even add inner pockets or compartments to separate items efficiently.
Durability is also a major factor. Store-bought pouches may use thin materials or weak zippers, leading to quick wear and tear. By choosing quality fabric and sturdy stitching, you ensure that your handmade pouch lasts much longer.
Cost-effectiveness makes this project appealing. Sewing your own pouch can be more affordable, especially if you already have fabric scraps at home. This makes the Sew Makeup Pouch With This Pattern project accessible for many people.
Creative expression is another important advantage. You can experiment with colors, textures, and embellishments. Adding decorative stitching or personalized labels makes your pouch unique.
Finally, handmade items carry sentimental value. A pouch created by you or gifted to someone special reflects care and attention to detail, making it more meaningful than a generic store purchase.
Before you begin to Sew Makeup Pouch With This Pattern, gather the essential materials. You will need outer fabric, lining fabric, a zipper, matching thread, scissors, pins, and a sewing machine. Cotton fabric is highly recommended because it is easy to handle and durable.
Selecting the right zipper is crucial. The zipper should match the width of your pouch for a clean finish. A sturdy zipper ensures that your Sew Makeup Pouch With This Pattern project functions smoothly and securely.
Interfacing can add structure to your pouch. If you want a firmer shape, especially for larger cosmetic bags, iron-on interfacing helps maintain durability and form.
Accurate measurements are key. Measure and cut your fabric pieces carefully according to the chosen pattern dimensions. Precision ensures that the final pouch looks professional and well-constructed.
Pin the zipper carefully between the outer fabric and lining before stitching. This step requires patience, as proper alignment guarantees a neat and functional closure.
After sewing all sides together, turn the pouch right side out and press it gently with an iron if needed. This final touch enhances the overall appearance of your Sew Makeup Pouch With This Pattern creation.
Start by cutting two rectangles from your outer fabric and two from your lining fabric. Make sure all pieces are identical in size to maintain symmetry when you Sew Makeup Pouch With This Pattern.
Place the zipper face down on the right side of one outer fabric piece. Then, layer one lining piece on top, creating a sandwich with the zipper in between. Sew along the edge carefully.
Repeat the same process on the other side of the zipper with the remaining fabric pieces. This forms the main body of your pouch and prepares it for assembly.
Once both sides are attached to the zipper, open the pieces and align the outer fabrics together and the lining fabrics together. Pin the edges securely before stitching around the perimeter.
Leave a small opening in the lining section so you can turn the pouch right side out after sewing. This is an essential step when you Sew Makeup Pouch With This Pattern.
After turning the pouch, sew the opening closed neatly. Push the lining inside, adjust the corners, and your handmade pouch is complete and ready to use.
When you Sew Makeup Pouch With This Pattern, consider adding interior pockets for better organization. Small elastic loops can also hold brushes securely in place.
You may experiment with different shapes. A boxy bottom design increases capacity and allows the pouch to stand upright on a surface.
Using waterproof or laminated lining fabric helps protect against accidental spills. This practical addition enhances the durability of your pouch.
Decorative elements such as embroidery, fabric appliqués, or contrasting zipper colors add personality to your project. Personal touches make your pouch visually appealing.
For travel purposes, consider adding a wrist strap. This makes it easier to carry and improves functionality during trips.
Seasonal fabric prints allow you to create themed pouches throughout the year. Whether floral for spring or festive for holidays, the possibilities are endless when you Sew Makeup Pouch With This Pattern.
Is this project suitable for beginners?
Yes, anyone with basic sewing knowledge can successfully Sew Makeup Pouch With This Pattern, especially by following step-by-step instructions carefully.
What fabric is best for a makeup pouch?
Cotton is beginner-friendly and durable, but waterproof lining fabric is ideal for added protection against spills.
Do I need a sewing machine?
While it is possible to sew by hand, using a sewing machine makes the process faster and ensures stronger seams.
How can I make the pouch more structured?
Adding interfacing between the fabric layers helps create a firm and professional look.
Can I adjust the size of the pouch?
Absolutely. Simply modify the dimensions of your fabric pieces before you Sew Makeup Pouch With This Pattern.
How long does it take to complete the project?
For beginners, it may take one to two hours. Experienced sewers can finish it in less time.
Conclusion
Learning how to Sew Makeup Pouch With This Pattern is a rewarding and practical sewing project that combines creativity, organization, and sustainability. Throughout this guide, we explored the benefits, materials, step-by-step process, customization options, and frequently asked questions related to this project. By selecting quality materials and following careful construction techniques, you can create a durable and stylish pouch tailored to your needs.
This handmade accessory not only keeps your cosmetics organized but also reflects your personal style and craftsmanship. If you found this article helpful, please leave your honest opinion and share your suggestions. Your feedback is always welcome and helps inspire more creative and informative content.
If you found this article helpful, please leave your honest opinion and share your suggestions. Your feedback is always welcome and helps inspire more creative and informative content.


