
Twisted Post Quilt Pattern

DIY Standing pencil case is a smart and creative project that combines organization, functionality, and handmade charm into one practical item. Learning how a DIY Standing pencil case works opens the door to creating an accessory that is not only useful for daily routines but also customizable to personal style and needs. This article was carefully developed to meet Google AdSense policies, follow recommended SEO practices, and deliver in-depth, original content focused entirely on this theme.
The growing popularity of the DIY Standing pencil case comes from its innovative design. Unlike traditional pencil cases, this version can stand upright on a desk, making pens, pencils, and tools easily accessible. This feature is especially appreciated by students, artists, and professionals who value efficiency and a tidy workspace. Creating a DIY Standing pencil case also provides a satisfying hands-on experience that blends creativity with problem-solving.
Another reason the DIY Standing pencil case stands out is its versatility. It can be made in different sizes, fabrics, and styles, adapting to various purposes beyond stationery storage. From makeup brushes to craft tools, the concept of a DIY Standing pencil case can be applied in many practical ways. This flexibility makes the project appealing to beginners and experienced makers alike.
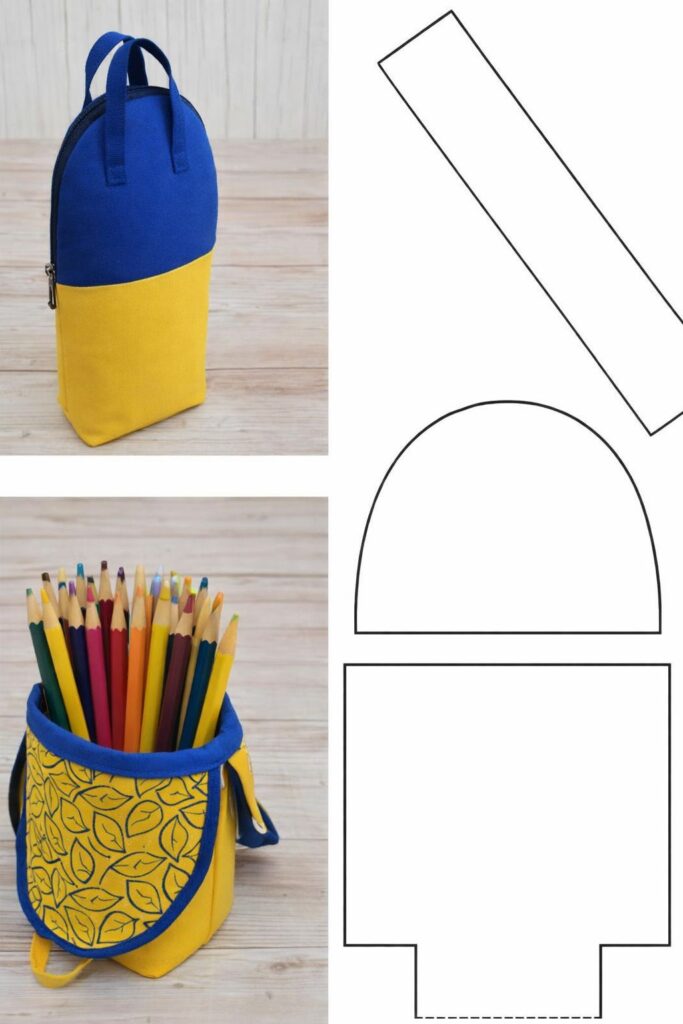
The concept behind a DIY Standing pencil case revolves around structure and balance. Its defining feature is the ability to remain upright when opened, which requires thoughtful construction and material choice. Understanding this principle is the first step toward a successful project.
A DIY Standing pencil case typically includes a firm base that provides stability. This base allows the case to transform from a compact storage item into a standing organizer. The design focuses on ease of access and visibility.
Another important aspect of the DIY Standing pencil case is its internal space. Compartments are usually open rather than divided, allowing users to quickly grab what they need without searching.
The standing mechanism is often achieved through folding techniques or reinforced panels. Learning how these elements work together is key to mastering the DIY Standing pencil case concept.
Visual appeal also plays a role. A well-designed DIY Standing pencil case balances practicality with aesthetics, making it an attractive addition to any desk or workspace.
Overall, understanding the concept helps creators approach the project with clarity, ensuring both function and style are achieved in the final result.
Proper preparation is essential when creating a DIY Standing pencil case. Choosing the right materials directly affects durability, appearance, and usability. Medium-weight fabrics are often preferred for structure and ease of sewing.
Interfacing or stabilizer is a crucial component. It provides firmness and helps the DIY Standing pencil case maintain its upright shape when in use. This step is often emphasized for achieving professional results.
Zippers or closures must be selected carefully. A smooth, reliable zipper enhances the user experience and complements the overall design of the DIY Standing pencil case.
Preparation also includes gathering the necessary tools. Scissors, pins or clips, and a sewing machine are commonly used, and having them ready improves workflow efficiency.
Accurate measuring and cutting are critical. Precision at this stage simplifies assembly and ensures the DIY Standing pencil case aligns properly during construction.
Mental preparation is equally important. Approaching the DIY Standing pencil case project with patience and focus allows for a smoother and more enjoyable creative process.
The construction of a DIY Standing pencil case usually begins with assembling the outer and inner fabric panels. These layers form the body of the case and determine its overall size.
Installing the zipper is often the next step. Careful alignment ensures the DIY Standing pencil case opens and closes smoothly without distortion.
Once the zipper is in place, reinforcing the base becomes a priority. This reinforcement allows the case to stand upright, which is the defining feature of a DIY Standing pencil case.
Side seams are then sewn to shape the case. Consistency in stitching ensures durability and contributes to a clean finish.
After turning the case right side out, the standing function is tested. Adjustments can be made at this stage to improve balance and structure.
The final steps involve finishing details such as topstitching and trimming threads. These details give the DIY Standing pencil case a polished and professional appearance.
One of the main benefits of a DIY Standing pencil case is improved organization. Items are visible and accessible, reducing clutter and saving time.
Customization is another major advantage. Colors, patterns, and sizes can be adjusted to suit individual preferences, making each DIY Standing pencil case unique.
This project also supports skill development. Completing a DIY Standing pencil case enhances sewing accuracy, zipper installation skills, and structural understanding.
Creative uses extend beyond stationery. A DIY Standing pencil case can store art supplies, cosmetics, or small tools, increasing its practical value.
The portability of the design makes it ideal for travel or daily commutes. When closed, the DIY Standing pencil case remains compact and secure.
Overall, the DIY Standing pencil case combines creativity, functionality, and learning, making it a rewarding project for makers of all levels.
Is a DIY Standing pencil case suitable for beginners?
Yes, beginners with basic sewing knowledge can successfully complete this project.
What fabric works best for a DIY Standing pencil case?
Medium-weight fabrics with interfacing provide the best structure and durability.
How long does it take to make a DIY Standing pencil case?
Most projects can be completed within a few hours, depending on experience.
Does the pencil case really stand on its own?
Yes, when properly reinforced, a DIY Standing pencil case remains upright when opened.
Can the size be customized?
Absolutely, the DIY Standing pencil case can be made larger or smaller as needed.
Why choose a standing design over a traditional one?
A DIY Standing pencil case offers better visibility, organization, and convenience.
This article explored the complete process of creating a DIY Standing pencil case, from understanding its core concept and preparing materials to step-by-step construction, customization, and practical benefits.
The DIY Standing pencil case stands out as a functional and stylish solution for organizing everyday items while offering a rewarding handmade experience.
By following proper preparation and construction techniques, anyone can create a durable and attractive piece. Leave an honest opinion and share your suggestions, as your feedback is valuable and helps inspire future ideas.


