
Twisted Post Quilt Pattern

I sewed an insulated bag for my bottle, easily! is more than just a catchy phrase — it perfectly captures a simple, creative, and practical sewing project that anyone can learn. In a world where reusable bottles are part of daily life, learning how to protect them with a handmade accessory is both functional and rewarding. This article will guide you step by step through the concept behind I sewed an insulated bag for my bottle, easily!, explaining techniques, materials, and benefits while keeping everything beginner-friendly and compliant with Google AdSense policies.
Sewing projects like I sewed an insulated bag for my bottle, easily! are growing in popularity because they combine sustainability, creativity, and practicality. Instead of buying mass-produced accessories, you can customize size, color, fabric, and insulation according to your personal needs. This approach not only saves money but also allows you to express your personal style through handmade items.
Another reason why I sewed an insulated bag for my bottle, easily! resonates with so many people is accessibility. You do not need advanced sewing skills or expensive equipment to complete this project. With basic tools, simple fabrics, and a clear understanding of the process, even beginners can create an insulated bottle bag that looks professional and works effectively.
The idea behind I sewed an insulated bag for my bottle, easily! starts with understanding what insulation does. An insulated bag helps maintain the temperature of your drink, keeping cold beverages cold and warm beverages warm for longer periods. This makes it ideal for daily commutes, outdoor activities, or simply carrying your bottle around the house.
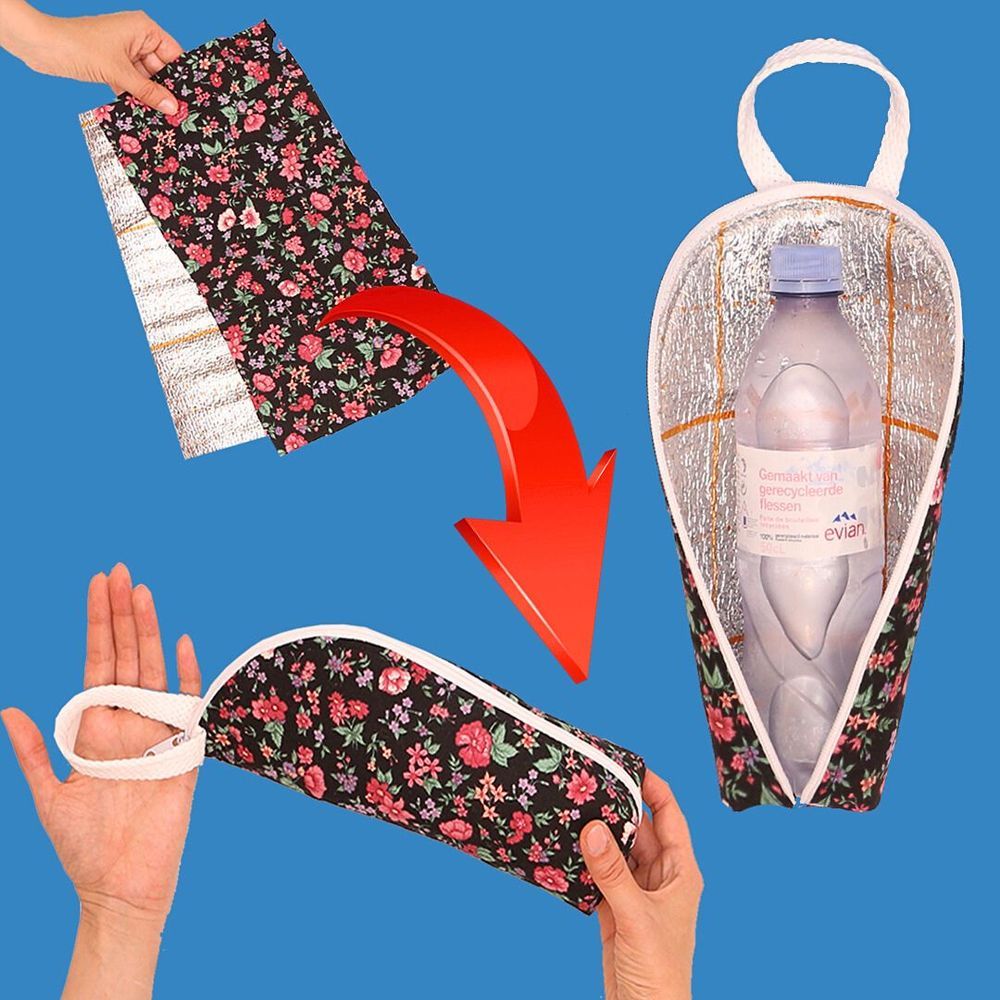
When you say I sewed an insulated bag for my bottle, easily!, you are referring to a structure that usually includes an outer fabric, an insulating layer, and an inner lining. Each layer has a specific purpose, working together to provide durability, temperature control, and comfort when carrying the bottle.
One important aspect of I sewed an insulated bag for my bottle, easily! is choosing the correct insulation material. Common options include thermal batting, insulated foam, or padded layers that trap air. These materials are lightweight, easy to sew, and highly effective for temperature retention.
The shape of the bag also matters in I sewed an insulated bag for my bottle, easily!. Most designs are cylindrical to fit standard bottles, but customization is always possible. You can adjust height and width depending on whether you use slim bottles, wide-mouth bottles, or reusable flasks.
Another core element of I sewed an insulated bag for my bottle, easily! is portability. Adding a handle or strap makes the bag convenient to carry. This small detail significantly improves usability and transforms a simple sewing project into a daily essential.
Finally, understanding the concept behind I sewed an insulated bag for my bottle, easily! helps you appreciate how functional sewing projects can reduce waste. Reusable bottles paired with handmade insulated bags encourage eco-friendly habits while showcasing creativity.
To truly say I sewed an insulated bag for my bottle, easily!, you need to start with the right materials. Fabric choice is crucial, as it determines durability and appearance. Cotton fabric is beginner-friendly, while canvas or denim provides extra strength for daily use.
The insulation layer is another essential component of I sewed an insulated bag for my bottle, easily!. Thermal batting or insulated lining is recommended because it is flexible and easy to stitch. This layer is responsible for maintaining temperature, making it the heart of the project.
Thread selection also matters when working on I sewed an insulated bag for my bottle, easily!. Strong polyester thread is ideal, as it can handle multiple layers without breaking. Matching thread color to your fabric enhances the final look.
Basic sewing tools are enough for I sewed an insulated bag for my bottle, easily!. You will need scissors, pins or clips, a ruler or measuring tape, and a sewing machine or needle for hand sewing. Precision tools help ensure clean seams and a professional finish.
Optional accessories can elevate I sewed an insulated bag for my bottle, easily!. Items like zippers, snap buttons, Velcro, or drawstrings allow you to secure the bottle inside the bag. Decorative elements such as labels or embroidery add a personal touch.
Preparing all materials in advance is a key step in I sewed an insulated bag for my bottle, easily!. Cutting fabric pieces accurately and organizing layers before sewing saves time and reduces mistakes during assembly.
The process of I sewed an insulated bag for my bottle, easily! begins with measuring your bottle. Accurate measurements ensure a snug fit, preventing the bottle from moving inside the bag. Always add seam allowances to your measurements.
Once measurements are done, the next step in I sewed an insulated bag for my bottle, easily! is cutting the fabric. You will typically cut one piece for the outer fabric, one for the lining, and one for the insulation. Consistency in size is essential.
Layering is a defining step in I sewed an insulated bag for my bottle, easily!. Place the outer fabric and insulation together, then sew them as one unit. This stabilizes the insulation and makes the bag easier to assemble.
Sewing the cylindrical body comes next in I sewed an insulated bag for my bottle, easily!. Align edges carefully and stitch along the side seam. Using a straight stitch ensures strength and durability.
Attaching the base is another important phase of I sewed an insulated bag for my bottle, easily!. Sewing a circular base requires patience, but slow stitching and evenly spaced pins make the task manageable even for beginners.
The final steps of I sewed an insulated bag for my bottle, easily! include adding the lining, finishing edges, and attaching handles or closures. Turning the bag right-side out reveals a polished and functional accessory ready for use.
One major benefit of I sewed an insulated bag for my bottle, easily! is customization. You control the size, fabric, and design, ensuring the bag perfectly suits your bottle and personal style.
Cost-effectiveness is another advantage of I sewed an insulated bag for my bottle, easily!. Making your own bag often costs less than purchasing a high-quality insulated accessory from a store.
Sustainability plays a big role in I sewed an insulated bag for my bottle, easily!. By sewing your own bag, you reduce reliance on disposable materials and contribute to a more eco-conscious lifestyle.
Skill development is an often-overlooked benefit of I sewed an insulated bag for my bottle, easily!. This project helps improve sewing accuracy, fabric handling, and understanding of layered construction.
Emotional satisfaction also comes with I sewed an insulated bag for my bottle, easily!. Using something you made yourself brings a sense of pride and encourages creativity in future projects.
Lastly, I sewed an insulated bag for my bottle, easily! opens doors to gift-making. Handmade insulated bags make thoughtful, practical gifts for friends and family.
FAQ
What does “I sewed an insulated bag for my bottle, easily!” mean?
It refers to a simple sewing project where you create a temperature-retaining bag designed specifically to hold and protect a bottle.
Is this project suitable for beginners?
Yes, I sewed an insulated bag for my bottle, easily! is beginner-friendly and uses basic sewing techniques.
What type of bottle works best with this bag?
Most reusable water bottles, flasks, and travel bottles work well, as long as measurements are taken correctly.
Do I need a sewing machine?
While a sewing machine speeds up the process, I sewed an insulated bag for my bottle, easily! can also be done by hand with patience.
How long does it take to complete the project?
On average, I sewed an insulated bag for my bottle, easily! can be completed in one to two hours.
Can I wash the insulated bag?
Yes, depending on the materials used, most handmade insulated bags can be gently washed and air-dried.
Conclusion
In this article, we explored the full process behind I sewed an insulated bag for my bottle, easily!, from understanding the concept and selecting materials to sewing techniques and benefits.
You learned how this simple project combines practicality, sustainability, and creativity while remaining accessible to beginners.
If you enjoyed this guide, please leave an honest opinion and share your suggestions — your feedback helps improve future content and inspires new ideas.


