
Twisted Post Quilt Pattern

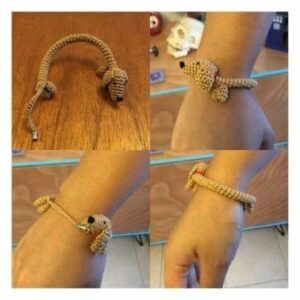
How to Make A Wrist Pincushion Easy Step By Step Sewing Tutorial is a practical and creative project that every sewing enthusiast can enjoy. A wrist pincushion is a small cushion that fits comfortably around your wrist, allowing you to keep pins and needles close while working on sewing, quilting, or craft projects. Learning How to Make A Wrist Pincushion Easy Step By Step Sewing Tutorial helps improve your organization, saves time, and makes your sewing sessions safer and more efficient. This simple accessory is both functional and customizable, making it perfect for beginners and experienced crafters alike.
When you follow How to Make A Wrist Pincushion Easy Step By Step Sewing Tutorial, you will discover how easy it is to create something useful with basic materials. Instead of searching for pins on the table or risking dropping them, your wrist pincushion keeps everything within reach. This improves your workflow and reduces distractions. With just a little fabric, stuffing, and elastic, you can make a durable and stylish wrist pincushion that matches your personal taste.
Another great reason to explore How to Make A Wrist Pincushion Easy Step By Step Sewing Tutorial is the opportunity for creativity. You can choose fun colors, patterns, and shapes to make your wrist pincushion unique. Whether you prefer floral prints, bright colors, or simple designs, this project allows full customization. It is also a wonderful handmade gift idea for friends who love sewing or crafting.

A key benefit of How to Make A Wrist Pincushion Easy Step By Step Sewing Tutorial is convenience. Wearing your pincushion on your wrist means your pins are always close by.
This reduces the risk of losing pins on the floor, which can be dangerous and inconvenient.
A wrist pincushion also improves efficiency by minimizing interruptions during sewing projects.
It helps keep your workspace clean and organized.
This accessory is lightweight and comfortable to wear for long periods.
Most importantly, it enhances safety by preventing accidental pin injuries.
To follow How to Make A Wrist Pincushion Easy Step By Step Sewing Tutorial, you need simple materials.
Fabric is the main component, and cotton works well for durability.
You will also need elastic or a Velcro strap to secure the pincushion to your wrist.
Soft stuffing gives the cushion its shape and allows pins to stay firmly in place.
Thread that matches your fabric creates a neat finish.
Scissors, pins, and a sewing machine or needle complete your basic tool list.
The first step in How to Make A Wrist Pincushion Easy Step By Step Sewing Tutorial is cutting two fabric circles.
Place the fabric pieces together with the right sides facing inward.
Sew around the edges, leaving a small opening.
Turn the fabric right-side out and fill it with stuffing.
Close the opening securely with a stitch.
Attach the elastic or strap to the back, and your wrist pincushion is ready.
When following How to Make A Wrist Pincushion Easy Step By Step Sewing Tutorial, personalization is easy.
Choose bright colors to make your pincushion easy to spot.
Add decorative stitches for a creative touch.
Use patterned fabric to reflect your style.
Adjust the size for comfort.
Try different shapes like hearts or flowers.
Add a button in the center for extra charm.
Is this project beginner-friendly?
Yes, it uses simple sewing techniques.
How long does it take to make?
Usually less than one hour.
Can I sew it by hand?
Yes, a sewing machine is optional.
What stuffing works best?
Soft fiberfill is ideal.
Is it comfortable to wear?
Yes, especially with elastic straps.
Can it be washed?
Hand washing is recommended.
Learning How to Make A Wrist Pincushion Easy Step By Step Sewing Tutorial is a valuable skill for anyone who enjoys sewing or crafting.
This simple accessory improves organization, safety, and efficiency while allowing creative expression. Throughout this article, we explored its benefits, materials, steps, customization options, and common questions.
We hope this guide inspired you to try How to Make A Wrist Pincushion Easy Step By Step Sewing Tutorial for yourself. Please leave your honest opinion, share your experience, and suggest new ideas. Your feedback and creativity are always welcome.


