
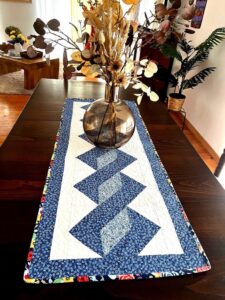
Twisted Post Quilt Pattern

Buzzing Bee Patchwork Block Tutorial is a charming and creative way to bring nature-inspired beauty into your quilting projects. This delightful block design captures the playful spirit of bees through fabric, color, and geometric shapes. By following a Buzzing Bee Patchwork Block Tutorial, quilters of all skill levels can create eye-catching blocks that add personality and warmth to any quilt.The popularity of the Buzzing Bee Patchwork Block Tutorial comes from its versatility and visual appeal. Bees symbolize teamwork, productivity, and positivity, making this block a meaningful addition to many quilting themes. Whether you are making a seasonal quilt, a baby blanket, or a decorative wall hanging, the buzzing bee design adds a joyful touch.
Another reason quilters love the Buzzing Bee Patchwork Block Tutorial is its balance between simplicity and creativity. The block uses basic shapes such as squares, rectangles, and half-square triangles, making it accessible for beginners while still offering room for customization for experienced quilters.This tutorial also encourages fabric play. Bright yellows, soft whites, bold blacks, and cheerful floral prints can be combined to create bees that feel lively and expressive. With the Buzzing Bee Patchwork Block Tutorial, every block can look slightly different, giving your quilt a unique and handcrafted feel.
Modern quilting trends favor playful, nature-inspired designs, and the Buzzing Bee Patchwork Block Tutorial fits perfectly into this style. It blends traditional patchwork techniques with fresh, modern aesthetics that appeal to today’s quilting community.By learning the Buzzing Bee Patchwork Block Tutorial, you gain more than just a new block pattern. You gain the confidence to experiment, the joy of creative expression, and the satisfaction of making something both beautiful and meaningful with your own hands.
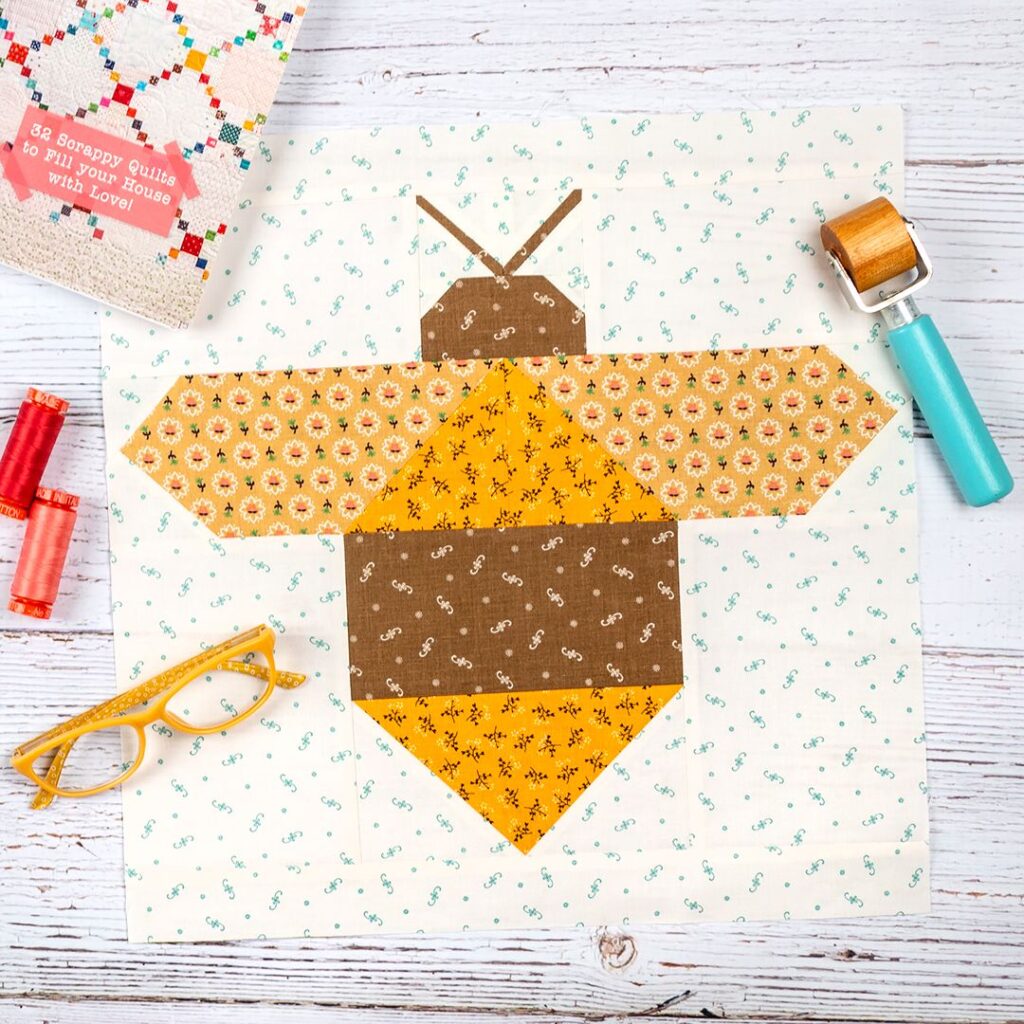
The Buzzing Bee Patchwork Block Tutorial is built around simple geometric shapes that come together to form a recognizable bee figure.
The body of the bee is usually made with alternating yellow and black fabric strips to mimic natural bee stripes.
White or light-colored fabric is often used for the wings, giving the bee a soft and airy appearance.
Small squares or triangles can represent the head, adding character to the block.
The background fabric helps the bee stand out, often using sky blue, green, or neutral tones.
This design structure makes the Buzzing Bee Patchwork Block Tutorial easy to adapt to different quilt sizes.
The block can be scaled up or down depending on your project needs.
Many quilters enjoy adding embroidery details, such as antennae or tiny smiles, to personalize their bees.
The simplicity of the shapes allows for clean lines and a polished look.
Color contrast is key in making the bee design pop.
Using high-contrast fabrics improves visibility and visual impact.
The Buzzing Bee Patchwork Block Tutorial blends creativity with structured design.
To follow a Buzzing Bee Patchwork Block Tutorial, you will need basic quilting tools.
A rotary cutter and cutting mat ensure precise fabric pieces.
A quilting ruler helps measure accurate dimensions.
Cotton fabric is recommended for durability and ease of sewing.
Thread in matching or neutral colors works best.
Pins or clips help keep fabric aligned.
A sewing machine speeds up the process, but hand sewing is also possible.
Pre-washing fabric prevents shrinkage later.
Ironing fabric before cutting ensures clean edges.
Choosing quality fabric improves the final look of your bee blocks.
Bright yellow, black, and white are classic bee colors.
Background fabric should contrast with the bee design.
Preparation makes the Buzzing Bee Patchwork Block Tutorial smoother.
The Buzzing Bee Patchwork Block Tutorial starts with cutting fabric pieces for the bee’s body, wings, head, and background.
Strips of yellow and black fabric are sewn together to form the striped body.
These strips are then trimmed to the correct size.
The head is usually made from a dark square attached to one end of the body.
Wing pieces are sewn separately using light-colored fabric.
Half-square triangles can shape the wings for a soft look.
Once the bee parts are ready, they are sewn onto the background fabric.
Careful alignment keeps the bee centered.
Seams are pressed flat for a clean finish.
The completed block is squared to the correct size.
Accuracy improves the overall quilt layout.
Following the Buzzing Bee Patchwork Block Tutorial step by step ensures success.
Fabric choice plays a big role in the Buzzing Bee Patchwork Block Tutorial.
Yellow fabrics can range from bright sunflower to soft pastel.
Black can be replaced with dark gray for a softer look.
White wings can be replaced with light prints.
Floral backgrounds add a garden theme.
Solid backgrounds create a modern style.
Mixing prints adds texture and interest.
High contrast makes the bee stand out.
Soft colors create a gentle appearance.
Bold colors make the design playful.
Fabric variety keeps the quilt visually exciting.
The Buzzing Bee Patchwork Block Tutorial allows creative freedom.
Let your fabric choices reflect your personal style.
One of the best parts of the Buzzing Bee Patchwork Block Tutorial is customization.
You can change wing shapes for different looks.
Add embroidered antennae for detail.
Use buttons or fabric circles for eyes.
Create flying bees with angled blocks.
Add flowers or honeycomb shapes around the bee.
Make multiple bees facing different directions.
Use scraps for a patchwork effect.
Create a whole bee-themed quilt.
Design borders with bee motifs.
Combine bees with floral blocks.
The tutorial encourages artistic expression.
Each block can tell a small story.
The Buzzing Bee Patchwork Block Tutorial works well for many projects.
Baby quilts look adorable with bee designs.
Wall hangings brighten up craft rooms.
Table runners add seasonal charm.
Pillow covers showcase single blocks.
Lap quilts offer comfort and style.
Garden-themed quilts feel lively.
Bee blocks can be framed for art.
Quilted bags look playful.
Bee quilts make great gifts.
Children love animal-themed designs.
Bee blocks bring joy to any project.
They fit both modern and traditional quilts.
Accuracy is important in the Buzzing Bee Patchwork Block Tutorial.
Measure twice before cutting.
Sew with consistent seam allowances.
Press seams carefully.
Trim blocks evenly.
Use sharp tools.
Work on a flat surface.
Take your time.
Practice improves results.
Mistakes are part of learning.
Enjoy the creative process.
Each block gets better.
Patience leads to beautiful quilts.
Uneven seams can distort the bee shape.
Always use a quarter-inch seam allowance.
Misaligned wings affect the design.
Pin pieces carefully.
Wrong fabric contrast can hide details.
Choose high-contrast colors.
Skipping pressing causes bulky seams.
Press every step.
Rushing leads to errors.
Slow, steady sewing works best.
Ignoring measurements causes size issues.
Follow the Buzzing Bee Patchwork Block Tutorial closely.
Wash quilts gently.
Use mild detergent.
Avoid high heat.
Air dry when possible.
Store in a cool, dry place.
Avoid direct sunlight.
Proper care extends quilt life.
Handmade quilts deserve protection.
Your bee blocks will stay vibrant.
Good care preserves your hard work.
Enjoy your quilt for years.
Share it with pride.
Is the Buzzing Bee Patchwork Block Tutorial beginner-friendly?
Yes, it uses simple shapes and basic sewing techniques.
What size is the bee block?
Sizes can vary, but most are around 10 to 12 inches square.
Can I hand sew the block?
Yes, hand sewing works if you prefer.
What fabric works best?
Cotton quilting fabric is ideal.
Can I make different bee styles?
Yes, you can customize wings, colors, and details.
Is this good for kids’ quilts?
Absolutely, bee designs are playful and cheerful.
The Buzzing Bee Patchwork Block Tutorial is a delightful way to add creativity, charm, and meaning to your quilting projects. From understanding the design and choosing fabrics to sewing, customizing, and using the blocks, this tutorial offers a complete guide for creating beautiful bee-themed patchwork. The simple shapes make it accessible, while the creative options keep it exciting.
Throughout this article, you learned how to build the bee block step by step, select the right materials, avoid common mistakes, and care for your finished quilt. Whether you are a beginner or an experienced quilter, the Buzzing Bee Patchwork Block Tutorial gives you the tools to create something truly special.
We would love to hear your honest opinion about this guide. Please share your thoughts, suggestions, and creative ideas so we can continue bringing you helpful and inspiring quilting content.


