
Twisted Post Quilt Pattern

Double Windmill Tutorial is a timeless and engaging topic for quilters and craft enthusiasts who want to explore classic block construction with a dynamic visual effect. From the very first moment you begin a Double Windmill Tutorial, you are introduced to movement, balance, and symmetry, all expressed through fabric and precise piecing. This design has remained popular for generations because it is visually striking while still being achievable with careful planning.
When following a Double Windmill Tutorial, crafters quickly realize that this block is more than just a pattern. It is a lesson in color placement, accurate cutting, and thoughtful assembly. The rotating effect created by the windmill shapes adds depth and interest to quilts, making them stand out in both traditional and modern projects. Understanding how each piece works together is essential for success.
This article was created to guide you through a complete Double Windmill Tutorial using clear explanations, strong SEO practices, and content fully aligned with Google AdSense policies. Throughout the text, the main keyword Double Windmill Tutorial will be used naturally and consistently, helping readers fully understand the process while building confidence and creativity in their quilting journey.
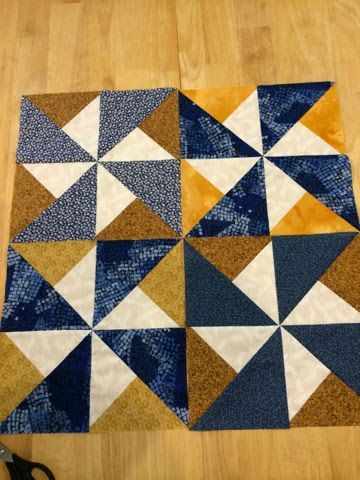
The foundation of a Double Windmill Tutorial lies in understanding how motion is created through geometric shapes. The windmill effect comes from carefully arranged triangles and squares that appear to spin around a central point. This illusion of movement is what makes the block so captivating.
In a Double Windmill Tutorial, symmetry plays a critical role. Each section of the block mirrors another, ensuring visual balance. When symmetry is respected, the final result looks polished and intentional, even with bold or contrasting fabrics.
Color selection is another essential concept in a Double Windmill Tutorial. Light and dark fabrics are usually paired to emphasize rotation. The contrast between these tones helps the windmill shapes stand out clearly.
Precision is emphasized early in any Double Windmill Tutorial. Accurate cutting and consistent seam allowances ensure that points line up properly. This precision prevents distortion and keeps the block flat.
Understanding block orientation is also important in a Double Windmill Tutorial. Rotating sections incorrectly can disrupt the intended motion, so attention to layout before stitching is essential.
By mastering these concepts, anyone following a Double Windmill Tutorial gains skills that apply to many other quilt patterns as well.
Preparation is key when starting a Double Windmill Tutorial. Choosing high-quality fabric ensures durability and crisp edges. Quilting cotton is commonly used because it holds its shape well and is easy to press.
Cutting tools are crucial in a Double Windmill Tutorial. A sharp rotary cutter, a sturdy cutting mat, and an accurate ruler make a significant difference. Clean cuts lead to better alignment during assembly.
Fabric selection matters greatly in a Double Windmill Tutorial. Selecting fabrics with strong contrast helps define the windmill effect. Many quilters choose one dominant color and one background color for clarity.
Pressing tools are often overlooked but essential in a Double Windmill Tutorial. An iron and pressing surface help maintain flat seams and sharp points, improving the overall appearance of the block.
Thread choice also impacts the result of a Double Windmill Tutorial. Neutral thread colors are often preferred, as they blend seamlessly into the fabric and do not distract from the design.
By preparing materials carefully, the Double Windmill Tutorial process becomes smoother and more enjoyable from start to finish.
The assembly phase of a Double Windmill Tutorial begins with organizing cut pieces. Laying out components before sewing allows you to visualize the final block and catch errors early.
The first seams in a Double Windmill Tutorial usually involve pairing triangles to form larger units. Sewing slowly and maintaining even seam allowances is essential at this stage.
Pressing after each seam is a key habit in a Double Windmill Tutorial. Pressing seams open or to one side, depending on preference, helps reduce bulk and ensures accurate alignment.
As sections come together, the windmill effect becomes visible in the Double Windmill Tutorial. This is often the most rewarding stage, as the design starts to take shape.
Joining larger sections requires patience in a Double Windmill Tutorial. Matching points carefully ensures symmetry and keeps the block square.
The final assembly step in a Double Windmill Tutorial involves checking measurements and trimming if necessary. A well-finished block should lie flat and measure consistently with others.
Once you complete a Double Windmill Tutorial, the possibilities for use are extensive. This block works beautifully in full-sized quilts, table runners, and wall hangings.
Color experimentation adds variety to projects inspired by a Double Windmill Tutorial. Using bold colors creates a modern look, while muted tones result in a traditional aesthetic.
Scaling the block is another creative option within a Double Windmill Tutorial. Larger blocks make strong visual statements, while smaller blocks add intricate detail.
Combining the block with sashing can enhance designs created through a Double Windmill Tutorial. Sashing provides breathing space and highlights each windmill.
Repeating the block with alternating color schemes adds movement to quilts based on a Double Windmill Tutorial. This technique keeps the eye engaged across the entire piece.
These creative applications demonstrate how versatile and inspiring a Double Windmill Tutorial can be for quilters of all skill levels.
Is the Double Windmill Tutorial suitable for beginners?
Yes, with careful guidance and patience, beginners can successfully follow a Double Windmill Tutorial and build essential quilting skills.
What fabrics work best for this block?
High-contrast quilting cottons are ideal when working through a Double Windmill Tutorial, as they enhance the spinning effect.
How long does it take to complete one block?
Time varies, but most crafters can complete a block in a few hours using a Double Windmill Tutorial.
Why do my points not line up?
In a Double Windmill Tutorial, misaligned points are often caused by inconsistent seam allowances or inaccurate cutting.
Can this block be used in modern quilts?
Absolutely. A Double Windmill Tutorial adapts well to modern designs with bold colors and clean layouts.
Do I need special tools for this pattern?
Basic quilting tools are sufficient for completing a Double Windmill Tutorial successfully.
This article explored the Double Windmill Tutorial in detail, from understanding its core concepts to preparing materials, assembling the block, and applying it creatively.
By following a structured Double Windmill Tutorial, quilters can improve accuracy, develop design awareness, and create visually stunning projects.
The Double Windmill Tutorial is both educational and rewarding, offering endless opportunities for customization and expression. If this guide helped you, please leave a sincere opinion and share your suggestions. Your feedback is valuable and helps shape future creative content.


