
Twisted Post Quilt Pattern

How To Make an Owl Oven Glove-Step by Step Tutorial is a beautiful and practical project that allows you to create a unique kitchen accessory with personality, charm, and function. Many people enjoy handmade items because they add warmth to the home, and this owl-themed glove is no exception. By following this How To Make an Owl Oven Glove-Step by Step Tutorial, you will learn how to sew a heat-resistant glove using fabrics, batting, and simple stitching techniques. Whether you are a beginner or an experienced crafter, this project brings creativity and utility together in a delightful way.
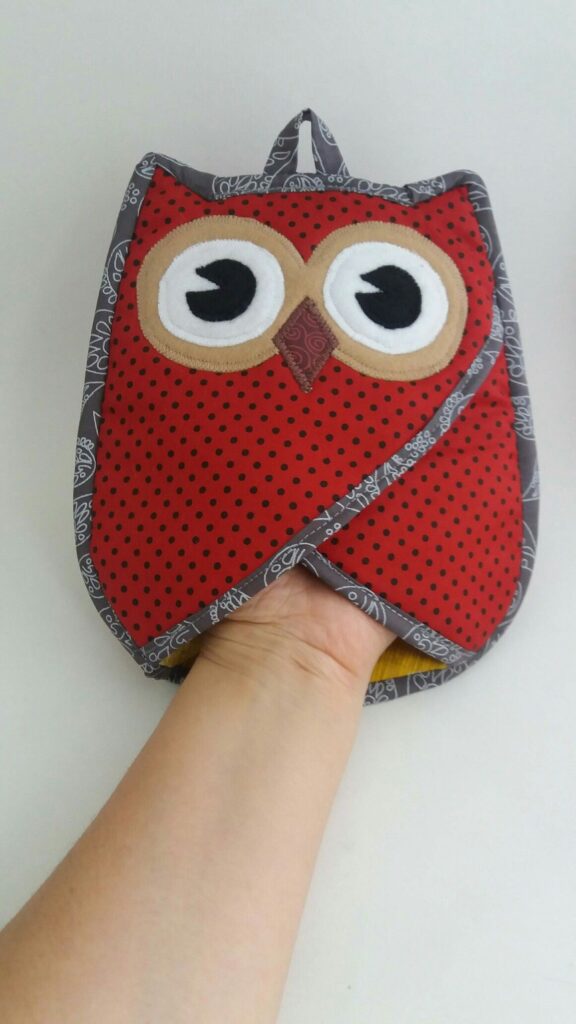
The appeal of this How To Make an Owl Oven Glove-Step by Step Tutorial is that it transforms an everyday kitchen tool into something adorable and eye-catching. Instead of a simple glove, you can craft an owl design with expressive eyes, layered feathers, and playful details. Handmade gloves make cooking more enjoyable and add a personal touch to your kitchen décor. Crafting your glove allows you to select colors, textures, and patterns that match your style, making the finished piece truly unique.
Another reason many crafters love this How To Make an Owl Oven Glove-Step by Step Tutorial is its practicality. Oven gloves are essential for safety in the kitchen, protecting your hands from heat when handling pots, pans, and baking trays. Creating your own glove ensures you can design it with the right thickness, comfort, and durability. This project combines creativity, functionality, and careful craftsmanship, resulting in a glove that is both beautiful and reliable for daily use.
To begin the How To Make an Owl Oven Glove-Step by Step Tutorial, assembling the correct materials is essential for a safe and polished result. You will need cotton fabric, heat-resistant batting, felt for details, thread, scissors, pins, and a sewing machine. Choosing cotton is ideal because it withstands heat and holds its shape well.
When selecting fabrics, choose patterns or solid colors that capture the personality of an owl. Many people enjoy mixing browns, yellows, or whimsical prints to create a fun and expressive design. The fabric you select will determine the style of your glove, from modern and elegant to bright and playful.
Heat-resistant batting is one of the most important elements. This layer protects your hands from burns by providing insulation inside the glove. Using high-quality batting helps ensure your oven glove is safe and comfortable to use in real cooking situations.
Felt is essential for adding details such as eyes, feathers, and beak shapes. Felt is easy to cut, does not fray, and adheres well when sewn onto fabric. These details make the owl oven glove charming and distinctive while adding texture to the final piece.
A sewing machine will help keep your stitches strong and durable. Since this glove will be used frequently, reinforcement is necessary to maintain its structure. However, if you prefer hand-sewing, it is possible—just make sure to use strong thread and tight stitches.
Lastly, pins, scissors, and a fabric marker are helpful accessories that ensure accuracy during cutting and assembling. These simple tools make the process smooth, organized, and enjoyable as you work through this How To Make an Owl Oven Glove-Step by Step Tutorial.
The first step in the How To Make an Owl Oven Glove-Step by Step Tutorial is to create the glove pattern. Using a paper template or tracing your hand with extra space for seams, shape the outline of the glove. Make sure the glove is wide enough to fit comfortably and long enough to protect your wrist from heat.
Next, place the pattern on your chosen cotton fabric and cut two pieces for the front and back of the glove. Repeat this process for the inner lining using a second layer of fabric. Maintaining accuracy during this step ensures your glove will fit well and feel comfortable during use.
Once the exterior pieces are ready, cut your heat-resistant batting using the same pattern. This batting layer will sit between the fabric layers to provide insulation. Aligning the batting carefully prevents uneven thickness, which could affect the glove’s protective ability.
Now begin assembling the layers. Stack one exterior fabric piece, the batting, and one lining piece together, forming a sandwich. Pin the edges to hold everything in place. This step prepares the glove for sewing, ensuring all layers remain aligned.
After stacking the layers, sew around the glove shape, leaving the bottom open. A straight stitch works well, and sewing slowly helps maintain precise curves. Trim excess fabric around the curves to create a smooth finish when the glove is turned inside out.
Finally, turn the glove inside out and check the shape. Once satisfied, you can begin decorating the front side with felt owl details. These decorations give personality to your oven glove and complete the look described in this How To Make an Owl Oven Glove-Step by Step Tutorial.
The owl design is what makes this How To Make an Owl Oven Glove-Step by Step Tutorial special, giving your glove charm and character. Begin by cutting two round felt pieces for the owl’s eyes. White, black, and brown felt layers work well to create expressive and bright eyes.
Next, cut a small triangle for the beak. Position the beak between the eyes and adjust its angle to give your owl a friendly or curious expression. Sewing the beak securely helps it stay in place even with frequent use.
To create the wings, cut two symmetrical curved shapes from felt or patterned cotton. These wings can be sewn directly onto the glove or attached loosely to create a layered effect. Choosing coordinating colors adds to the owl’s visual appeal.
For the feathers on the body, cut several small scalloped shapes. Arrange them in overlapping rows to resemble real feathers. This layering technique gives depth and dimension to the glove, making the design more lively.
Once all the pieces are arranged, pin them down before sewing. Stitching each felt item securely ensures that the decorations withstand daily kitchen activities. Reinforcing the edges keeps the felt from lifting or fraying over time.
The final step in this decorative stage is adding optional details such as buttons, embroidery, or color accents. These extra touches help personalize the owl and make your project unique, enhancing the handmade charm of the How To Make an Owl Oven Glove-Step by Step Tutorial.
To maximize the safety of your How To Make an Owl Oven Glove-Step by Step Tutorial, always choose high-quality heat-resistant batting. Using multiple layers can increase protection, especially if you frequently handle very hot cookware. It is better to add extra insulation than risk insufficient protection.
Reinforcing the stitching is another way to improve durability. Areas around the thumb and fingers often experience the most stress, so double stitching these seams keeps the glove strong and long-lasting. Strong stitching also helps maintain the glove’s shape.
Make sure the glove has a comfortable fit. A glove that is too loose can slip, while one that is too tight can restrict movement. Adjusting the pattern before sewing helps create a personalized and secure fit that enhances usability.
Washing the glove properly will help it last longer. Choose gentle washing methods to preserve the fabric and decorations. Avoid using bleach or high-heat drying, as these can damage the batting or felt details.
Storing your oven glove properly also helps maintain its quality. Hanging it near your stove or oven keeps it easily accessible while preventing wrinkles and damage. A hook or kitchen rail system works perfectly for this.
Finally, consider making a second glove using the same How To Make an Owl Oven Glove-Step by Step Tutorial. Having a pair enhances safety and convenience when handling large trays, heavy pots, or multiple dishes at once.
1. Is this project suitable for beginners?
Yes, this tutorial is simple enough for beginners while still offering creative flexibility.
2. What fabric works best?
Cotton is ideal because it is heat-resistant, durable, and easy to sew.
3. Do I need a sewing machine?
A sewing machine makes the process faster, but hand-sewing is possible with strong stitches.
4. How thick should the batting be?
At least one layer of heat-resistant batting is recommended, but two layers provide extra safety.
5. Can I personalize the owl design?
Absolutely—changing colors, felt shapes, or embellishments lets you create a one-of-a-kind glove.
6. Is the glove washable?
Yes, but wash gently to protect the felt details and batting.
This How To Make an Owl Oven Glove-Step by Step Tutorial has guided you through each stage of creating a charming, safe, and durable kitchen accessory.
From gathering materials to crafting the shape, adding batting, and decorating the owl features, every part of the process allows you to express creativity while building a functional item for everyday use.
I hope this tutorial inspires you to create your own version and enjoy the warmth of handmade kitchen crafts. Please leave a sincere opinion and share your suggestions—I would love to know your thoughts!


