
Twisted Post Quilt Pattern

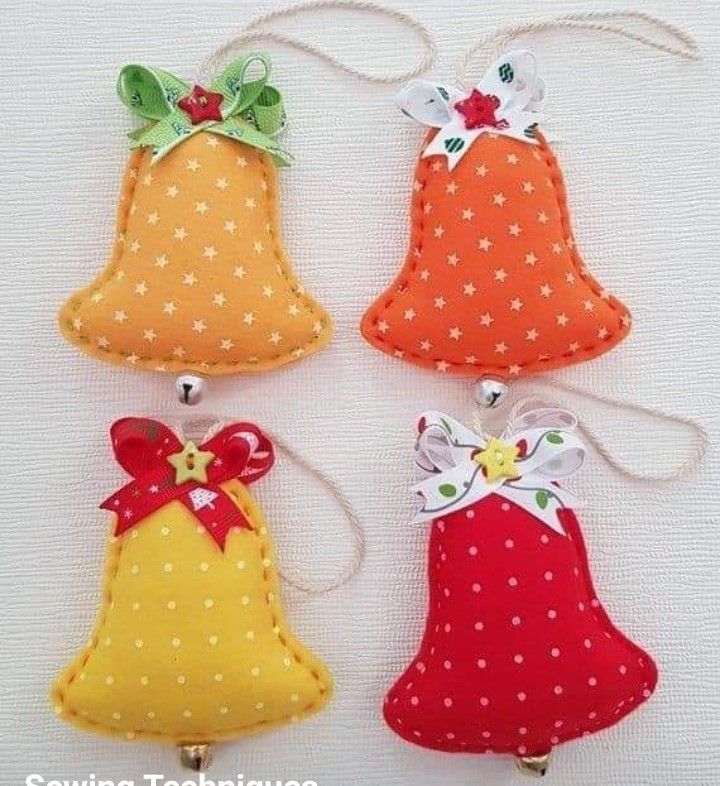
When it comes to decorating for the holidays, nothing brings more warmth and charm than handmade ornaments. In this How to make a Christmas bell ornament – Step by Step Tutorial, we’ll explore a simple yet beautiful way to add a personal touch to your festive decorations. This guide is designed to help beginners and experienced crafters alike create lovely crochet bells that can be hung on the Christmas tree, used in garlands, or even given as heartfelt gifts. With a few materials and a bit of creativity, you can craft something timeless that captures the spirit of the season.
The beauty of making your own Christmas bell ornament lies in its simplicity. You don’t need to be an expert in crochet to achieve great results. With a few easy stitches, you can make stunning bells that will shine among your Christmas lights. This Step by Step Tutorial focuses on explaining each part of the process in a clear and structured way, ensuring that you can follow along easily and enjoy every step of your creative journey.
Another reason many people love this How to make a Christmas bell ornament – Step by Step Tutorial is that it’s not just about crafting; it’s about creating memories. Whether you make these ornaments with your family or alone in a cozy corner with a cup of cocoa, you’ll be participating in a tradition of handmade holiday magic. Let’s dive into the details of how to create your own crocheted Christmas bell that will make your home sparkle this festive season.
Before beginning your Christmas bell ornament, you’ll need to gather a few basic materials. For most crochet projects, the key to success starts with preparation. Take your time to organize your supplies, as this will make the process smoother and more enjoyable.
You’ll need some yarn in festive colors such as red, white, gold, or silver. Cotton yarn works best because it holds its shape well, giving the bell a crisp look. A metallic thread can be added to give a shimmering touch to your finished ornament. You’ll also need a crochet hook appropriate for your yarn size—usually a 2.5 mm or 3 mm hook works perfectly.
Having a small bell or bead for the center is a lovely touch that gives your ornament an authentic jingle. You’ll also need scissors, a yarn needle, and some stiffening solution if you want your bell to hold a firmer shape. Before starting, lay out your tools neatly on a table to keep everything within reach.
Next, choose your pattern or decide on your own design. In this Step by Step Tutorial, we’ll be working with a basic pattern that can be easily customized. If you’re new to crochet, start with simple stitches like chains, single crochets, and double crochets. These will help you form the body of the bell.
It’s a good idea to make a small test swatch before starting your final piece. This helps you ensure that your tension is consistent, which is important for the bell to have a smooth and even look. Once you feel comfortable, you can move on to the real project.
Finally, prepare your workspace. Choose a well-lit area and keep all materials organized. Crocheting should be relaxing, and having a tidy area helps you stay focused and enjoy the creative process.
Now we’ll move into the main part of this How to make a Christmas bell ornament – Step by Step Tutorial. Begin by creating a magic ring, which will serve as the base of your bell. Work a few single crochets into the ring and tighten it gently. This forms the closed top of the bell.
In the next round, start increasing your stitches to create the bell’s curved shape. You can do this by adding two double crochets into one stitch at regular intervals. Continue this process for several rounds, allowing the bell to widen gradually. Keep checking the shape as you go, adjusting your tension if needed.
As the bell grows, you’ll start to see its form take shape. The edges should begin to flare out naturally. If you want a more defined curve, you can use a combination of single and double crochet stitches in alternating rounds. This helps to shape the structure without making it too bulky.
Once the body is complete, you’ll want to add a beautiful trim to the bottom. This can be done using picot stitches or shell patterns. A golden or silver yarn for the trim adds a lovely festive touch. It’s these small details that make your Christmas bell ornament stand out.
To finish the crocheting part, leave a small loop at the top of the bell for hanging. You can create this loop by chaining a few stitches and securing them back into the top with a slip stitch. This loop will allow you to easily hang your ornament on the Christmas tree.
Finally, weave in all loose ends using a yarn needle. Make sure there are no visible threads and that everything looks neat. Your crocheted bell is now ready for stiffening and decoration.
The next step in this How to make a Christmas bell ornament – Step by Step Tutorial is adding the finishing details that bring your creation to life. The decoration phase allows you to personalize your ornament and make it uniquely yours.
Start by applying a fabric stiffener to give your bell a firm shape. You can dip the bell into the solution or apply it with a brush. Then, shape the bell carefully and let it dry completely. This process helps the ornament maintain its form when hung.
Once dry, it’s time to add embellishments. You can sew a small jingle bell or bead inside the crochet bell to make it ring gently. Add a bow on top made of satin ribbon or twine for an extra decorative touch. Using tiny pearls or sequins can also enhance the bell’s sparkle.
If you’re making multiple bells, try experimenting with different color combinations. Red and white create a traditional Christmas look, while gold and cream give an elegant, classic feel. The key is to let your creativity shine.
Adding a metallic yarn border can make your Christmas bell ornament look even more festive. If you have glitter glue or decorative fabric paint, use it sparingly for subtle shimmer. The goal is to highlight the beauty of your crochet work without overdoing it.
When you’re satisfied with the decorations, attach a string or ribbon through the loop at the top. Make sure it’s long enough to hang securely on your Christmas tree or wall display.
Once you’ve mastered this How to make a Christmas bell ornament – Step by Step Tutorial, you can start experimenting with variations. There are countless ways to make your bell ornaments more unique and versatile.
For example, you can adjust the size by using thicker yarn or a larger hook to make a bigger bell. These can be used as door hangers or centerpiece decorations. Smaller bells made with fine yarn can be perfect for garlands or gift wrapping.
You can also combine several crocheted bells with stars, snowflakes, or hearts to create a festive mobile. This makes a wonderful handmade decoration for windows or mantels. Mixing different shapes and colors adds charm and visual interest.
If you enjoy adding texture, try using novelty yarns such as metallic thread or yarn with a slight sparkle. These materials give the bell a magical holiday glow when the light hits them.
You might even turn your crocheted bells into personalized gifts by adding initials or small tags. Handmade ornaments make thoughtful presents that friends and family will treasure for years.
Finally, don’t forget to have fun with the process. Crocheting these bells is not just about crafting—it’s about creating joy, relaxation, and lasting holiday memories.
1. What kind of yarn is best for making a Christmas bell ornament?
Cotton yarn is ideal because it provides a clean shape and firm texture. You can also use acrylic yarn if you prefer a softer look.
2. Do I need to use a stiffener for the crochet bell?
Yes, if you want your bell to maintain its shape. Fabric stiffeners or homemade solutions made with glue and water work well.
3. Can beginners follow this Christmas bell ornament tutorial?
Absolutely! This Step by Step Tutorial is designed for all skill levels. Even beginners can create a lovely ornament with patience and practice.
4. How can I make my bell sparkle?
Use metallic yarn, sequins, or small beads to add shine. Just be careful not to overload the design.
5. How long does it take to make one crocheted bell?
Typically, it takes around one to two hours, depending on your skill level and the amount of detail you want to include.
6. Can I wash the ornament after it’s made?
It’s best to spot clean gently with a damp cloth to avoid ruining the shape or decorations.
In this How to make a Christmas bell ornament – Step by Step Tutorial, we’ve explored everything you need to know to create a beautiful and festive crocheted decoration. From gathering materials and following the crochet steps to adding personal touches and variations, this project combines creativity, skill, and the true joy of handmade art.
Creating your own Christmas bell ornament allows you to bring warmth and charm into your home while celebrating the season in a personal way. Now it’s your turn to grab your yarn and hook and start crafting these delightful bells.
We hope this guide inspired you to try this project. Share your experience, leave your sincere opinion, and tell us how your Christmas bell ornament turned out. Your feedback and suggestions help keep the crafting spirit alive and shining brightly every holiday season.


