
Twisted Post Quilt Pattern

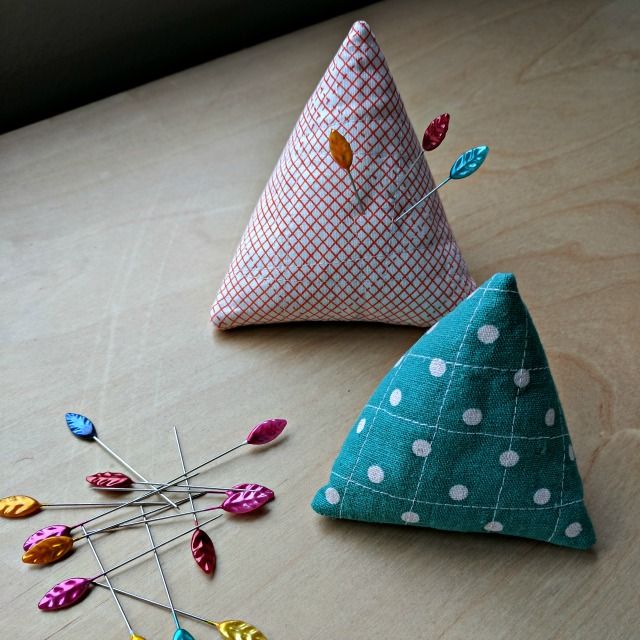
If you love sewing or crafting, keeping your pins organized is essential, and what better way to do it than by learning how to Make this pin holder out of fabric-Step by Step Tutorial? A fabric pin holder is a simple yet practical item that not only helps you stay organized but also adds a touch of creativity to your sewing space. Whether you’re a beginner or an experienced crafter, this easy tutorial will guide you through the process of making a functional and decorative pin holder using materials you likely already have at home.
The idea behind this Make this pin holder out of fabric-Step by Step Tutorial is to create something useful while expressing your creativity. Unlike store-bought pin cushions or holders, making your own gives you the freedom to choose the fabric, size, and style that suit your taste. You can go for floral cotton fabric for a vintage look, or bright patterns for a cheerful touch. It’s also a great way to use leftover fabric scraps from previous projects, turning them into something beautiful and practical.
What makes this project even better is that it’s easy to customize. You can make it small enough to carry in your sewing kit or larger to keep on your craft table. With this Make this pin holder out of fabric-Step by Step Tutorial, you’ll learn the basics of sewing, cutting, and assembling your holder step by step. This project is not only fun and budget-friendly but also a great opportunity to improve your sewing skills while creating something you’ll use every day.
Before we begin the Make this pin holder out of fabric-Step by Step Tutorial, let’s gather all the materials you’ll need. Most of these items are simple, inexpensive, and may already be in your sewing kit. You’ll need a piece of cotton fabric (around 10×10 inches), a small piece of felt or batting for padding, sewing thread, scissors, a sewing needle or sewing machine, and pins for assembling. You can also use ribbon, buttons, or lace for decoration if you like.
Choosing the right fabric is one of the most important steps. Cotton is highly recommended because it’s soft, durable, and easy to sew. You can choose solid colors or printed patterns depending on your style. If you’re a beginner, go for medium-weight cotton as it’s easier to handle compared to slippery or stretchy fabrics.
The padding or filling helps keep the pins in place securely. You can use felt, wool scraps, or even fiberfill stuffing. The goal is to make a firm but flexible surface that allows pins to go in easily without falling out.
When it comes to sewing tools, you can hand sew or use a machine. A sewing machine will make the process faster, but hand stitching gives a more personal, handmade feel. Whichever method you choose, the key is to sew with precision so that your final result looks neat and professional.
Decorative elements are optional, but they can make your pin holder truly unique. Adding a bow, lace border, or button can elevate the look and reflect your personality. Think of it as combining practicality with beauty—something every crafter appreciates.
Once you have all your materials ready, you’re set to move to the next part of this Make this pin holder out of fabric-Step by Step Tutorial, where we’ll go through the process of cutting, sewing, and assembling your pin holder.
Now it’s time to dive into the creative process of the Make this pin holder out of fabric-Step by Step Tutorial. The steps are simple and can be completed in under an hour, even if you’re new to sewing. Start by cutting two squares of fabric—one for the front and one for the back—measuring approximately 10×10 inches each. If you want a smaller holder, you can reduce the measurements accordingly.
Place the two pieces of fabric with their right sides facing each other. If you’re using batting or felt for padding, place it on top of one of the wrong sides. Pin the layers together so that they don’t move while sewing.
Sew around the edges, leaving a small opening of about 2 inches. This gap will allow you to turn the fabric right side out after sewing. Make sure to backstitch at the beginning and end to secure your seams. Once done, trim the corners slightly to remove excess fabric and make turning easier.
Turn the fabric right side out through the opening. Use a pencil or the blunt end of a crochet hook to gently push the corners out so they’re sharp and neat. Smooth out the fabric and iron it lightly to make it flat.
Now it’s time to close the opening. Fold in the raw edges neatly and either hand stitch it using an invisible stitch or topstitch around the entire square for a polished finish. If you like, you can sew a decorative seam about half an inch from the edge to give your pin holder a professional look.
Finally, add any decorations you desire. Sew on a small button, attach a piece of ribbon, or add embroidery. These details make your handmade creation stand out. Congratulations—you’ve completed your Make this pin holder out of fabric-Step by Step Tutorial and created something beautiful and practical!
One of the most enjoyable parts of the Make this pin holder out of fabric-Step by Step Tutorial is personalizing your design. The possibilities are endless. You can create a round, square, or heart-shaped holder depending on your preference. Simply adjust your fabric cutting shape to suit your vision.
If you prefer something more functional, you can turn your pin holder into a wrist cushion. Just sew a piece of elastic to the back and wear it while sewing. This keeps your pins handy and makes your work more efficient.
You can also create themed pin holders. For example, use floral fabric for a vintage style, denim for a rustic look, or bright prints for a cheerful modern twist. Each one will reflect your personality and make your sewing space more inviting.
Another creative option is to make a hanging pin holder. Attach a small loop or ribbon so you can hang it near your sewing machine or work table. This saves space and keeps your pins accessible.
These pin holders also make wonderful gifts for sewing enthusiasts. You can personalize them with initials, decorative stitches, or even small embroidered designs. Handmade gifts like these are always appreciated because they show care and creativity.
Whether you keep it for yourself or gift it to someone else, your Make this pin holder out of fabric-Step by Step Tutorial creation will bring a smile to anyone who enjoys crafting.
To get the best results from this Make this pin holder out of fabric-Step by Step Tutorial, here are a few tips. First, always iron your fabric before cutting. This ensures accuracy and clean edges, making your pin holder look more professional.
Second, double-check your measurements before sewing. Even small discrepancies can cause uneven sides or misaligned corners. Taking time to measure carefully will save you frustration later.
When stuffing your pin holder, don’t overfill it. It should be firm enough to hold pins securely but still soft enough for easy insertion. Distribute the filling evenly to avoid lumps or bumps.
For extra durability, use quality thread and backstitch at stress points like corners and the opening. This helps your pin holder last longer, even with frequent use.
If you want to make your holder more eco-friendly, consider using recycled fabric or natural fibers. Old shirts, jeans, or fabric remnants can be repurposed beautifully for this project.
Finally, enjoy the process! Crafting should be fun, relaxing, and rewarding. Each stitch brings you closer to a finished product that reflects your creativity and skill.
1. What type of fabric works best for a pin holder?
Cotton is the best option because it’s durable, easy to sew, and holds its shape well.
2. Can I make the pin holder without a sewing machine?
Yes! You can hand sew it using simple stitches like the running stitch or backstitch.
3. What can I use instead of fiberfill for stuffing?
You can use felt scraps, wool, or small fabric leftovers as an eco-friendly alternative.
4. How do I clean my fabric pin holder?
It’s best to spot clean it with a damp cloth. Avoid machine washing to maintain its shape.
5. Can I make this project with children?
Yes, with supervision. It’s a fun and safe beginner project for young sewing learners.
6. Can I make different shapes other than square?
Absolutely! You can make heart-shaped, round, or even animal-themed pin holders for variety.
The Make this pin holder out of fabric-Step by Step Tutorial is a delightful and practical sewing project that combines creativity, skill, and functionality.
You’ve learned how to prepare your materials, sew the pieces together, and add personal touches that make your holder unique. Whether you’re organizing your sewing pins, gifting it to a friend, or adding it to your handmade collection, this project offers endless possibilities.
Making your own fabric pin holder is not just about sewing—it’s about expressing creativity and enjoying the process. Try it today, experiment with colo


