
Twisted Post Quilt Pattern

Creating a Bag from a rectangular piece- Step by Step Tutorial is one of the easiest and most rewarding DIY sewing projects you can try at home. With just a single piece of fabric and some basic sewing skills, you can craft a stylish, functional bag that is perfect for everyday use. This project is ideal for beginners because it requires minimal cutting, simple stitches, and very few materials while still producing a beautiful and durable result.
One of the best things about making a Bag from a rectangular piece- Step by Step Tutorial is its versatility. Depending on the fabric you choose and how you decorate the bag, it can be casual, elegant, or even eco-friendly for shopping or carrying books. You can customize it with colors, patterns, or embellishments, making each bag unique. Plus, since it starts with just one rectangular piece, the construction is straightforward and beginner-friendly.
In this article, you will learn everything you need to know to make your own Bag from a rectangular piece- Step by Step Tutorial, including the materials required, a clear step-by-step guide, customization ideas, and helpful tips for beginners. By the end, you will be confident enough to create a bag that fits your style and needs perfectly.
Before starting the Bag from a rectangular piece- Step by Step Tutorial, gather all the necessary materials. You will need a rectangular piece of fabric, matching thread, scissors, sewing pins, a sewing machine or needle for hand-sewing, and handles or straps if desired.
The fabric you choose determines the strength and style of your bag. Cotton or canvas fabrics are recommended for beginners because they are easy to sew and provide good durability. For a more sophisticated look, you can choose linen or decorative upholstery fabric. If you want a washable and lightweight bag, cotton blends work perfectly.
The size of the rectangle depends on how big you want your bag to be. A common size for a medium tote bag is around 18 inches by 36 inches, but you can adjust this based on your preferences. Larger rectangles create bigger bags suitable for shopping, while smaller ones are perfect for carrying essentials.
Thread should match your fabric color for a neat finish, or you can use contrasting thread to add a decorative element. Sewing pins are important for holding the fabric in place before sewing, especially when folding the edges or attaching straps.
Handles or straps can be made from fabric strips, leather, or even ready-made webbing material. They should be strong enough to support the weight of the items you plan to carry in your bag.
Lastly, prepare your sewing machine or needle and ensure you have enough space to work comfortably. Having all your tools ready before starting the Bag from a rectangular piece- Step by Step Tutorial makes the process smoother and more enjoyable.
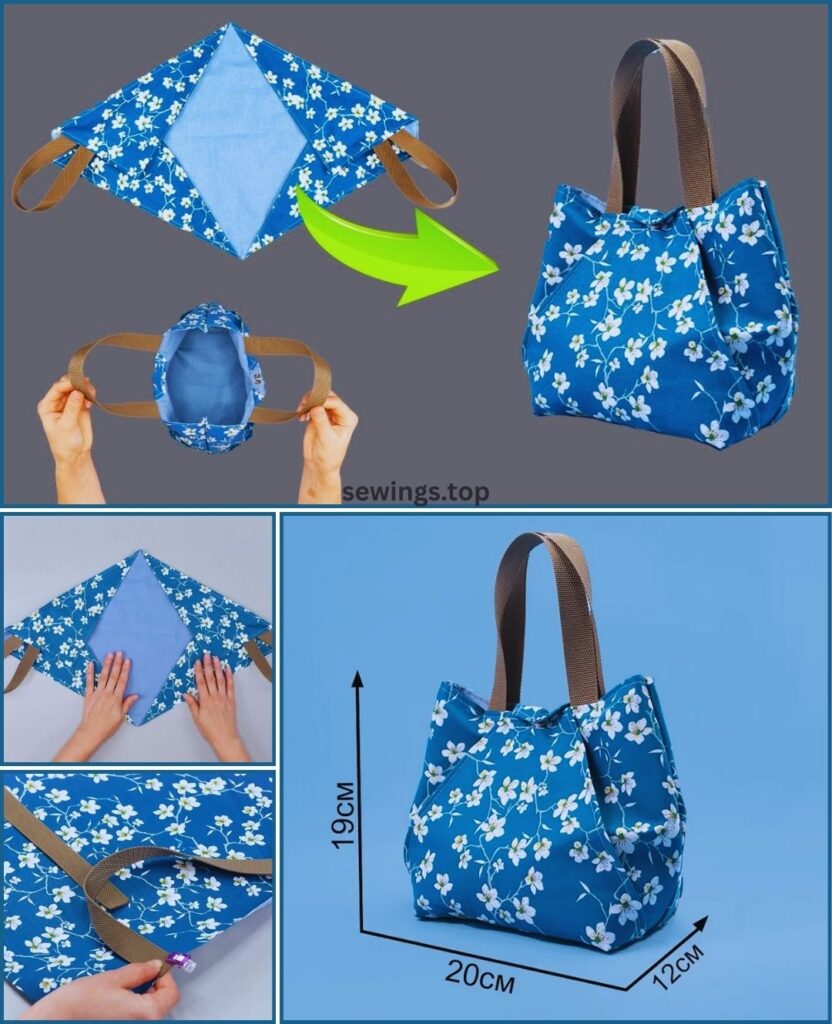
The first step in the Bag from a rectangular piece- Step by Step Tutorial is to fold the rectangular fabric in half, with the right sides facing each other. This creates the basic shape of the bag, with the fold forming the bottom edge.
Next, sew along both side edges, leaving the top open. Make sure to use a straight stitch for durability. If you are using a sewing machine, backstitch at the beginning and end to secure the seams. Beginners can also sew by hand using a simple running stitch or backstitch for strength.
After sewing the sides, you can create box corners at the bottom for a flat base. To do this, pinch each bottom corner so the side seam aligns with the bottom fold, then sew across about 2 inches from the tip. This step gives your bag more depth and allows it to stand upright.
Next, fold the top edge of the bag down about one inch to create a hem. Pin it in place and sew along the edge for a clean, finished look. This prevents fraying and strengthens the opening of the bag.
Now it is time to attach the handles or straps. Position them evenly on each side of the opening, making sure they are the same length. Sew them securely with a square or cross-stitch pattern for extra durability.
Finally, turn the bag right side out. At this point, your Bag from a rectangular piece- Step by Step Tutorial is complete, and you have a simple yet functional tote bag ready to use or decorate further.
One of the most exciting parts of the Bag from a rectangular piece- Step by Step Tutorial is personalizing your creation. You can decorate the bag with fabric paint, iron-on patches, or embroidery to make it unique.
Adding a lining is another great idea, especially if you want a more professional finish. Cut a second rectangular piece of lightweight fabric, sew it in the same way as the main bag, and insert it inside before attaching the handles. This hides the seams and makes the bag stronger.
You can also add pockets inside or outside the bag for organization. Small pockets are perfect for carrying keys, a phone, or other essentials, making the bag more practical for everyday use.
For a decorative touch, consider adding lace trim, buttons, or even a fabric bow to the front of the bag. These small details can completely change the look and style of your project.
If you want a reusable shopping bag, choose lightweight cotton fabric and make the bag foldable. You can even add a small strap with a button or snap to keep it compact when not in use.
Finally, experiment with different shapes and proportions. A taller rectangle creates a narrow tote, while a wider one makes a short, spacious bag. This flexibility is what makes the Bag from a rectangular piece- Step by Step Tutorial so beginner-friendly and customizable.
For those new to sewing, following the Bag from a rectangular piece- Step by Step Tutorial might feel intimidating at first, but it becomes easier with a few helpful tips. Always measure and cut your fabric carefully because uneven edges can make sewing difficult and affect the final shape of your bag.
Use sewing pins to keep the fabric layers aligned, especially when hemming or attaching straps. Skipping this step can lead to crooked seams or uneven handles.
Practice sewing straight lines on scrap fabric before working on your bag. Consistent stitching not only looks better but also makes the bag stronger and longer-lasting.
Avoid using very thin fabric for your first bag because it can be difficult to control and may not hold its shape well. Medium-weight fabrics are much easier for beginners to handle.
Do not rush through the project. Taking your time to press seams with an iron and double-check measurements will result in a more professional-looking bag.
Lastly, remember that every mistake is part of the learning process. Even if your first bag is not perfect, you will gain skills and confidence for future projects.
Q1: Is this project suitable for beginners?
Yes, this Bag from a rectangular piece- Step by Step Tutorial is perfect for beginners because it requires simple stitches and minimal materials.
Q2: Can I sew the bag by hand instead of using a machine?
Absolutely! A backstitch by hand can make strong seams if you do not have a sewing machine.
Q3: What size should the rectangle be for a standard tote bag?
A good starting size is 18 inches by 36 inches, but you can adjust depending on your needs.
Q4: How can I make the bag stronger?
Use durable fabric like canvas and double-stitch the handles for extra support.
Q5: Can I wash the bag after finishing it?
Yes, most fabric bags are machine washable, but always check the fabric care instructions.
Q6: How can I add a zipper or button closure?
You can sew a simple zipper along the top edge or attach a button and loop for an easy closure option.
Making a Bag from a rectangular piece- Step by Step Tutorial is a simple, fun, and customizable project that anyone can try.
We covered materials, instructions, decoration ideas, beginner tips, and common questions to help you create a practical and stylish bag with confidence.
Now it is your turn to give this tutorial a try! We would love to hear your honest opinion and any uggestions for future projects. Share your experience and let us know how your handmade bag turned out.


