
Twisted Post Quilt Pattern

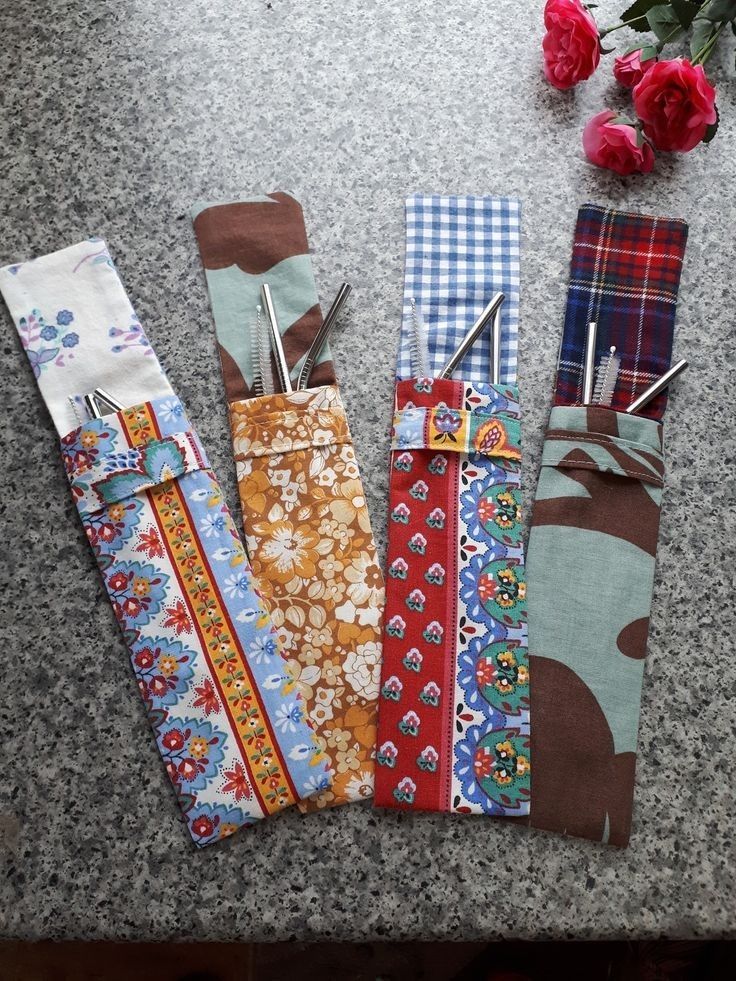
A fabric cutlery holder – step by step tutorial is a perfect project for those who enjoy sewing and crafting practical items. A fabric cutlery holder is not only functional but also adds a decorative touch to your dining table. Whether you are preparing for a family dinner, a picnic, or a festive gathering, a handmade cutlery holder can bring personality and charm to your presentation. With just a few materials and some simple sewing techniques, you can create a reusable and eco-friendly accessory that replaces disposable paper or plastic holders.
Learning how to make a fabric cutlery holder is also a beginner-friendly sewing project. It does not require advanced techniques, and you can easily customize the size, fabric choice, and design to match any occasion. From plain cotton fabrics to festive prints, the possibilities are endless. This is why many people search for a fabric cutlery holder – step by step tutorial, as it guides them through the process of making something useful, creative, and budget-friendly.
In addition to being a practical home accessory, a cutlery holder made of fabric also promotes sustainability. Instead of buying disposable table accessories, you are reusing fabric and creating something long-lasting. This makes the project a wonderful introduction to eco-friendly sewing. By the end of this tutorial, you will not only know how to create your own but also have the skills to design variations for special events such as weddings, Christmas dinners, or birthday parties.
The first step in a fabric cutlery holder – step by step tutorial is gathering the right materials. You will need fabric of your choice, preferably cotton or linen for durability and easy sewing. A fabric piece that measures around 10 x 12 inches is usually enough for one cutlery holder. If you want a sturdier holder, consider adding interfacing.
You will also need scissors or a rotary cutter, sewing pins, an iron, a ruler or measuring tape, and a sewing machine. Hand sewing is also possible, but a machine ensures cleaner and stronger seams. For closing or decorating the cutlery holder, you can add buttons, snaps, or ribbons, depending on your preferred style.
Before cutting your fabric, always wash and iron it to avoid shrinkage later. Pre-washing also makes the fabric softer and easier to handle while sewing. Taking care of preparation ensures that the fabric cutlery holder looks neat and professional once finished.
It is also important to think about the design. Some holders have simple pockets, while others include decorative stitches, embroidery, or lace. The beauty of this project is that you can personalize it as much as you like. This means your dining table will always have a unique touch that reflects your personality or the theme of the event.
Another useful tip is to practice cutting straight lines before starting. Accuracy is key in sewing, and neat edges make the sewing process easier. If you are a beginner, using a rotary cutter and a cutting mat will save time and make your fabric look more precise.
Finally, prepare your sewing space with good lighting and a comfortable chair. Sewing small projects like this does not take long, but having a well-organized workspace helps you focus and enjoy the process.
To start sewing the fabric cutlery holder, take your fabric piece and fold it in half lengthwise. This will form the base of the pocket where the cutlery will sit. Make sure the right sides of the fabric are facing each other so that the seams will be hidden once you turn the holder inside out. Pin along the sides to keep everything in place.
Next, sew along the edges, leaving a small gap at the bottom so you can turn the fabric right side out. After sewing, trim the corners slightly to reduce bulk, then turn the fabric inside out through the gap. Use a pencil or chopstick to push the corners neatly into place.
Press the fabric with an iron to flatten the seams. This step is very important because it gives your fabric cutlery holder a crisp and professional look. Once ironed, topstitch along the edges to close the gap and secure the shape. Topstitching also adds strength to the seams and prevents fraying over time.
Now it’s time to create the pocket. Fold up the bottom part of the fabric about 4 inches and pin it in place. This fold forms the pocket where the cutlery will rest. Sew along both sides of the fold, reinforcing the stitches at the beginning and end. Congratulations, you now have the basic structure of your cutlery holder!
At this stage, you can already insert a fork, knife, and spoon to test the size. If you find that the pocket is too small or too large, you can adjust it on your next holder. One of the advantages of this step by step tutorial is that you can experiment with different measurements until you find the one that fits your dining needs perfectly.
Finally, finish the sewing base by checking for any loose threads and trimming them. Your holder should look neat and ready for the next step, which involves adding details and decorations.
Once the base is complete, it is time to personalize your fabric cutlery holder. Decoration makes your project stand out and allows you to create different designs for different occasions. A simple way to decorate is by using contrasting thread for topstitching. This adds a subtle but stylish detail to your holder.
Another option is to sew on lace, ribbon, or trim along the pocket edge. This is especially beautiful for festive dinners or weddings where table decoration plays an important role. If you enjoy embroidery, you can add initials, floral motifs, or seasonal symbols to your holder. Personal touches like this make your creation unique and meaningful.
For those who prefer a more functional style, you can add a closure. A small button and loop, a snap, or a ribbon tie will keep the cutlery secure inside the holder. This is useful for picnics or outdoor dining where you need to transport the cutlery.
Patchwork is also a wonderful idea. Instead of using a single piece of fabric, combine small scraps in different patterns and colors to create a cheerful and eco-friendly fabric cutlery holder. This not only looks charming but also helps reduce fabric waste.
If you are making several holders for a large gathering, consider using fabric that matches the theme of the event. For example, red and green prints for Christmas, floral fabrics for spring celebrations, or elegant linen for a formal dinner.
Finally, don’t be afraid to experiment. Every holder you make improves your sewing skills and gives you ideas for future projects. With each attempt, you will discover new ways to personalize and decorate, making this craft even more enjoyable.
After completing your fabric cutlery holder – step by step tutorial, the next step is learning how to use and care for it properly. These holders are not just decorative but also practical, keeping your cutlery organized and clean during meals.
To use, simply place your fork, knife, and spoon inside the pocket. For special occasions, you can also tuck in a napkin for an elegant touch. The holder keeps everything neatly arranged and makes the table look more inviting.
When it comes to care, fabric cutlery holders are easy to maintain. Since they are made of washable materials, you can clean them in the washing machine with similar colors. For best results, use a gentle cycle and mild detergent. After washing, iron them lightly to restore their shape and crisp appearance.
If you plan to use your holders outdoors, like on picnics, it may be a good idea to choose stain-resistant or darker fabrics. This helps maintain their appearance even after multiple uses. Linen and cotton blends are especially durable and withstand frequent washing.
One of the benefits of making your own holders is that you can create as many as you need. For everyday use, you may want a set of neutral-colored holders. For parties, you can design a separate set with festive fabrics. Having multiple options ensures that your table always looks coordinated and stylish.
Most importantly, treat your handmade cutlery holders with care. Since you put time and effort into making them, regular maintenance ensures they last for years, adding beauty and functionality to your meals.
1. What is the best fabric for a fabric cutlery holder?
Cotton and linen are the most recommended fabrics because they are durable, easy to sew, and washable. You can also use blends or quilting fabrics for creative designs.
2. Can I sew a cutlery holder without a sewing machine?
Yes, it is possible to hand sew a fabric cutlery holder. However, a sewing machine makes the process faster and produces stronger seams.
3. How do I size my fabric cutlery holder correctly?
A common size is about 10 x 12 inches before folding. However, you can adjust the measurements depending on the cutlery you plan to store.
4. Can I personalize my holder with embroidery or applique?
Absolutely. Adding embroidery, applique, or decorative trims is a great way to personalize your holder and make it unique.
5. Are fabric cutlery holders washable?
Yes, most fabric holders are washable. Use mild detergent and iron them afterward to maintain their shape and neatness.
6. Can fabric cutlery holders be used for outdoor dining?
Yes, they are perfect for picnics and barbecues. Adding a closure like a snap or ribbon can help secure the cutlery during transport.
Making a fabric cutlery holder – step by step tutorial is a rewarding and practical sewing project. It combines creativity, sustainability, and functionality in one simple craft. With just a few materials and some basic sewing skills, you can create a beautiful accessory that enhances your dining table while reducing waste.
We explored materials, sewing instructions, decoration ideas, and maintenance tips, along with answering the most common questions about this project. Now it is your turn to try it at home and enjoy the satisfaction of crafting something useful with your own hands.
If you found this tutorial helpful, please share your honest opinion in the comments and suggest new ideas for future tutorials. Your feedback is valuable and helps inspire more creative projects.


