
Twisted Post Quilt Pattern

Learning how to make pieced heart quilt blocks – step by step tutorial is a wonderful way to add charm, love, and personality to your quilting projects. Heart quilt blocks are classic designs that symbolize warmth, affection, and creativity, making them a favorite choice for both beginner and advanced quilters. Whether you want to create a romantic gift, a seasonal decoration, or a project that spreads positivity, mastering pieced heart quilt blocks is an essential quilting skill to have in your toolkit.
The beauty of this technique is its versatility. You can use fabric scraps, color-coordinated fabrics, or even themed textiles to create heart blocks that reflect your personal style. By learning how to make pieced heart quilt blocks in a simple and structured way, you not only expand your sewing skills but also gain the confidence to design quilts that look professional and heartfelt. This step by step tutorial will walk you through all the necessary steps, from choosing your fabric to stitching your blocks together.
Another reason quilters love working with heart quilt blocks is that they can be adapted for many occasions. From Valentine’s Day quilts to wedding gifts, baby blankets, or even everyday home décor, these blocks are timeless and meaningful. With patience and practice, even a beginner can master how to make pieced heart quilt blocks using the techniques outlined in this guide. Now let’s go through each step carefully so you can start your project with ease and confidence.
To begin how to make pieced heart quilt blocks – step by step tutorial, you need to gather all the essential materials. The first step is choosing your fabric. Pick fabrics that complement each other in terms of color and texture. Solid fabrics make the heart shapes pop, while patterned fabrics add personality and charm to the quilt block. Cotton is the best option for quilting since it’s durable, easy to cut, and stitches well.
Next, prepare your cutting tools. You will need a rotary cutter, a cutting mat, and quilting rulers to make precise cuts. Accuracy is key when working with pieced blocks, as even a small misalignment can affect the final look of your heart design. Make sure your tools are sharp and in good condition to avoid frayed edges.
Thread selection is also important. Choose a high-quality cotton thread that matches or blends with your fabric. A neutral shade like white, cream, or gray works well for most quilting projects, but you may opt for a contrasting thread if you want a decorative finish. Keeping a few extra bobbins ready will save you time during stitching.
Another key step in preparation is pre-washing your fabrics. Pre-washing helps prevent shrinkage and color bleeding, ensuring your finished quilt remains intact after multiple washes. Once washed, iron your fabrics flat to make them easier to cut and piece together.
In addition to fabrics and tools, it’s a good idea to have quilting pins or clips. These will help hold your fabric pieces together as you stitch, keeping your design accurate. A seam ripper should also be on hand, just in case adjustments are needed along the way.
Finally, set up a comfortable and organized sewing space. A clean, well-lit area with enough room for your cutting mat and sewing machine will make the process smoother and more enjoyable. Being organized ensures that your quilting experience is both fun and efficient.
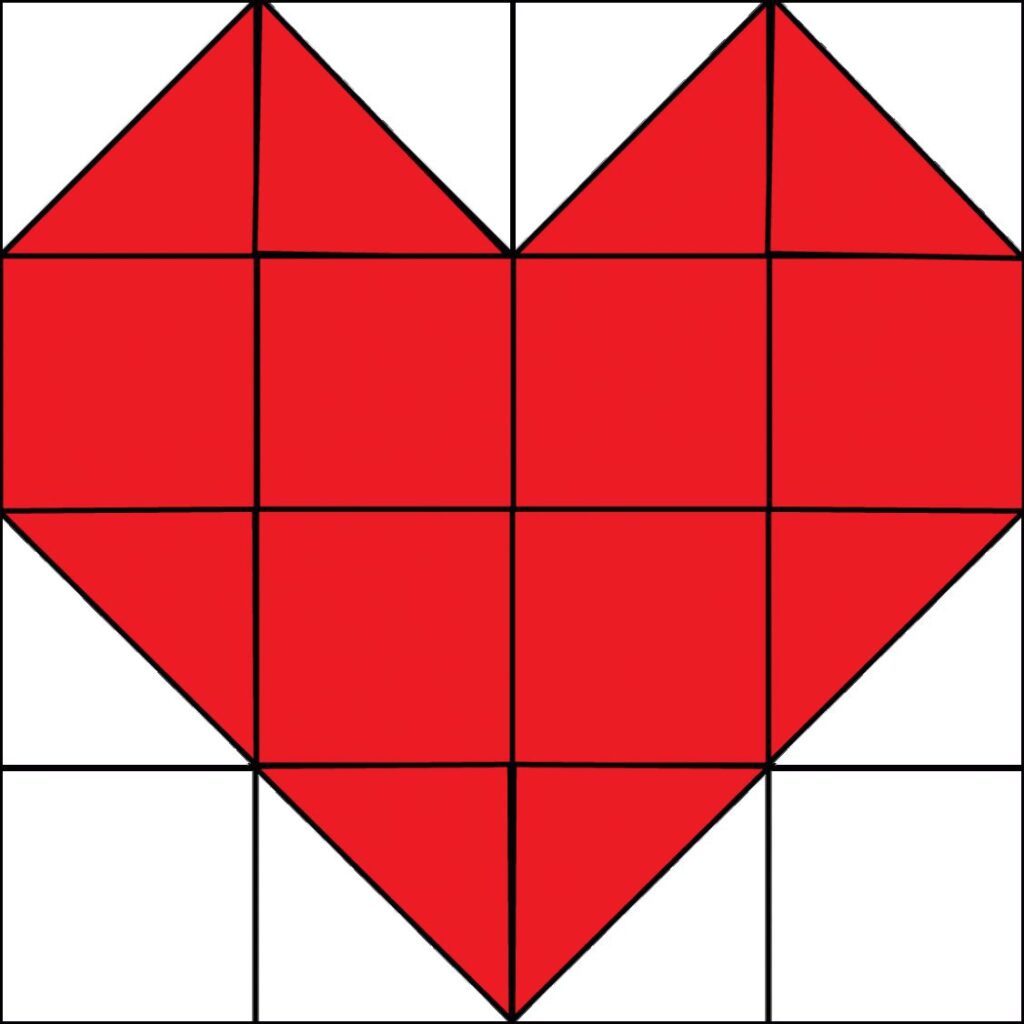
The main part of how to make pieced heart quilt blocks – step by step tutorial is learning how to piece the fabric correctly. Begin by cutting your fabric squares. Most heart quilt blocks are created by joining half-square triangles and squares, so accuracy in cutting is crucial. Follow a standard block size or adjust the dimensions based on your desired quilt size.
Once your fabric pieces are ready, arrange them on your workspace to form the shape of a heart. Laying out the pieces before stitching helps you visualize the final design and prevents mistakes. This step also allows you to experiment with color placement to achieve the best contrast.
Now it’s time to sew the half-square triangles. Pair your fabric squares right sides together, draw a diagonal line across one square, and stitch a quarter inch seam on both sides of the line. Cut along the drawn line to reveal two half-square triangles. Press the seams open to reduce bulk.
After preparing the half-square triangles, assemble them with the squares according to your heart block layout. Begin sewing row by row, carefully aligning edges. Use quilting pins to hold pieces in place and maintain accuracy. Always press seams after each row to keep your block neat and flat.
Once all rows are stitched, join them together to complete the heart shape. Pay special attention to matching seam intersections, as this will make your quilt block look sharp and professional. Slow and steady stitching is key here.
Finally, give the completed heart block a final press with your iron. This step ensures your block is smooth and ready to be joined with other blocks or used as a standalone design. Congratulations, you’ve successfully pieced your first heart quilt block!
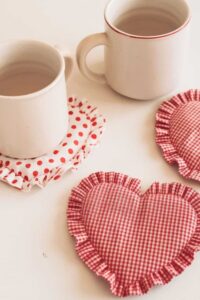
The exciting part of how to make pieced heart quilt blocks – step by step tutorial is exploring creative variations. While traditional heart blocks are charming, you can personalize them to reflect your own artistic vision. One way to add variety is by experimenting with different block sizes. Small heart blocks are perfect for mug rugs or wall hangings, while larger ones can become the centerpiece of a quilt.
Another variation involves playing with colors. You can create a gradient effect by blending shades of red, pink, or purple, or you can make a modern design using bold, contrasting colors like black and white. Scrappy heart blocks, made from leftover fabric pieces, are also a great way to add texture and eco-friendly creativity.
The type of fabric you choose also impacts the look of your quilt block. Floral prints give a romantic touch, polka dots create a playful design, and solid colors offer a clean, minimalist finish. Mixing patterns within a single heart block can make the quilt more dynamic.
For added creativity, consider incorporating applique details. A small embroidered message or a layered applique heart stitched onto the pieced block makes the design even more meaningful. These added elements are especially perfect for quilts made as gifts.
You can also experiment with asymmetrical designs. Instead of a perfectly balanced heart, try offsetting the pieces slightly for a more abstract look. This modern twist adds uniqueness and flair to your quilting project.
Lastly, combine heart quilt blocks with other traditional quilt blocks. Pairing hearts with stars, squares, or nine-patch designs results in a quilt that is visually diverse and full of character. Mixing patterns allows you to push your creativity even further.
Once you’ve learned how to make pieced heart quilt blocks – step by step tutorial, the next step is finishing and using your blocks. First, trim your block to the correct size. Trimming ensures that all your blocks will align neatly when joined together in a quilt. Use a rotary cutter and ruler for precision.
After trimming, decide how you want to use your block. You can join multiple heart blocks together to make a full quilt or incorporate them into smaller projects. They work beautifully in table runners, pillow covers, tote bags, or baby blankets.
If you’re making a quilt, add sashing between your blocks. Sashing not only separates the designs but also enhances the overall layout. Borders can also be added around the quilt for a polished finish. Choose complementary colors to frame your hearts effectively.
When the quilt top is ready, layer it with batting and backing fabric. Use quilting pins or spray adhesive to hold the layers together. Quilting stitches can be simple straight lines or decorative free-motion patterns, depending on your style and skill level.
Once quilted, finish with a binding. Binding is the fabric strip that wraps around the quilt edges, giving it durability and a clean look. Hand-stitching the binding provides a professional and classic finish.
Finally, enjoy your finished piece. Whether it becomes a personal keepsake, a heartfelt gift, or a practical home décor item, your pieced heart quilt block project will carry both beauty and meaning.
1. What is the easiest size for a beginner to start with?
Beginners usually find it easier to start with larger blocks, such as 12-inch squares. Larger pieces are easier to cut and sew accurately, making the process less frustrating.
2. Can I make pieced heart quilt blocks without a rotary cutter?
Yes, you can use scissors, but a rotary cutter ensures cleaner, more accurate cuts. Precision is very important for pieced blocks, so investing in a rotary cutter is highly recommended.
3. What type of fabric is best for pieced heart blocks?
Cotton is the best choice because it is durable, easy to sew, and widely available. Avoid fabrics that stretch too much, as they can distort your block.
4. Do I need to pre-wash my fabric before quilting?
Pre-washing is highly recommended. It prevents shrinkage and removes any chemicals that may be in the fabric, ensuring your quilt remains intact after washing.
5. How do I keep my seams aligned when piecing?
Pinning is the best way to keep seams aligned. Also, pressing each seam as you go helps reduce bulk and keeps everything neat.
6. Can I combine heart quilt blocks with other block designs?
Absolutely. Combining heart blocks with stars, squares, or other classic patterns makes your quilt more unique and creative.
Now that you know how to make pieced heart quilt blocks – step by step tutorial, you have the knowledge to create beautiful and meaningful quilting projects.
From choosing fabrics to finishing touches, each step adds a layer of skill and creativity. Pieced heart quilt blocks are versatile, timeless, and perfect for both gifts and personal projects.
I hope this tutorial has inspired you to start your own quilting journey with heart blocks. If you try this project, I’d love to hear your experience! Please leave a sincere opinion and share any suggestions you may have so we can continue to grow and learn together as a quilting community.


