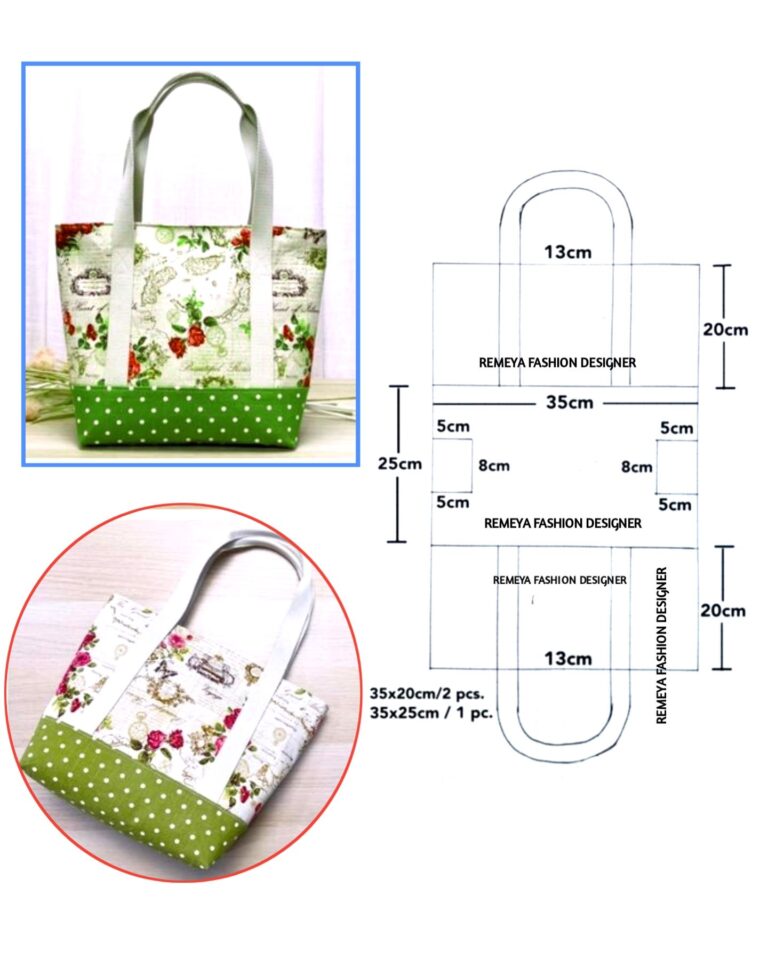
Diy Cute Tote Bag With A Zipper Pocket Inside Sewing Tutorial

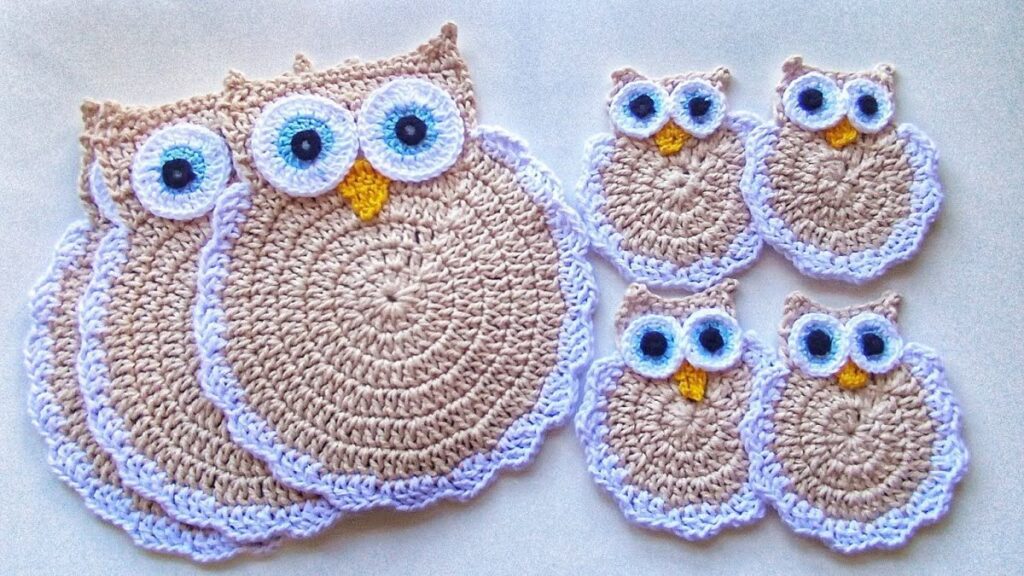
The crochet owl coaster – step by step tutorial is a fun and practical project for crochet lovers of all skill levels. These cute coasters are perfect for protecting your tables while adding a touch of handmade charm to your home décor. Making your own crochet coasters is also a wonderful way to practice different stitches and techniques while creating something functional.
Owl-themed crafts are always popular because of their whimsical and friendly look, and coasters shaped like owls can be a delightful gift for friends and family. With a few basic materials, you can create colorful and unique pieces that match your kitchen or dining room style. The crochet owl coaster – step by step tutorial will guide you through each stage, from preparing your materials to finishing the final details.
This project is perfect for beginners because it uses simple stitches like chains, single crochet, and double crochet. It is also quick to complete, so you can make a set of coasters in just a few hours. By following this tutorial carefully, you will learn how to make your own owl coasters that are both decorative and functional.
To make the crochet owl coaster, you will need cotton yarn in several colors. Cotton is the best choice because it is durable, absorbs moisture well, and is heat resistant. Choose at least three colors: one for the body, one for the eyes, and one for the beak and wings.
You will also need a 3.5 mm to 4 mm crochet hook, a pair of scissors, a yarn needle for sewing details, and stitch markers if you prefer to keep track of your rounds. Cotton yarn ensures your coasters will stay flat and sturdy, making them ideal for holding cups and glasses.
It is best to choose bright colors to make the owls look fun and eye-catching. However, you can also select neutral shades to create a more elegant and minimalist style. This flexibility makes the crochet owl coaster – step by step tutorial perfect for personalizing each coaster according to your taste.
Before starting, make sure to wind your yarn into small balls for easier handling. Having all your materials prepared will make the process smoother and more enjoyable. Organizing your workspace with good lighting is also helpful, especially when working on small details like the eyes and beak.
This preparation step is important to avoid interruptions while crocheting. Once everything is ready, you can start the project and follow the tutorial carefully to achieve great results.
Begin the crochet owl coaster – step by step tutorial by creating a magic ring. Work 10 double crochet stitches into the ring and pull it tight. Join with a slip stitch to close the round. This will form the center of the coaster.
For the second round, chain two and work two double crochet stitches in each stitch around. You should have a total of 20 stitches by the end of this round. Join with a slip stitch.
In the third round, chain two, then make two double crochet stitches in the first stitch and one double crochet in the next. Repeat this pattern around. This will increase your stitch count evenly while keeping the circle flat.
Continue increasing in the same manner for two or three more rounds, depending on the size you want for your coaster. Make sure the circle stays flat and does not curl up. This circular piece will be the body of your owl.
Once the circle is complete, fasten off and weave in the ends. You now have the base of your coaster ready. The next steps involve making the owl features, such as the eyes, beak, and wings.
Following these steps will give you a clean and even coaster base, ready for the decorative owl details that make this project unique and fun.
To make the eyes, create two small circles using white yarn. Start with a magic ring, work six single crochet stitches into the ring, and join with a slip stitch. Switch to black or dark yarn to make the pupils by embroidering a small dot in the center.
For the beak, use orange or yellow yarn. Chain four stitches, then single crochet in the second chain from the hook, half double crochet in the next, and double crochet in the last. This creates a small triangular shape that looks like a beak.
The wings can be made by crocheting two small half-circle shapes. Chain six stitches, then work single crochet, half double crochet, double crochet, half double crochet, and single crochet across the chain. This will give the wings a rounded shape.
Attach the eyes, beak, and wings to the coaster using a yarn needle and matching yarn colors. Position the features evenly to give your owl a friendly and balanced look.
If you want, you can add tufts to the owl’s head by making small chains with a few strands of yarn. These details make the coaster look even cuter and more personalized.
At this stage, your crochet owl coaster should already resemble a little owl. Adding these small details brings the design to life and makes the coaster stand out as a decorative piece.
Once all the features are sewn on, weave in any remaining loose ends to ensure your coaster looks neat and professional. Trimming extra yarn will give the coaster a clean finish.
Block the coaster if necessary by slightly dampening it and shaping it flat. This step is optional but helps the coaster maintain its shape. Cotton yarn responds well to blocking and will hold its form better.
You can create sets of coasters in different colors for a fun and practical gift. Handmade sets like these are perfect for housewarmings, birthdays, or holidays.
If you want to make larger owl pieces, simply add more rounds to the base circle before attaching the features. This versatility allows you to use the same pattern for placemats or wall decorations.
The crochet owl coaster – step by step tutorial is simple, but the end result looks professional and impressive. Even if you are a beginner, the clear instructions make it easy to follow along and create something beautiful.
With practice, you can create multiple owl coasters in different colors and styles, making this project both fun and functional.
1. Is the crochet owl coaster beginner-friendly?
Yes, this project uses basic stitches like chains, single crochet, and double crochet, making it great for beginners.
2. What type of yarn is best for coasters?
Cotton yarn is the best choice because it is durable, absorbs moisture, and holds its shape well.
3. Can I use acrylic yarn?
You can, but acrylic does not absorb moisture as well as cotton and may not stay flat.
4. How can I make the coaster bigger or smaller?
To change the size, simply add or reduce the number of rounds when making the base circle.
5. Can I wash the crochet owl coaster?
Yes, cotton coasters are machine washable. Handwashing is recommended for longer durability.
6. Are these coasters good for hot drinks?
Yes, cotton yarn is heat resistant and works well for holding cups with hot beverages.
The crochet owl coaster – step by step tutorial is a simple yet rewarding project that combines creativity and practicality. By following the instructions, you can create adorable owl-shaped coasters that protect your tables and brighten up your space.
This tutorial covered materials, step-by-step instructions, how to add owl features, and tips for finishing touches. It also answered common questions to help you succeed with this project.
We hope you enjoyed learning how to make this fun and useful item. Share your thoughts in the comments and let us know how your coasters turned out. Your feedback and suggestions are always welcome to help us create even better tutorials for you!