Fancy Fox Quilt Pattern: A Whimsical Touch to Your Quilting Projects
Advertising
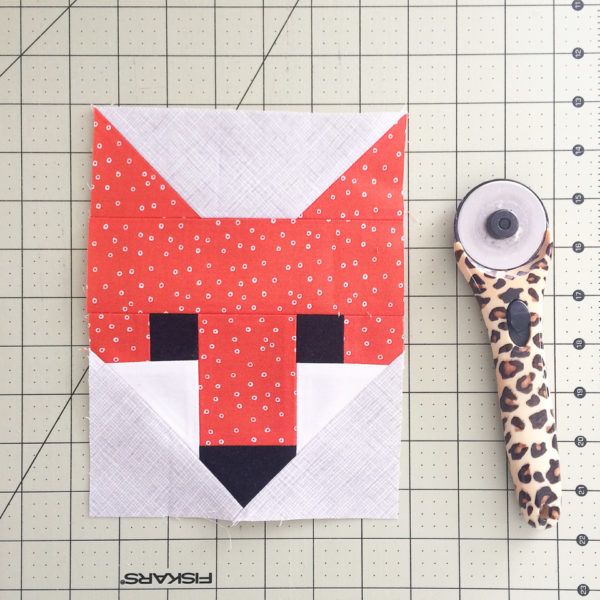
If you’re looking to add a charming and playful element to your next quilting adventure, the Fancy Fox Quilt Pattern might be just what you need. This delightful quilt pattern brings personality and warmth to any space, featuring the lovable face of a fox made entirely from fabric pieces and careful stitching. Whether you’re a beginner or seasoned quilter, this design is easy to adapt and personalize.
The Fancy Fox Quilt Pattern has grown in popularity for good reason. It’s beginner-friendly, uses simple techniques, and yields stunning results. Even better, the fox motif can be scaled up or down and combined with other blocks to create everything from baby quilts to full-sized bedspreads. If you’re aiming to explore creative quilting projects while following structured steps, this pattern offers the perfect opportunity.
Advertising
In this blog post, you’ll learn how to sew a Fancy Fox block from start to finish using clear instructions and a structured format. We’ll go through fabric measurements, fabric selection, cutting guides, and sewing techniques. And most importantly, you’ll discover how to make a fox-themed quilt that’s as functional as it is fabulous.
The first step to making a successful Fancy Fox Quilt Pattern is selecting the right materials. Because the fox design relies on visual contrast and playful fabric combinations, it’s best to choose colors that stand out but also complement each other. Cotton is the ideal fabric for beginners and advanced quilters alike.
To begin, gather high-quality quilting cotton in the following suggested colors: a fox-colored print (orange, red, or grey), a background fabric (white or light cream), and accent fabric for the eyes and nose (black or dark brown). For a more whimsical effect, try mixing prints and solids.
For one Fancy Fox quilt block, you’ll need:
(1) 8.5” x 5” rectangle (fox face)
(2) 2.5” squares (eye corners)
(2) 1.5” x 1.5” squares (eyes)
(2) 1.5” x 5” rectangles (side accents)
(1) 1.5” x 8.5” rectangle (top headband)
(1) 1” x 2.5” strip (nose)
(2) 1.5” x 1.5” squares (nose side)
(2) 2.5” x 2.5” squares (ears)
(2) 2.5” x 3” rectangles (background)
Multiply these fabric cuts by the number of fox blocks you plan to make. For a baby quilt, about 12–20 blocks work well. For a throw-size quilt, consider 35–40 blocks. Always buy a little extra fabric to account for trimming and errors.
Pre-wash your fabrics to avoid shrinkage later. Then, press each piece with a steam iron to ensure accuracy when cutting and sewing. Precision matters greatly with quilt blocks.
Use a rotary cutter, quilting ruler, and self-healing cutting mat for clean cuts. These tools speed up the process and help you maintain straight lines and right angles, especially for beginners.
Label your cut pieces with small sticky notes or place them in individual plastic bags. Organization will save you time and reduce errors during assembly.
Piecing the Fancy Fox Quilt Bloc
Once your pieces are cut, it’s time to begin piecing your fox together. The process is logical and repetitive, making it ideal for quilters of all levels. You’ll build the block in sections, starting with the fox’s eyes and working your way outward.
Start by making the eyes. Sew a 1.5” black square to a 1.5” background square to make two pairs. These are the fox’s eyes. Press the seams open for a flat block and less bulk.
Next, assemble the eye section. Attach each eye unit to a 1.5” x 5” strip of your background fabric. Then sew these on either side of the 8.5” x 5” main fox rectangle. This creates the full face of the fox with the eyes embedded in the top portion.
To make the nose, sew the 1” x 2.5” black strip (the nose) between the two 1.5” background squares. This strip is then sewn below the face. It adds a charming and recognizable detail.
Attach the top headband (1.5” x 8.5”) to complete the fox’s head. The result should look like a rectangle with distinct features—two eyes, a snout, and a headband top.
Make the ears using the stitch-and-flip method. Place each 2.5” background square on top of the 2.5” x 3” ear rectangle, right sides together. Draw a diagonal line and stitch on that line. Trim 1/4” away from the seam and press.
Finally, assemble all the pieces: attach the ears to the top headband portion and press the entire block well. Your fox face is now complete and ready to be joined with other blocks or sashing.
Designing Your Quilt Layout
With your fox blocks complete, it’s time to lay out your quilt and plan the final design. The Fancy Fox Quilt Pattern is very flexible and works beautifully in many formats. Whether you want a minimalist layout or something more dynamic, the possibilities are endless.
Advertising
Begin by arranging your blocks on a large flat surface or a design wall. Move them around to find a balance in color and pattern. Try alternating the direction of the fox faces or mixing in blank blocks for visual relief.
If desired, you can add sashing between the blocks. Use 2”–3” strips of neutral fabric to frame each block and create separation. This can help each fox stand out and gives the quilt a more structured look.
For a baby quilt layout (approximately 36″ x 48″), you’ll typically use a 4 x 5 grid of blocks. For a throw size (about 60″ x 72″), go with a 6 x 8 grid. Adjust sashing and borders to match your desired finished size.
Don’t forget to add borders! Borders can add visual weight and tie together the entire color scheme. A 3” or 4” border around the quilt helps give it a polished, finished appearance.
Once you’re happy with your layout, stack the rows in order and clip them with labels. This keeps your blocks organized and makes sewing the top together much easier.
Sew the blocks into rows, then sew rows together. Press seams carefully and make sure everything lines up. A well-pressed quilt top will look smoother and be easier to quilt later.
Finishing Your Fancy Fox Quilt
The final steps involve quilting, binding, and labeling your quilt. This process transforms your quilt top into a finished, usable quilt. You can choose to quilt it yourself or send it out to a long-arm quilter.
Create a quilt sandwich by layering your quilt top, batting, and backing fabric. Spray baste or use quilting pins to hold the layers together. Smooth out any wrinkles.
Choose a quilting pattern. For a playful quilt like the Fancy Fox Quilt Pattern, a meandering stitch or simple diagonal grid works well. Keep it light and let the fox faces shine.
Quilt using a walking foot on your domestic sewing machine or take it to a longarm quilter for custom stitching. Make sure the quilting is evenly spaced and secure.
Trim the excess batting and backing to match the top. Prepare your binding strips: cut 2.5” wide fabric strips, join them together, and press them in half lengthwise.
Attach the binding to the front of the quilt, mitering the corners as you go. Then fold it to the back and stitch it down either by hand or machine.
Don’t forget to label your quilt! A small tag with the date, your name, and the quilt name adds a personal touch and makes it extra special, especially if you’re gifting it.
By following this complete guide to making a Fancy Fox Quilt Pattern, you’re not only learning valuable quilting techniques but also creating something adorable and practical. This quilt pattern is perfect for gifting, decorating nurseries, or simply adding charm to your home. And with all the fabric cutting guides and clear steps provided, it’s a fun and approachable project for all quilters.
Whether you’re crafting your first quilt or adding to your collection of quilt patterns, this fox-themed design is sure to bring a smile to anyone’s face. So gather your fabrics, fire up your sewing machine, and let your creativity roam free—one fox block at a time!


